OPmac - tips, tricks, tutorials

This page includes solutions of various tasks when using OPmac. Each solution would be “small” it means you can see whole solution at once in your www browser. The constellation of each solution is similar: user description followed by macro code followed by explanation of the macro code. User can copy and paste the macro code to his/her document simply by the mouse.

If there exists any tip from you, OPmac user, please don't hesitate and send it to me. I'll welcome it and save it here (with the author of the solution mentioned).

Fonts

The ex height correction

The visual incompatibility of font height can sometimes occur. For example typewriter font \tt has different ex height than normal text font even though both fonts are loaded at the same size. The correction can be done simply by \thefontscale macro from OPmac. The scale factor is based on the current size of the font (no on the fixed design size). The following macro can be used, for example:

\def\tt{\tentt\thefontscale[1120]} 

This definition scales the \tt font 1.12 times with respect to surrounded font. The current font size can be arbitrary. The example above with the ratio 1.12 is suitable for Bookman + Courier fonts.

Čeština ID: 0001 Author: P. O. Published

More intelligent \typosize and \typoscale

The macros \typosize and \typoscale resize the fonts in all variants but they don't respect the current variant selected before \typosize or \typoscale is used. They always reset the current variant to \rm. This is feature of OPmac because \thefontsize and \thefontscale can be used for resizing single selected variant of the font.

The problem can be illustrated in this example:

\bf text \typosize[13/15] big 

The word “big” is printed in \rm, not in \bf. We can redefine \typosize and \typoscale macros so, that they do respect the current variant. This can be done by the following code:

\let\currvf=\rm 
\addto\rm{\let\currvf\rm}   \addprotect\rm 
\addto\it{\let\currvf\it}   \addprotect\it 
\addto\bf{\let\currvf\bf}   \addprotect\bf 
\addto\bi{\let\currvf\bi}   \addprotect\bi 
 
\def\textfontsize[#1]{\if$#1$\else 
  \fontdim=#1\ptunit \ifx\fontdimB\undefined \edef\fontdimB{\the\fontdim}\fi 
  \let\dgsize=\fontdim 
  \edef\sizespec{at\the\fontdim}% 
  \resizeall \currvf 
  \let\dgsize=\undefined 
  \fi 
} 

The macros \rm, \bf, \it and \bi select the appropriate font variant (of course) and they save the information about selected variant of font into \currvf. The \addprotect is used in order to avoid the problems when \rm, \bf etc. are inside \write parameters. The internal macro of OPmac \textfontsize is redefined: only the occurrence of \rm (after \resizeall) is replaced by \currvf.

Čeština ID: 0132 Author: P. O. Published

Font size changed by given width of the text

We prepare the macro \scaleto size {text} which prints “text” by actual font resized, that the “text” width is the given size. For example \scaleto5cm{hello} creates a box with the text “hello” resized that the width of the text “hello” is 5cm. This can be usable for creating titles of posters, for resizing the title to the \hsize etc.

\def\scaleto#1#{\bgroup\def\bw{#1}\scaletoA} 
\def\scaletoA #1{\expandafter\let \expandafter\thefont \the\font 
   \calculatefontdim{#1}\edef\dgsize{\the\fontdim}\letfont\thefont=\thefont at\fontdim 
   \calculatefontdim{#1}\letfont\thefont=\thefont at\fontdim 
   \hbox to\bw{\thefont#1}% 
   \egroup 
} 
\def\calculatefontdim#1{% 
   \setbox0=\hbox{\thefont #1}\tmpdim=\bw \tmpnum=\wd0 
   \divide\tmpnum by256 \divide\tmpdim by\tmpnum \multiply\tmpdim by256 
   \fontdim=\expandafter\ignorept\the\tmpdim\fontdim 
} 

The macro calculates the right aspect ratio by dividing the desires size by the real size of the text. The \fontdim is multiplied by this ratio. The calculating is done twice. After first attempt the \fontdim and \dgsize are changed. This means that the suitable optical size of the font is used. But this can change the real size of the text. So, the second calculation does correction of this and only geometrical resizing is done during second attempt.

If eTeX is activated then the ratio of two dimensions can be calculated more comfortable by \dividedimen macro, which works at expand processor level.

\def\dividedimen (#1/#2){\expandafter\ignorept\the 
   \dimexpr\numexpr\number\dimexpr#1\relax*65536/\number\dimexpr#2\relax\relax sp\relax 
} 
\def\calculatefontdim#1{% 
   \setbox0=\hbox{\thefont #1}% 
   \fontdim=\dividedimen(\bw/\wd0)\fontdim 
} 
Čeština ID: 0027 Author: P. O. Published

Listing of all fonts loaded by OPmac

Sometimes, it is usable to list loaded fonts. For example user needs to know used fonts after \input lmfonts and \typosize[11/13]. User can type \showfonts, if this macro is defined like:

\def\showfonts{\bgroup 
   \def\wterm##1{\immediate\write16{##1}} 
   \def\resizefont##1{\wterm{##1= \fontname##1}}\resizeall 
   \tmpnum=0 \loop 
      \wterm{\the\tmpnum: \fontname\textfont\tmpnum\space/ 
                          \fontname\scriptfont\tmpnum\space/ 
                          \fontname\scriptscriptfont\tmpnum} 
      \advance\tmpnum by1 \ifnum\tmpnum<16 \repeat 
   \egroup} 

The \showfonts prints the names of all textual fonts registered by \regfont. Moreover, it prints names of all math fonts of families 0 to 15.

Čeština ID: 0029 Author: P. O. Published

Setting the set of preloaded math fonts

When we use \showfonts from previous OPmac trick then we find that OPmac preloads not only standard CM fonts but also a lot of special fonts from AMS package and EC fonts package. Maybe, we needn't to use such special fonts and, moreover, we have these fonts not installed in TeX distribution.

We can avoid this dependency on external fonts using \let\normalmathloading=\relax. This setting must be done before \input opmac. Next, you have to define math sets \normalmath and \boldmath followed by execution of \normalmath. For example, we want to use only CM fonts and nothing else. Then we can write

\let\normalmathloading=\relax 
\input opmac 
 
\def\normalmath{% 
  \loadmathfamily 0 cmr  % CM Roman 
  \loadmathfamily 1 cmmi % CM Math Italic 
  \loadmathfamily 2 cmsy % CM Standard symbols 
  \loadmathfamily 3 cmex % CM extra symbols 
  \loadmathfamily 8 cmbx % bold 
  \setmathfamily  9 \tenbi % bold slanted 
  \setmathfamily 10 \tenrm 
  \setmathfamily 11 \tenit 
  \setmathdimens 
} 
\def\boldmath{% 
  \loadmathfamily 0 cmbx  % CM Roman Bold Extended 
  \loadmathfamily 1 cmmib % CM Math Italic Bold 
  \loadmathfamily 2 cmbsy % CM Standard symbols Bold 
  \loadmathfamily 3 cmex  % CM extra symbols 
  \loadmathfamily 8 cmbx  % bold 
  \setmathfamily  9 \tenbi % bold slanted 
  \setmathfamily 10 \tenrm 
  \setmathfamily 11 \tenit 
  \setmathdimens 
} 
\normalmath 

Of course, the math symbols from ignored fonts will not work after such setting, i. e. AMS symbols will be unavailable, \script, \frak, \bbchar will not work, \bf and \bi prints normal bold (not sans serif). On the other hand, the processing isn't dependent on availability of AMS nor EC fonts in your TeX distribution.

Another solution of the same task can be: copy the file ams-math.tex into your new file (say my-math.tex) and do changes in this file as you wish. Then you can load this file *before* \input opmac. So:

\input my-math 
\input opmac 

Explanation: If \normalmath is defined before \input opmac then OPmac doesn't load ams-math.tex file any more.

Čeština ID: 0111 Author: P. O. Published

Upright brackets in italic text

The feature from LaTeX package embrac.sty (300 lines of very nontransparent code) can be implemented in OPmac by only one line.

The typographical requirement to keep brackets () unslanted in slanted text can occur. This means that if we type {\em italics with (brackets)}, then we get

{\it italics with {\rm(}brackets{\/\rm)}} 

This can be solved by following definition:

\addto\em{\adef({\ifmmode(\else{\rm(}\fi}\adef){\ifmmode)\else{\/\rm)}\fi}} 

This definition set the brackets as active in italics and keeps the original meaning of brackets in math mode. So, it works:

{\em Text $\bigl((yxy)+z\bigr)$ and something (in brackets)}. 
Čeština ID: 0064 Author: P. O. Published

Resize first letter in the paragraph

We implement the macro \Capinsert, which resizes the first letter in the paragraph:

\Capinsert First letter will be resized, i.e. the F in this case... 
or 
\Capinsert {left typesetting} First letter will be resized... 

We need to declare the size of resized letter and how to include it into the lines of the paragraph. The declaration part can look like:

\newdimen\ptem     \ptem=.1em        % unit dependent on "em" 
\newdimen\Capsize  \Capsize=44\ptem  % desired size 
\newdimen\Capabove \Capabove=8\ptem  % top enjambment over baseline 
\newdimen\Capafter \Capafter=1\ptem  % the space amount after the letter 
\def\Capprefix{\localcolor\Red}      % the macro executed before the letter 
 
%% The shape declaration for each letter 
% \declCap letter {left shift; 1. line correction, 2. line corr., etc.} 
\declCap {default} {0;0,0,0}  % default values for undeclared letters 
\declCap W {3;0,4,6} 
\declCap A {1;6,2,-2} 
\declCap L {0;9,0,0} 
... 

The implementation follows. Note, that the similar feature solves the LaTeX package lettrine.

\def\declCap #1#2{\sxdef{cap:=#1}{#2}} 
\def\Capinsert{\def\leftCapmaterial{}\futurelet\next\CapinsertA} 
\def\CapinsertA{\ifx\next\bgroup \expandafter\CapinsertB \else 
\expandafter\CapinsertC \fi} 
\def\CapinsertB #1{\def\leftCapmaterial{#1}\CapinsertC} 
\def\CapinsertC #1{\par 
  \isdefined{cap:=#1}\iftrue \edef\tmp{\csname cap:=#1\endcsname}% 
                     \else   \edef\tmp{\csname cap:=default\endcsname}\fi 
  \setbox0=\hbox{{\thefontsize[\expandafter\ignorept\the\Capsize]\Capprefix#1}\kern\Capafter}% 
  \expandafter \CapinsertD \tmp,,% 
  \noindent\kern-\firstlineindent \rlap{\kern-\protrudeCap\ptem\llap{\leftCapmaterial}% 
                                        \vbox to0pt{\kern-\Capabove\box0\vss}}% 
  \kern\firstlineindent 
} 
\def\CapinsertD #1;{\tmpnum=1 \let\firstlineindent=\undefined 
   \def\parshapeparams{}\def\protrudeCap{#1}\CapinsertE} 
\def\CapinsertE #1,{\ifx,#1,\parshape =\tmpnum \parshapeparams 0pt \hsize 
  \else 
     \advance\tmpnum by1 
     \tmpdim=\wd0 \advance\tmpdim by-#1\ptem \advance\tmpdim by-\protrudeCap\ptem 
     \edef\parshapeparams{\parshapeparams\the\tmpdim}% 
     \ifx\firstlineindent\undefined \let\firstlineindent\parshapeparams \fi 
     \advance\tmpdim by-\hsize \tmpdim=-\tmpdim 
     \edef\parshapeparams{\parshapeparams\the\tmpdim}% 
     \expandafter \CapinsertE \fi 
} 

The detail description of this macro can be found at tex.stackexchange.

Čeština ID: 0075 Author: P. O. Published

Faked bold

Sometimes, the real bod isn't available. But we need to point out some letter or character by bold shape (especially in math). For example, the symbols from AMS-A or AMS-B collections are not available in bold shape. The faked bod can help you in such cases. The usage is simple:

Formula: $a+b\fakebold{+}c = \fakebold{\script D}$. 

The \fakebold macro is based on PDF code inserted using \pdfliteral

\def\fakebold#1{\pdfliteral{2 Tr .3 w}#1\pdfliteral{0 Tr 0 w}} 

The code 2 Tr .3 w gives the message to PDF RIP: the characters defined by their outlines will be not only filled but they will be stroked around outline too. The width of the stroke line is declared as .3 bp (see the w parameter). The result seems like bold shape.

You can experiment with another effects. For example the characters will be only stroked but not filled: 1 Tr. The stroke width have to be set, of course .2 w.

Čeština ID: 0095 Author: P. O. Published

Underline omitting the descenders

Using previous OPmac trick, we create the macro \underlinee{text} which creates underlined text but the rule respects descenders. Test: \underlinee{jumping quickly} prints

jumping quickly

The \underlinee macro designed for Computer modern at 10pt can look like

\def\underlinee#1{% 
   \leavevmode\vbox to0pt{\vss 
      \hrule height.3pt 
      \vskip-\baselineskip \kern2.5pt 
      \localcolor 
      \hbox{\strut\rlap{\White\pdfliteral{2 Tr 1.1 w}#1\pdfliteral{0 Tr 0 w}}#1} 
}} 

If another font is used then you can set the constants .3pt, 2.5pt and 1.1 indiviually in order to reach the best result.

The \underline{text} macro creates a box, so the text isn't breakable into more lines inside the paragraph. If you need automatically broken underlined text then you can be inspired by OPmac trick 0063. Analogical problem is solved at tex.sx.com

Čeština ID: 0112 Author: P. O. Published

Colors

Color switchers like font switchers

This OPmac trick has its reason for until version Nov. 2014. New version Dec. 2014 provides the command \localcolor at the beginning of your document. You needn't do nothing more. The colors are set locally after such declaration inside groups. But you need to take care in following cases:

\setbox0=\hbox{text \Red text}   % Doesn't work, because the re-setting 
                                 % to the original color is done after 
                                 % \setbox0, i.e. outside the box. 
\setbox0=\hbox{{text \Red text}} % Works, the re-setting is done 
                                 % inside the box. 
Čeština ID: 0026 Author: P. O. Published

Color switchers like in LaTeX

The LaTeX color package provides the macro \color, which sets the color locally by its argument. This macro can be defined by:

\def\color#1{\localcolor\colorA#1\relax} 
\def\colorA#1#2\relax{\uppercase{\csname#1}#2\endcsname\ignorespaces} 
 
Text {\color{red} red text} and {\color{blue} blue text} and normal. 

This macro ensures \localcolor and runs the control sequence given by the parameter, but first letter is capitalized.

Čeština ID: 0034 Author: P. O. Published

Colors in margin notes

If you set colors of text inside the paragraph and you are using \mnote simultaneously then you can be surprised. The \mnote text is inserted after the current line (like special virtual line), so it is colorized by the color used at the end of the current line (no at the moment when macro \mnote were used). If you need to have the color of the mnotes unchanged, you can write at beginning of the document:

\def\mnotehook{\noindent\localcolor\Blue} 

The \noindent command is needed because the color-set mark have to be inserted in horizontal mode else \mnote will not be vertically aligned.

Why OPmac doesn't define \Black in \mnotehook by default? Because the implicit behavior supposes that the \mnotes will inherit their color from the color of the relevant paragraph. This color can be set for more pages, for example.

You can use nested colors in nested groups in the \mnote parameter.

Čeština ID: 0037 Author: P. O. Published

Math nucleus colorization without subscript or superscript

The task is to colorize only nucleus of the formula without subscript and superscript. When we write $\colormath\Red Y_i^2$ then the letter Y will be red, but subscript and superscript is colorized by the outside color. The simple solution ${\localcolor\Red Y}_i^j$ doesn't work right because the command for returning back to the outside color is inserted after nucleus and this breaks the right kerning between nucleus and subscript. The solution saves the outside color to the \tmpc and uses it in the subscript and superscript.

\def\colormath#1#2{% #1=color #2=colored text 
   \bgroup \let\tmpc=\currentcolor % saving current color 
   \localcolor#1#2% 
   \isnextchar_{\colormathA}{% 
      \ifcat\next.\insertmukern{#2}\next\fi 
      \ifcat\next x\insertmukern{#2}\next\fi 
      \egroup}% 
} 
\def\colormathA_#1{_{\setcmykcolor\tmpc#1}\isnextchar^{\colormathB}{\egroup}} 
\def\colormathB^#1{^{\setcmykcolor\tmpc#1}\egroup} 
 
\def\ignorefracpart#1.#2\relax{#1} 
\newmuskip\tmpmudim 
\def\insertmukern #1#2{\setbox0=\hbox{$#1#2$}\setbox1=\hbox{$#1\null#2$}% 
   \tmpdim=\wd0 \advance\tmpdim by-\wd1 
   \tmpmudim=\expandafter\ignorept\the\tmpdim mu \tmpmudim=288\tmpmudim 
   \tmpdim=16em \divide\tmpmudim by\expandafter\ignorefracpart\the\tmpdim\relax 
   \mkern\tmpmudim 
} 

The macro solves additional problem: between the “Y” letter and the comma is negative kern in CM font but this kern cannot be used if the single “Y” is colorized and followed by comma. We calculate such kern and insert it by the \insertmukern macro. The macro measures the kern by comparing the width of two boxes in \textstyle. The result is in pt units, but the macro recalculate this to mu units in order to the result depends on the \textstyle/\scriptsyle/\scripscriptstyle context. The formula for recalculation is: mu = (288 / 16em) pt = 18/\quad pt. The 16em is used because of minimization the rounding errors when dividing integer by integer.

Čeština ID: 0066 Author: P. O. Published

Only math accent colorized

This is similar problem like the problem solved in the previous OPmac trick 0066. We can set the color for the accent but the base have to be in outside color and this breaks the right kerning. We can test:

$\widetilde{E}\ \widetilde{\pdfliteral{}E}\ \coloredaccent\Red\widetilde{E}$ 

and we get:

Colored accent

Note that the middle E~ is bad because the \pdfliteral command was inserted between the accent and the base. This breaks the \skewchar calculation of the accent position. It is irrelevant if \pdfliteral is empty (as in the example) or it includes the color command. The last example of E~ is typeset right because the \coloredaccent macro is used. This macro is defined here:

\newmuskip\tmpmudim 
 
\def\coloredaccent#1#2#3{% #1=color, #2=accent, #3=base 
   {\ifnum\skewchar\textfont1<0 \tmpmudim=0mu \else \calculatemukern {#3}{\char\skewchar\textfont1}\fi 
    \let\tmpc=\currentcolor % saving current color 
    \localcolor #1\mkern2\tmpmudim #2{\setcmykcolor\tmpc \mkern-2\tmpmudim#3} 
   } 
} 
\def\calculatemukern #1#2{\setbox0=\hbox{\the\textfont1 #1#2}\setbox1=\hbox{\the\textfont1 #1\null#2}% 
   \tmpdim=\wd0 \advance\tmpdim by-\wd1 
   \tmpmudim=\expandafter\ignorept\the\tmpdim mu \tmpmudim=288\tmpmudim 
   \tmpdim=16em \divide\tmpmudim by\expandafter\ignorefracpart\the\tmpdim\relax 
} 
\def\ignorefracpart#1.#2\relax{#1} 

The macro \coloredaccent measures the kerning pair when \skewchar is set. The conversion to the mu units is done similar as in previous trick 0066. The accent is mover right by the calculated result and the base is set back to left.

Čeština ID: 0074 Author: P. O. Published

Colors given in RGB

OPmac works internally in CMYK color space. How to change this internal commands to RGB is described in the following OPmac trick 0090. Now, we have another aim: to give the possibility to the user to set colors in RGB coordinates, but keep the CMYK color space internal. For example

\def\Pink{\setRGBcolor{213 30 101}} 
or 
\def\Pink{\setrgbcolor{.835 .118 .396}} 
or 
\def\Pink{\setHEXcolor{D51E65}} 

All three cases above defines the same color which is realized internally as \setcmykcolor{0 .859 .526 .165}.

\def\setRGBcolor#1{\setRGBcolorA#1 } 
\def\setRGBcolorA#1 #2 #3 {\def\tmpb{}\tmpdim=0pt 
   \ifdim#1pt>\tmpdim \tmpdim=#1pt \fi 
   \ifdim#2pt>\tmpdim \tmpdim=#2pt \fi 
   \ifdim#3pt>\tmpdim \tmpdim=#3pt \fi 
   \tmpnum=\expandafter\onedecimaldigit\the\tmpdim\relax \relax 
   \ifnum\tmpnum=0 \def\tmpb{0 0 0 1}\else 
      \setRGBcolorB{#1}\setRGBcolorB{#2}\setRGBcolorB{#3}% 
      \tmpdim=2550pt \advance\tmpdim by-\tmpnum pt \divide\tmpdim by2550 
      \edef\tmpb{\tmpb\expandafter\ignorept\the\tmpdim}\fi 
   \setcmykcolor\tmpb 
} 
\def\setRGBcolorB#1{\tmpdim=#1pt 
   \tmpdim=-\expandafter\onedecimaldigit\the\tmpdim\relax pt 
   \advance\tmpdim by\tmpnum pt \divide\tmpdim by\tmpnum 
   \edef\tmpb{\tmpb\expandafter\ignorept\the\tmpdim\space}% 
} 
\def\onedecimaldigit#1.#2#3\relax{#1#2} 
\def\setHEXcolor#1{\setHEXcolorA#1} 
\def\setHEXcolorA #1#2#3#4#5#6{\setRGBcolorA "#1#2 "#3#4 "#5#6 } 
\def\setrgbcolor#1{\setrgbcolorA#1 } 
\def\setrgbcolorA#1 #2 #3 {\def\tmpb{}\dimen0=255pt 
   \setrgbcolorB{#1}\setrgbcolorB{#2}\setrgbcolorB{#3}% 
   \expandafter\setRGBcolorA\tmpb 
} 
\def\setrgbcolorB#1{\tmpdim=#1\dimen0 
   \edef\tmpb{\tmpb\expandafter\ignorept\the\tmpdim \space}} 
\addprotect\setRGBcolor  \addprotect\setrgbcolor  \addprotect\setHEXcolor 

The \setRGBcolor macro does conversion from RGB to CMYK by the simple equations (i.e without ICC profiles):

K'=max(R,G,B), C=(K'-R)/K', M=(K'-G)/K', Y=(K'-B)/K', K=(255-K')/255.

The macro accepts first decimal digit in the R, G, B data. This is reason why the \onedecimaldigit macro is used and why the nominator in the calculation isn't 255 but 2550.

The \setrgbcolor macro multiplies the parameters by 255 and uses \setRGBcolor. The macro \setHEXcolor uses " character before parameters and uses \setRGBcolor too.

Čeština ID: 0089 Author: P. O. Published

RGB as internal color space

OPmac works internally in CMYK color space. The conversion from RGB to CMYK can be done by the previous OPmac trick 0089. But sometimes arises the need to use RGB directly. For example because the document is intended only for computer monitors (i.e. RGB device) and this color space provides better gamut with dense colors. Another reason can be the fact that Inkscape exports the images in RGB only (unfortunately) and we need to harmonize the colors of these images with the colors of the text.

The colors can be defined by \def\Pink{\setrgbcolor{.835 .118 .396}}.

OPmac version Jul. 2019 defines \setrgbcolor already. The following code redefines \setcmykcolor in order to it converts CMYK to RGB internally used:

\def\setcmykcolor#1{\expandafter\setcmykcolorA#1 } 
\def\setcmykcolorA #1 #2 #3 #4 {\def\tmpb{}% 
   \tmpdim=1pt \advance\tmpdim by-#4pt 
   \edef\tmpa{\expandafter\ignorept\the\tmpdim}% 
   \setcmykcolorB{#1}\addto\tmpb{ }\setcmykcolorB{#2}\addto\tmpb{ }\setcmykcolorB{#3}% 
   \setrgbcolor\tmpb 
} 
\def\setcmykcolorB#1{\tmpdim=1pt \advance\tmpdim by-#1pt 
\tmpdim=\tmpa\tmpdim 
   \edef\tmpb{\tmpb\expandafter\ignorept\the\tmpdim}% 
} 
\def\setRGBcolor#1{\setRGBcolorA#1 } 
\def\setRGBcolorA#1 #2 #3 {\def\tmpb{}\setRGBcolorB{#1}\setRGBcolorB{#2}\setRGBcolorB{#3}% 
   \setrgbcolor\tmpb 
} 
\def\setRGBcolorB#1{\tmpdim=#1pt \divide\tmpdim by255 
   \edef\tmpb{\tmpb\expandafter\ignorept\the\tmpdim\space}% 
} 

The original \setcmykcolor macro is redefined in order to convert its arguments into RGB and to use the \setrgbcolor. The following equations are used:

R = (1-C)*(1-K), G = (1-M)*(1-K), B = (1-Y)*(1-K).

Finally, the macro \setRGBcolor is defined. It divides its arguments by 255 and uses \setrgbcolor.

Čeština ID: 0090 Author: P. O. Published

Color mixing like at painter's palette

The macro \cmixdef\NewColor{linear combination of colors} defines new color as linear combination of given colors. The name of the macro means "color mix define". Example:

\cmixdef\myCyan {.3\Green + .5\Blue}  % mix 30 % of green, 50 % of blue, the rest is white 
\cmixdef\myColor {.1\Blue + .4\Brown + .5\Yellow} 
\cmixdef\LightBlue {.6\Blue} % Light blue: 60 % of blue, the rest is white 
\cmixdef\DarkBlue {\Blue + .4\Black} % Blue mixed with 40 % of black 

The color mixing is processed at the addition color space CMYK. If the result has a component greater than 1 then finally all components are multiplied by a coefficient in order to maximal componet is eqal to 1. If you need to emulate the painter's activity then the convex kombination is recommended, as in the second line of the example: one piece of blue, four pieces of brown and five pieces of yellow. But there isn't necessery to use convex combination:

\cmixdef\Blue{\Cyan + \Magenta} % really, the basic colors are from CMYK, but: 
\cmixdef\myBlue{.5\Cyan + .5\Magenta} is equal to \cmixdef\myBlue{.5\Blue}. 

You can use minus intead plus in the linear combination. The given color is substracted in such case and the negative components are rounded to zero immediately. For example

\cmixdef\Color{\Brown-\Black} 

can be used for removing black component from the color. Finally, you can use ^ immediately preceeded before macro name of the color. Then the complementary color is used here.

\cmixdef\mycolor{\Grey + .6^\Blue} the same as \cmixdef\mycolor{\Grey+.6\Yellow} 

The implementation:

\def\cmixdef#1#2{\bgroup 
   \let\setcmykcolor=\relax \edef\tmpb{+#2}% 
   \replacestrings{ }{}\replacestrings{+}{\addcolor}\replacestrings{-}{\addcolor-}% 
   \replacestrings{^\setcmykcolor}{\setcmykcolor^}% 
   \replacestrings{-\setcmykcolor}{-1\setcmykcolor}% 
   \def\C{0}\def\M{0}\def\Y{0}\def\K{0}% 
   \tmpb \checkcmyk 
   \xdef#1{\setcmykcolor{\C\space \M\space \Y\space \K}}% 
   \egroup 
} 
\def\addcolor#1\setcmykcolor#2{\def\tmp{}% 
   \tmpdim=\ifx$#1$1\else#1\fi pt 
   \ifx^#2\expandafter \addcolorC 
   \else \addcolorA#2 \fi 
} 
\def\addcolorA #1 #2 #3 #4 {% 
   \addcolorB\C{#1}n\addcolorB\M{#2}n\addcolorB\Y{#3}n\addcolorB\K{#4}k% 
} 
\def\addcolorB#1#2#3{\dimen0=#2\tmpdim 
   \ifx\tmp\empty\else 
      \ifx#3n\advance\dimen0 by\K\tmpdim \dimen0=-\dimen0 \advance\dimen0 by\tmpdim 
      \else \dimen0=0pt 
   \fi\fi 
   \advance\dimen0 by#1pt 
   \ifdim\dimen0<0pt \def#1{0}\else \edef#1{\expandafter\ignorept\the\dimen0}\fi 
} 
\def\addcolorC#1{\def\tmp{^}\addcolorA#1 } 
 
\def\checkcmyk{\tmpdim=\C pt 
   \ifdim\M pt>\tmpdim \tmpdim=\M pt \fi 
   \ifdim\Y pt>\tmpdim \tmpdim=\Y pt \fi 
   \ifdim\K pt>\tmpdim \tmpdim=\K pt \fi 
   \ifdim\tmpdim>1pt %\tmpdim=1/\tmpdim: 
      \tmpnum=1073741824 \divide\tmpnum by\tmpdim \multiply\tmpnum by4 \tmpdim=\tmpnum sp 
      \checkcmykA\C \checkcmykA\M \checkcmykA\Y \checkcmykA\K 
   \fi 
} 
\def\checkcmykA#1{\dimen0=#1\tmpdim 
   \ifdim\dimen0>1pt \def#1{1}\else \edef#1{\expandafter\ignorept\the\dimen0}\fi 
} 
Čeština ID: 0105 Author: P. O. Published

CMYK normalization

The basic colors of CMYK should realize grey result if the same coefficent is used for C, M and Y. Especially full C+M+Y should be Black. (Of course we suppose ideal tonners, the reality is very dark brown.) The concequence is that if the min(C,M,Y) isn't zero then we can subtract this minimum from C, M, and Y and replace this by appropriate amount of K. The normalized CMYK includes coordinates where the above activity is done, so there is at least one C, M, Y component equal zero. The normalized CMYK saves the expensive color tonners and uses black tonner if this is possible.

The color mixing by \cmixdef from previous OPmac trick gives the un-normalized CMYK very often. We can normalize it by macro \normalcmyk\Color. For example:

\cmixdef\myColor{linear combination of colors} \normalcmyk\myColor 

The macro \normalcmyk replaces the min(C,M,Y) by K. This is done via the formulas for conversion to RGB (OPmac trick 0090) and back using formulas for conversion from RGB to new normalized CMYK (OPmac trick 0089). The implementation follows:

\def\normalcmyk#1{\bgroup \let\setcmykcolor=\relax 
   \edef\tmp{#1}\def\tmpa{#1}\expandafter\normalcmykA\tmp 
} 
\def\normalcmykA#1#2{\normalcmykB #2 } 
\def\normalcmykB#1 #2 #3 #4 {\tmpdim=#1pt 
   \ifdim#2pt<\tmpdim \tmpdim=#2pt \fi  \ifdim#3pt<\tmpdim \tmpdim=#3pt \fi 
   \ifdim\tmpdim=0pt \else 
      \ifdim\tmpdim<1pt 
         \dimen2=\tmpdim % \dimen2=min(C,M,Y) 
         \tmpdim=-\tmpdim \advance\tmpdim by1pt \dimen1=\tmpdim % \dimen1 = 1-min 
         \tmpnum=1073741824 \divide\tmpnum by\tmpdim \multiply\tmpnum by4 \tmpdim=\tmpnum sp 
         \edef\tmp{\expandafter\ignorept\the\tmpdim}% \tmp = 1 / (1-min) 
         \normalcmykC\C{#1}\normalcmykC\M{#2}\normalcmykC\Y{#3}% 
         \dimen0=-#4\dimen2 \advance\dimen0 by\dimen2 \advance\dimen0 by#4pt 
         \edef\K{\expandafter\ignorept\the\dimen0}% K_new = 1 - (1-min)*(1-K_old) 
         \expandafter\xdef\tmpa{\setcmykcolor{\C\space\M\space\Y\space\K}}% 
      \else \expandafter\xdef\tmpa{0 0 0 1}% 
   \fi\fi \egroup 
} 
\def\normalcmykC#1#2{\ifdim\dimen2=#2pt \def#1{0}\else 
      \dimen0=\dimen1 % C_new = ((1-min) - (1-C_old)) / (1-min) 
      \advance\dimen0 by#2pt \advance\dimen0 by-1pt 
      \dimen0=\tmp\dimen0 \ifdim\dimen0>1pt \dimen0=1pt \fi 
      \edef#1{\expandafter\ignorept\the\dimen0}% 
   \fi 
} 
Čeština ID: 0106 Author: P. O. Published

The declaration of color set from X11

The file rgb.txt from X11 includes the color names and their RGB declarations used in X window system. This set of color names and declarations are rewritten in LaTeX file x11nam.def. If we are able to read this file then about three hunderds color names from this file will be available like \DeepPink, \Azure, \CadetBlue etc. These names are in four variants in the file: varinat one is pure color, varaints 2, 3 and 4 are the color mixed with a grey.

We read the file x11nam.def in order to the colors with variant one have the direct name (i.e. instead \Chocolate1 only \Chocolate) and the variant 2 has the name with B added, variant 3 with C added and variant 4 with D added. For example:

\def\trycolor#1{{#1\vrule height10pt depth5pt width20pt}\kern2pt} 
\trycolor\DeepPink \trycolor\DeepPinkB \trycolor\DeepPinkC \trycolor\DeepPinkD 

creates the set of four ping rectangles, first with direct pink and next rectangles with pink mixed with grey. Note that \DeepPinkA color doesn't exist.

We can read the file x11nam.def by:

\long\def\tmp#1\preparecolorset#2#3#4#5{\tmpa #5;,,,;} 
\def\tmpa#1,#2,#3,#4;{\ifx,#1,\else 
   \def\tmpb{#1}\replacestrings{1}{}\replacestrings{2}{B}% 
   \replacestrings{3}{C}\replacestrings{4}{D}% 
   \expandafter\def\csname\tmpb\endcsname{\setrgbcolor{#2 #3 #4}}% 
   \expandafter\tmpa\fi 
} 
\expandafter\tmp\input x11nam.def 

Next, we must use OPmac trick 0090 for direct usage of RGB color space or OPmac trick 0089 for conversion from RGB to CMYK.

Čeština ID: 0108 Author: P. O. Published

Transformations

Transformed box with new bounding box calculated

We create the macro \transformbox{transformation}{contents of box} which puts the linear-transformed \hbox into outer box. The dimensions of the outer box are correctly calculated. The origin of the transformation stays on the baseline of the new outer box. For example:

Sample bumble-bee

\picw=5cm \transformbox{\pdfrotate{45}}{\inspic bumblebee.jpg } 

prints the picture rotated by 45 degrees. If (for example) the picture is square then the outer box will have height plus width equal to 5cm * sqrt(2) and the depth is 0 cm.

The lines are invisible in the real output, of course. Another example:

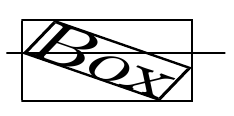
\transformbox{\pdfscale{2}{1.2}\pdfrotate{-30}}{Box} 

creates a box of width, height and depth as in the following sketch:

Box example

It is possible to define rotating of box like \rotbox{angle}{contents} simply by the following code:

\def\rotbox#1#2{\transformbox{\pdfrotate{#1}}{#2}} 

The macro \transformbox id defined:

\newdimen\vvalX \newdimen\vvalY 
\newdimen\newHt \newdimen\newDp \newdimen\newLt \newdimen\newRt 
\let\oripdfsetmatrix=\pdfsetmatrix 
 
\def\multiplyMxV #1 #2 #3 #4 {% matrix * (vvalX, vvalY) 
   \tmpdim = #1\vvalX \advance\tmpdim by #3\vvalY 
   \vvalY  = #4\vvalY \advance\vvalY  by #2\vvalX 
   \vvalX = \tmpdim 
} 
\def\multiplyMxM #1 #2 #3 #4 {% currmatrix := currmatrix * matrix 
   \vvalX=#1pt \vvalY=#2pt \expandafter\multiplyMxV \currmatrix 
   \edef\tmpb{\expandafter\ignorept\the\vvalX\space \expandafter\ignorept\the\vvalY}% 
   \vvalX=#3pt \vvalY=#4pt \expandafter\multiplyMxV \currmatrix 
   \edef\currmatrix{\tmpb\space 
      \expandafter\ignorept\the\vvalX\space \expandafter\ignorept\the\vvalY\space}% 
} 
\def\transformbox#1#2{\hbox{\setbox0=\hbox{#2}\preptransform{#1}% 
   \kern-\newLt \vrule height\newHt depth\newDp width0pt 
   \setbox0=\hbox{\box0}\ht0=0pt \dp0=0pt \pdfsave#1\rlap{\box0}\pdfrestore \kern\newRt}% 
} 
\def\preptransform #1{\def\currmatrix{1 0 0 1 }% 
   \def\pdfsetmatrix##1{\edef\tmpb{##1 }\expandafter\multiplyMxM \tmpb\unskip}#1% 
   \setnewHtDp 0pt  \ht0  \setnewHtDp 0pt  -\dp0 
   \setnewHtDp \wd0 \ht0  \setnewHtDp \wd0 -\dp0 
   \let\pdfsetmatrix=\oripdfsetmatrix 
} 
\def\setnewHtDp #1 #2 {% 
   \vvalX=#1\relax \vvalY=#2\relax \expandafter\multiplyMxV \currmatrix 
   \ifdim\vvalX<\newLt \newLt=\vvalX \fi \ifdim\vvalX>\newRt \newRt=\vvalX \fi 
   \ifdim\vvalY>\newHt \newHt=\vvalY \fi \ifdim-\vvalY>\newDp \newDp=-\vvalY \fi 
} 

The matrix arithmetic is implemented here and it is applied on currentmatrix. The \pdfsetmatrix is redefined while \pretransform processing: the currentmatrix is not set but only calculated. The calculated matrix is multiplied by four points -- vertices of the box before transformation. The results are four vertices of the transformed box. We use them for the calculation of the new dimensions of the outer box \newHt, \newDp and the left side \newLt and right side \newRt.

Čeština ID: 0046 Author: P. O. Published

Rotated box by 90 degrees

The need of rotating the typesetting material to 90 or -90 degrees is very common and usually we needn't nothing more. If we needn't to specify another angle then we needn't to use complicated macro \rotbox from previous OPmac trick and a simple macro \rotsimple is sufficient. Usage:

\rotsimple{90}\hbox{contents of the rotated box} 
or 
\rotsimple{-90}\vbox to\hsize{...} 

The implementation:

\def\rotsimple#1{\hbox\bgroup\def\tmpb{#1}\afterassignment\rotsimpleA \setbox0=}% 
\def\rotsimpleA{\aftergroup\rotsimpleB} 
\def\rotsimpleB{\setbox0=\hbox{\box0}% 
   \ifnum\tmpb>0 \kern\ht0 \tmpdim=\dp0 \else \kern\dp0 \tmpdim=\ht0 \fi 
   \vbox to\wd0{\ifnum\tmpb>0 \vfill\fi 
                \wd0=0pt \dp0=0pt \ht0=0pt 
                \pdfsave\pdfrotate{\tmpb}\box0 \pdfrestore 
                \vfil}% 
   \kern\tmpdim 
   \egroup} 

Note that this macro puts the whole width of the rotated box to the height of the new box without reference to the parameter 90 or -90 degrees. This is a difference with regard to the \rotbox macro from previous OPmac trick where the box contents is put to the depth of the new box if rotating is done by negative angle.

If you need to rotate around the center of the box, you can use

\rotsimple{90}\hbox to0pt{\hss contents of the rotated box\hss} 

Of course, the rotated text is overlapped upwards and downwards, but this doesn't matter in typical applications.

Čeština ID: 0101 Author: P. O. Published

Scaling box to desired size

We create macros

\shbox to dimen{text} 
\svbox to dimen{text} 

which behaves similar as \hbox to dimen{text} and \vbox to dimen{text}, but there is a difference: the box is composed without stretching or shrinking inside with only base size. Finally the linear scaling of whole box to the desired size (to the with for \hbox or to the height for \vbox) is processed.

The implementation can be:

\def\shbox to#1#{\sboxA\hbox\wd{#1}} 
\def\svbox to#1#{\sboxA\vbox\ht{#1}} 
\def\sboxA#1#2#3#4{#1to#3{% 
   \setbox0=#1{#4}\tmpdim=#3\relax \tmpnum=#20 
   \divide\tmpnum by256 \divide\tmpdim by\tmpnum \multiply\tmpdim by256 
   \edef\tmp{\expandafter\ignorept\the\tmpdim}% 
   \ifx#1\hbox \vrule height\tmp\ht0 depth\tmp\dp0 width0pt 
   \else \hrule width\tmp\wd0 height0pt \tmpdim=\dp0 \fi 
   \ht0=0pt \dp0=0pt \wd0=0pt \pdfsave\pdfscale{\tmp}{\tmp}\box0\pdfrestore 
   \ifx#1\hbox\hfil 
   \else \vfil \hrule height0pt width0pt depth\tmp\tmpdim \fi}% 
} 

First, the box0 is created and the ratio desired:real size is calculated and saved to the \tmp. Then the \pdfscale is used and the box is put to the outer box with dimensions created by invisible \hrule, \vrule.

Čeština ID: 0104 Author: P. O. Published

Curved arrows

We prepare the macro

\arrowcc x0 y0 {cx0 cy0 cx1 cy1} x1 y1 (dx1 dy1) {Text} 

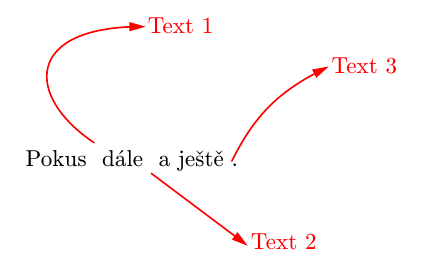
which draw the curve from x0 y0 to x1 y1 ended by arrow spike. The part {cx0 cy0 cx1 cy1} can be empty, i. e. {}. The line is drawn in such case. The numbers {cx0 cy0 cx1 cy1} gives the control points of a Bézier curve. At the end of the arrow is printed the "Text" shifted by xd1 dy1. The numbers cx0 cy0 cx1 cy1 x1 y1 are relative to the origin x0 y0. This origin is relative to the current typesetting point. All numbers are in bp units by default. The macro \arrowccparams can include the additional settings (color, line width, etc.). The macro \arrowccspike includes the drawing of the arrow spike and you can redefine it.

\vglue5cm 
\def\arrowccparams{1 0 0 rg 1 0 0 RG}  % red color is initialized 
 
Pokus \arrowcc 0 10 {-30 20 -30 50} 20 50 (3 -3) {Text 1} 
dále \arrowcc 0 -3 {} 40 -30 (3 -3) {Text 2} 
a ještě \arrowcc 0 2 {10 20 20 30} 40 40 (3 -2) {Text 3}. 

creates:

Arrows example

\def\arrowccspike{2 0 m -5 2 l -5 -2 l h f} 
\def\arrowcc #1 #2 #3 #4 #5 (#6)#7{% 
   % x0 y0 {cx1 cy1 cx2 cy2} x1 y1 (dx1 dy1) {Text} 
   \pdfsave\rlap{\pdfliteral{% 
   .7 w \arrowccparams\space 1 0 0 1 #1 #2 cm 0 0 m 
   \if ^#3^#4 #5 l \else #3 #4 #5 c \fi S 1 0 0 1 #4 #5 cm}% 
   \if^#3^\calculateargofvector(0 0) (#4 #5)\else \preparedirection #3 (#4 #5)\fi 
   \pdfsave\pdfrotate{\argofvector}\pdfliteral{\arrowccspike}\pdfrestore 
   \if^#7^\else\pdfliteral{1 0 0 1 #6 cm}\hbox{#7}\fi}\pdfrestore 
} 
\def\preparedirection #1 #2 #3 #4 {\calculateargofvector(#3 #4) } 
\def\arrowccparams{} 

The macro uses low level PDF commands for graphics and the calculation of the direction from OPmac trick 0061.

Čeština ID: 0062 Author: P. O. Published

Canceled text

The macro \cancel type {text} prints text and the line over the text. If the type is / then the line is slanted from bottom left to top right. If the type is \\ then the line is drawn from top left to bottom right. If the type is X or x then both lines are drawn. For example

\cancel /{Tady je text} 
\cancel X {U} 

creates first two lines of the following result:

Cancel example

The \cancel macro is implemented by the code:

\def\cancel#1#2{\setbox0=\hbox{#2}% 
   \dimen0=.9963\wd0  \dimen1=.9963\ht0 \advance\dimen1 by.9963\dp0 
   \hbox{\rlap{#2}\vbox to0pt{\kern\dp0 \csname cancel:\string#1\endcsname \vss}\kern\wd0}% 
} 
\def\cancelB#1{\expandafter\ignorept\the\dimen#1 } 
\sdef{cancel:x}{\pdfliteral{q 0.4 w 1 J \cancelcolor\space 0 0 m \cancelB0 \cancelB1 l 
                            0 \cancelB1 m \cancelB0 0 l S Q}} 
\expandafter\let\csname cancel:X\expandafter\endcsname \csname cancel:x\endcsname 
\sdef{cancel:/}{\pdfliteral{q 0.4 w 1 J \cancelcolor\space 0 0 m \cancelB0 \cancelB1 l S Q}} 
\sdef{cancel:\string\\}{\pdfliteral{q 0.4 w 1 J \cancelcolor\space 0 \cancelB1 m \cancelB0 0 l S Q}} 
\def\cancelcolor{1 0 0 RG} 

If we want to cancel by arrow (see the last line in the example) then we can use the \cancel macro with the type ^ (slanted up) or _ (slanted down). The last line in the example was created by \cancel_{Slanted down}.

The macro \arrowcc from previous OPmac trick 0062 is used here.

\sdef{cancel:^}{\arrowcc 0 0 {} \cancelB0 \cancelB1 (0 0) {}} 
\sdef{cancel:_}{\arrowcc 0 \cancelB1 {} \cancelB0 -\cancelB1 (0 0) {}} 
\def\arrowccparams{1 0 0 rg 1 0 0 RG .4 w 1 J}  % red arrow 
\def\arrowccspike{4 0 m -.3 1 l -.3 -1 l h f} 
Čeština ID: 0082 Author: P. O. Published

Text around a circle

We create a macro \circletext {radius}{angle}{TEXT}{correction} which prints TEXT around a circle with given radius. First letter of the TEXT starts at given angle. The fourth parameter declares a corrections between letter pairs because the standard kerning table is deactivated when printing around circle. The TEXT runs clockwise when the radius is positive (the center of the circle is below the letters). When the radius parameter is negative then TEXT runs anticlockwise and the center of the circle is above the letters. The macro creates a typesetting material with zero dimensions, the center of the circle is at the actual typesetting point. For example

Circle example

\hbox{% 
\circletext {1.7cm} {212}  {{$\bullet$} UNIVERSITAS CAROLINA PRAGENSIS {$\bullet$}} 
                           {\spaceskip=.5em \kpcirc TA{-.1}\kpcirc NA{-.05}} 
\circletext {-1.7cm} {237} {Facultas MFF} 
                           {\kpcirc Fa{-.1}} 
} 

The fourth parameter correction can include the declaration of word space (using \spaceskip=...) and the space corrections between declared pairs of letters using \kpcirc AB{num}: the \kern num (in em units) is inserted between each pair of letters AB. Note that the example includes the "composed object" $\bullet$. Such object must be enclosed by braces.

The letterspacing can be set by \def\circletextS{\kern value}. The zero letterspacing is set by default.

The \circletext macro can be defined by:

\newdimen\tmpdimA 
\def\circletext#1#2#3#4{\hbox\bgroup 
    \tmpdim=14668pt \tmpdimA=#1 \divide\tmpdimA by256 \divide\tmpdim by\tmpdimA 
    \edef\tmpC{\expandafter\ignorept\the\tmpdim}% \tmpC=(180/pi)/R 
    \setbox0=\hbox{\ifdim#1<0pt X\fi}% lap letters by X height if R<0 
    \tmpdimA=0pt \baselineskip=#1 \advance\baselineskip by-\ht0 \lineskiplimit=-\maxdimen 
    \tmpdim=#2pt \advance\tmpdim by-\ifdim#1<0pt-\fi 90pt 
    \def\tmpb{{}#3}\replacestrings{ }{{ }}#4% spaces => {spaces} 
    \pdfsave \pdfrotate{\expandafter\ignorept\the\tmpdim}% 
    \expandafter\circletextA\tmpb\relax 
} 
\def\circletextA#1{\ifx#1\relax\pdfrestore\egroup\ignorespaces\else 
    \ifx^#1^\else \setbox0=\hbox{#1\circletextS}% 
       \ifdim\tmpdimA=0pt \else 
          \advance\tmpdimA by.5\wd0 \dimen0=\tmpC\tmpdimA 
          \pdfrotate{-\expandafter\ignorept\the\dimen0}% 
       \fi 
       \tmpdimA=.5\wd0 
       \vbox to0pt{\vss\hbox to0pt{\hss#1\hss}\null}% 
    \fi 
    \expandafter\circletextA\fi 
} 
\def\kpcirc#1#2#3{\replacestrings{#1#2}{#1{\kern#3em}#2}} 
\def\circletextS{} 
Čeština ID: 0109 Author: P. O. Published

Modification of \ignorept macro and new \nopt macro

We need to use \ignorept macro very often when \pdfliteral is used. We can minimize the output code (in PDF) when ignorept is re-defined:

\begingroup \lccode`\?=`\p \lccode`\!=`\t \lowercase{\endgroup 
   \def\ignorept #1.#2?!{% Print minimized point value 
       \ifnum#2=0 #1\else \ifnum#1=0 \expandafter\remzero\fi #1.#2\fi} 
} 
\def\remzero #10{#1}% Remove zero and leave minus if present 

All work is done at expand processor level and numbers are in reduced form.

We can define \nopt[param] macro which keeps the space after usage of such macro and enables to use calculations in parameter, for example \nopt[1.65\hoffset + 1in] generates appropriate number in the \pdfliteral argument.

\def\nopt[#1]{\expandafter\ignorept\the\dimexpr #1\relax} 

For example, the code in OPmac trick 0021 can look like:

\def\prepghook{\dimen0=.996264truein  
  \pdfliteral{q \bgcolor\space k -0.996264 0 0 0.996264 -\nopt[\dimen0] \nopt[\dimen0] cm  
  \nopt[\hoffset] \nopt[\voffset] -\nopt[\pdfpagewidth] -\nopt[\pdfpageheight] re f Q}} 
Čeština ID: 0169 Author: Petr Krajník Published

Page

Running heads

OPmac doesn't implement the running heads because this is a part of design of the document and OPmac doesn't solve design. Additional macros have to be used. But the \mark primitive with the title of section is used by \sec macro, so we can use this in running head by \firstmark or something similar. For example the following code adds titles of chapters to the head of even pages and titles of sections to the head of odd pages. We needn't second type of \mark because chapters starts the new page every time. The page where a chapter begins has empty head.

\edef\oriheadline{\the\headline} 
\def\printchap#1{\vfil\break 
   \headline={\oriheadline\hfil\global\headline={\oriheadline\printheadline}} 
   \xdef\headchap{\ifnonum\else\thechapnum. \fi}\global\addto\headchap{#1} 
   {\chapfont \noindent \mtext{chap} \dotocnum{\thetocnum}\par 
    \nobreak\smallskip\noindent #1\nbpar}\mark{}% 
   \nobreak \remskip\bigskipamount \firstnoindent 
} 
\def\printheadline{\lower4pt\null\vadjust{\hrule}\tenit\thefontsize[10] 
   \ifodd\pageno \hfill\firstmark \else \headchap\hfill \fi} 

This code keeps original \headline in \oriheadline (it is used by OPmac for DRAFT marks when \draft mode is activated). The macro \printchap is rewritten here and the second and third line of code is added. The head preparation is done here. The title of the chapter is saved to \headchap (the expanded number but unexpanded title text). The head is printed by \printhead macro.

Čeština ID: 0020 Author: P. O. Published

Background image on each page

This trick is possible to use for every document types but the slides can use it probably very frequent. We can prepare the background image (by an external graphics editor) and save it to the background.pdf file. This image can be inserted to every page by the following code:

\def\prepghook{\vbox to0pt{\kern-\voffset\kern-1in 
   \hbox to0pt{\kern-\hoffset\kern-1in\background\hss}\vss}% 
   \nointerlineskip 
} 
\pdfximage width\pdfpagewidth height\pdfpageheight {background.pdf} 
\mathchardef\picbackground=\pdflastximage 
\def\background{\pdfrefximage\picbackground} 

The \background is placed exactly to the left up corner of the paper using \prepghook macro (available from OPmac May 2015).

The image is loaded by \pdfximage and the right dimensions are set. The image is referenced by \picbackground constant and the image is placed to the page by this reference. This doesn't add new data with the image at every page and the PDF file size is minimized.

If you need to set only solid background color to each page then you needn't to create a background image. The usage of \pdfliteral is sufficient:

\def\prepghook{\pdfliteral{q \bgcolor\space k -0.996264 0 0 0.996264 -72 72 cm 
  \nopt{\hoffset} \nopt{\voffset} -\nopt{\pdfpagewidth} -\nopt{\pdfpageheight} re f Q}} 
\def\nopt#1{\expandafter\ignorept\the#1} 
 
\def\setbasecolor#1{#1\expandafter\setbasecolorA#1\pdfblackcolor} 
\def\setbgcolor#1{\expandafter\setbasecolorA#1\bgcolor} 
\def\setbasecolorA#1#2#3{\def#3{#2}} 
 
\setbasecolor\Yellow 
\setbgcolor\Blue 
 
Hello. Here is yellow text on blue background. 

If you plan to use \magnification or \magscale in your document then you must to replace the numbers -72 72 by re-calculated values of one inch:

\def\prepghook{\dimen0=.996264truein 
  \pdfliteral{q \bgcolor\space k -0.996264 0 0 0.996264 -\nopt{\dimen0 } \nopt{\dimen0 } cm 
  \nopt{\hoffset} \nopt{\voffset} -\nopt{\pdfpagewidth} -\nopt{\pdfpageheight} re f Q}} 
Čeština ID: 0021 Author: P. O. Published

The page/line break only if there is small space to the end of page/line

PlainTeX provides \vfil\break for page breaks. If the authors use this in order to “improve” their documents and the document contents is changed late then bad page breaks occur, for example almost empty pages can be printed. The macro \maybebreak dimen can be used instead of \vfil\break (for example \maybebreak2cm). The page is broken here if the space to the bottom is approximately less than dimen. If there is more space then the macro does nothing.

The macro \maybebreak processes the line breaks in horizontal mode and page breaks in the vertical mode. If you need to be sure that page break is processed then type:

\par\maybebreak 3.5cm 
Čeština ID: 0058 Author: P. O. Published

Columns like in news paper

The typesetter can load the articles into boxes by:

\setbox\articleA=\vbox{\hsize=column width \penalty0 \input articleA.tex } 
\setbox\articleB=\vbox{\hsize=column width \penalty0 \input articleB.tex } 
... 

He can split these articles to the columns and inserts them to the pages by the given page design by \vsplit and by \hbox/\vbox/\vtop arithmetic. This idea is described in TBN, page 275 and it is reinvented here in order to keep the line grid. For example three columns typesetting including image across more columns (see the example here) can be programmed by the code:

\ulamuj\articleA 
\hbox{\ulom[18]\kern\colsep 
      \vtop{\hbox {\ulom[3]\kern\colsep \ulom[3]} 
      \vynech[13] \placepic[0pt,\twocols,\picw=9cm]{sheep1.jpg} 
      \hbox {\ulom[2]\kern\colsep \ulom[2]} 
      }} 

The macro \ulom means “split” and \vynech means “skip”. These macros read their parameter [the number of lines] in the square brackets. The reader read all text above the image (in the second and third column) and then he/she continues reading below the image. If we need another reading schema (all text in the column regardless of the existence of the image) then the programme for the columns structure can look like:

\hbox{\ulom[21]\kern\colsep 
      \vtop{\ulom[3]% 
            \vynech[14] \placepic[0pt,\twocols,\picw=10.5cm]{sheep2.jpg} 
            \ulom[4]}\kern\colsep 
      \vtop{\ulom[3]\vynech[14]\ulom[4]}% 
     } 

The macro \ulamuj (do splitting) prepares the article for splitting. The \ulom splits the lines by \vsplit primitive and calculates the depth of the last line by \lastbox trick (see TBN page 450). This depth is saved ti \lastdepth. If the \ulom is used in horizontal mode, for example \hbox{\ulom[9]\ulom[9]\ulom[9]}, then the \lastdepth includes the maximal depth of all columns here. The \vynech macro (skip) uses the \lastdepth parameter.

\tmpdim=\baselineskip  \splittopskip=\tmpdim plus.1pt minus.1pt 
\def\ulom[#1]{\setbox0=\vsplit\wholebox to #1\baselineskip 
   \vtop{\kern-.3\baselineskip \unvbox0 
         \nointerlineskip\lastbox \global\lastdepth=\prevdepth}% 
   \ifhmode \ifdim\lastdepth<\maxhdepth \global\lastdepth=\maxhdepth \fi 
            \maxhdepth=\lastdepth \fi 
} 
\def\ulamuj#1{\let\wholebox=#1\setbox0=\vsplit\wholebox to0pt} 
\def\vynech[#1]{\vskip-.7\baselineskip\vskip#1\baselineskip \prevdepth=\lastdepth} 

The complete code including the declaration part and including the definition of the macro

\placepic[vertical shift, box width, before \inspic] {imagefile.extension} 

which inserts the picture without inserting space is available in the separate file.

Čeština ID: 0076 Author: P. O. Published

Crop marks

We prepare the macro \cropmark which adds crop mark to the page and cooperates with the \margins macro. For example

\sdef{pgs:spec}{(150,170)mm} 
\margins/1 spec (7,7,7,7)mm \cropmarks 

This example declares the page dimension 150x170mm with the margins 7mm. The \cropmarks sequence enlarges the page at all four sides by 10mm and prints the crop marks in this new margins. It is possible use the declaration above followed by

\margins/1 a4 (,,,)mm \cropcenter 

which keeps the crop marks on their place but all is centered in the A4 page.

The implementation:

\newdimen\cropw \cropw=10mm 
\def\ltcrop{\vbox{\hbox to\cropw{\hfil\vrule height\cropw depth-.2\cropw} 
                  \hbox to\cropw{\vrule height.4pt width.8\cropw \hfil}}} 
\def\rtcrop{\vbox{\hbox to\cropw{\vrule height\cropw depth-.2\cropw\hfil} 
                  \hbox to\cropw{\hfil\vrule height.4pt width.8\cropw}}} 
\def\lbcrop{\vbox{\hbox to\cropw{\vrule height.4pt width.8\cropw \hfil} 
                  \kern.2\cropw \hbox to\cropw{\hfil\vrule height.8\cropw}}} 
\def\rbcrop{\vbox{\hbox to\cropw{\hfil\vrule height.4pt width.8\cropw} 
                  \kern.2\cropw \hbox to\cropw{\vrule height.8\cropw\hfil}}} 
 
\newdimen\lmar \newdimen\tmar \tmar=1truein \lmar=1truein 
\def\cropmarks{% 
   \ifx\cropwidth\undefined 
      \advance\lmar by\hoffset \advance\tmar by\voffset 
      \hoffset=-1truein \voffset=-1truein 
      \advance\pdfpagewidth by2\cropw \advance\pdfpageheight by2\cropw 
      \dimen0=\pgwidth \advance\dimen0 by2\cropw \edef\cropwidth{\the\dimen0}% 
      \edef\cropheight{\the\pgheight} 
      \let\shipoutori=\shipout 
      \def\shipout##1 {\shipoutori % \opmacoutput uses \shipout\box0 
         \vbox{\let\vrule=\orivrule \let\hrule=\orihrule 
               \offinterlineskip \kern.2pt 
               \ifodd\pageno\else\moveleft\shiftoffset\fi 
                  \hbox to\cropwidth{\kern.2pt\ltcrop\hfil\rtcrop\kern.2pt}% 
               \kern-.2pt 
               \vbox to\cropheight{\kern\tmar\hbox{\kern\cropw\kern\lmar\box0}\vss} 
               \kern-.2pt 
               \ifodd\pageno\else\moveleft\shiftoffset\fi 
                  \hbox to\cropwidth{\kern.2pt\lbcrop\hfil\rbcrop\kern2.pt}}}% 
   \else\errmessage{\noexpand\cropmarks can't by used twice}\fi 
} 
\def\cropcenter{\advance\hoffset by-\lmar \advance\hoffset by-\cropw 
                \advance\voffset by-\tmar \advance\voffset by-\cropw} 
Čeština ID: 0081 Author: P. O. Published

No page numbers in one-page documents

The page number on the one-page document is pointless. But we often do not know wether a short document will have one or more pages. The following macro prints page numbers to the document if and only if the document contains more than one page.

\openref\ifnum\lastpage=1\footline{\hss}\fi 

We must run TeX two times.

I use this trick when I write one/two pages of peer review.

Čeština ID: 0133 Author: Jan Šustek Published

Little pages with sizes given by box

We create a macro \outbox which creates a page with following box in the PDF output immediately. Sizes of the page (medium sizes) will be the same as sizes of given box (plus margins). The margins can be declared by \outboxmargins(left,right,top,bottom)unit macro. default values of margins are 1pt for all sides. For example:

\outboxmargins(1,1,2,2)pt 
 
\outbox\hbox{text}      % creates a little page with "text" 
                        % and with given margins. 
\outbox\vbox{paragraph} % creates a page with given paragraph. 

The implementation follows

\def\outbox{\afterassignment\outboxA \setbox0=} 
\def\outboxA{\aftergroup\outboxC} 
\def\outboxC{\setbox0=\outboxB 
   \begingroup 
      \hoffset=-1in \voffset=-1in 
      \pdfpagewidth=\wd0 \pdfpageheight=\ht0 
      \shipout\box0 
   \endgroup 
} 
\def\outboxmargins (#1,#2,#3,#4)#5 {\def\outboxB{% 
   \vbox{\kern#3#5\hbox{\kern#1#5\box0 \kern#2#5}\kern#4#5}}% 
} 
\outboxmargins (1,1,1,1)pt 

The \outbox macro sets box0 and runs \outboxC. This is done via itermediate \outboxB, see TBN page 338 for reasons. The \outboxC macro re-boxes the box0: adds the margins using \outboxB macro which is defined by \outboxmargins. Then the media size \pdfpagewidth and \pdfpageheight are set to sizes of the box and box is put to the page using \shipout. This circumvents the \output routine.

Čeština ID: 0147 Author: P. O. Published

Verbatim

Local tthook

When we type \def\tthook{code} then such definition is global and changes all following \begtt...\endtt environments. But we need to type the codes which affects only the following \begtt...\endtt.

The solution uses two registers of toks type: \gtthook (includes global code) and \ltthook (code only for the following verbatim environment). The user can type, for example:

\gtthook {\typosize[9/11]}    % all verbatim in 9pt size 
\ltthook {\adef!#1.{{\it#1}}} % active ! only for the following environment 
\begtt 
... !aha. ... 
\endtt 

The macro code:

\newtoks\gtthook  \newtoks\ltthook 
\def\tthook{\the\gtthook \the\ltthook \global\ltthook{}} 

We can define the \addtoks macro

\def\addtoks#1#2{#1\expandafter{\the#1#2}} 

and use it, for example:

\bgroup \addtoks\gtthook{code} ... \egroup 

the code affect to all verbatim environments in the \bgroup...\egroup scope.

We needn't to double the hash marks in the \gtthook and \ltthook declaration.

Analogically we can use other \foohook macros from OPmac.

Čeština ID: 0002 Author: P. O. Published

Robust verbatim in titles of sections

The verbatim environment (surrounded by \activettchar character) cannot be used in macro parameters, especially in section titles, because cactode changing isn't robust operation. We declare the macro \code{text} here, which prints the text like verbatim (with exceptinos described below) but it is robust: it can be used in parameters of other macros and if it is used in sections then the text is printed without changes in TOC, in headlines and in PDF outlines. But the parameter text of the \code cannot be prepared absolutely “verbatim”. User must respect the following rules:

* Write \\ instead \, write \# instead # and write \% instead %.
* All other characters are printed verbatim.
* You can escape other TeX-special characters: {, }, $, &, ^, _, (space), ~ by backslash. This backslash isn't printed.
* The {parameter text} must be balanced with respect to braces {}. If you need to insert non-balancing brace, write \{.
* The double-caret followed by a code (like ^^ab) is replaced by specified character. If you don't need this then write ^\^ab.
* More subsequent spaces are replaced by one space. If you don't need this then write control space: \␣\␣.

Examples:

\code{ah_a uff{} &$^}         % prints: ah_a uff{} &$^ 
\code{\\def\\foo\#1{foo=\#1}} % prints: \def\foo#1{foo=#1} 
\code{a\%b\ \ \ c\%d}         % prints: a%b   c%d 

Implementation:

\def\code#1{\def\tmpb{#1}\edef\tmpb{\expandafter\stripm\meaning\tmpb\relax}% 
   \expandafter\replacestrings\expandafter{\string\\}{\bslash}% 
   \expandafter\replacestrings\bslash{}% 
   \codeP{\leavevmode\hbox{\tt\tmpb}}} 
\def\codeP#1{#1} 
\def\stripm#1->#2\relax{#2} 
\addprotect\code \addprotect\\ \addprotect\{ \addprotect\} 
\addprotect\^ \addprotect\_ \addprotect\~ 
\setcnvcodesA 
\addto\cnvhook{\let\code=\codeP} 

The macro \code detokenizes its parameter by \meaning and does \replacestrings in order to replace \\ to \ and other \ to nothing. When "\write to REF file" is processed then \code does nothing (as \relax) and the \\, \{, \}, \$ etc. are not expanded because they are protected. The same principles are used when normal PDF outlines are created (only difference is that \code#1 expands to #1). The PDF viewer removes backslashes automaticaly. Finally, PDF outlines with pdfuni.tex macro are more complicated: we need to detokenize the \code parameters from outline parameter before it is processed by \pdfunidef. This is done by \precode macro:

\ifx\pdfunidef\undefined\else  \def\cnvhook #1#2{#2\precode \pdfunidef\tmp\tmp}\fi 
\def\precode{\def\codeP##1{}\let\bslash=\Bslash 
   \edef\tmp{\expandafter}\expandafter\precodeA\tmp\code{}} 
\def\precodeA#1\code#2{\addto\tmp{#1}% 
   \ifx\end#2\end \else 
      \codeA{#2}% 
      \expandafter\addto\expandafter\tmp\expandafter{\tmpb}% 
      \expandafter\precodeA \fi 
} 
\let\codeA=\code 
Čeština ID: 0102 Author: P. O. Published

\clubpenalties and \widowpenalties between lines in code listing

The LaTeX fancyvrb package allows to insert \clubpenalty after first line of listing and \widowpenalty before the last. So, we are able to avoid single line of the listing after page breaking. The implementation in fancyvrb is somewhat clumpy. We do the same more elegant and, moreover we allow to insert the penalties declared by eTeX primitives \clubpenalties and \widowpenalties, so we can avoid more than only one single line after breaking. The fancyvrb is unable to do this.

\def\tthook{% 
   \clubpenalties   3 10000 10000 25 
   \widowpenalties  3 10000 10000 25 
   \setbox0=\vbox\bgroup \aftergroup\tthookA} 
\def\tthookA{\setbox2=\hbox{}\setbox0=\vbox\bgroup\unvbox0 \tthookB} 
\def\tthookB{\unskip\unskip\unpenalty \setbox0=\lastbox 
   \ifvoid0 \egroup \noindent\unhbox2 \par \egroup 
   \else \global\setbox2=\hbox{\box0\penalty0\unhbox2}% 
      \expandafter\tthookB 
   \fi} 

Next listing is breakable only between third and fourth line:

\begtt 
  first 
  second 
  third 
  fourth 
  fifth 
  sixth 
\endtt 

The whole listing is packed to box0 by \tthook. Then this box is unpacked in \tthookA and repacked to the sinle line hbox2 (original lines are side by side seperated by \penalty0 here). Finally, we do \noindent\unhbox2\par, so the normal paragraph is started and this process inserts the appropriate penalties between lines, of course.

Čeština ID: 0123 Author: P. O. Published

Automatic syntax highlighting

We can active a syntax highlighting between \begtt...\endtt by \hisyntax{language} immediately before \begtt or before \verbinput. For example:

hisyntax example

\hisyntax{C} 
\begtt 
#include <stdio.h> 
int main(int argc, char **argv) 
{ 
   printf("Hello World!\n"); // Prints the message 
   return 0; 
} 
\endtt 

The macro \hisyntax locally redefines the string post-processing between \begtt...\endtt using \ptthook (from OPmac Oct. 2015). The macro \ghisyntax activates coloring of all listings in the document. Specially, the \hisyntax{C} (or \ghisyntax{C}) uses an internal macro \hisyntaxC and you can define analogical macro for another programming languages. The \hisyntaxC looks like:

\def\hisyntax#1{\bgroup\def\ptthook{\csname hisyntax#1\endcsname}} 
\def\ghisyntax#1{\def\ptthook{\bgroup\csname hisyntax#1\endcsname}} 
 
\def\hisyntaxC#1\egroup{\let\n=\relax \let\NLh=\relax \let\U=\relax 
   \let\TABchar=\relax % used in OPmac trick 0151 
   \adef{ }{\n\ \n}\adef\^^M{\n\NLh\n}\edef\tmpb{#1\egroup}% 
   \replacestrings{\n\egroup}{\egroup}% 
   \replacestrings{/*}{\tmp}\def\tmp##1*/{\U{commentC}{##1}}\edef\tmpb{\tmpb}% 
   \replacestrings{//}{\tmp}\def\tmp##1\NLh{\U{commentCpp}{##1}}\edef\tmpb{\tmpb}% 
   \edef\tmp{\noexpand\replacestrings{\string\"}{\n{\string\"}}}\tmp 
   \replacestrings{"}{\tmp}\def\tmp##1\tmp{\U{stringC}{##1}}\edef\tmpb{\tmpb}% 
   \doreplace{##1}{\n{\chCcolor##1}\n}\charsC{}% 
   \doreplace{\n##1\n}{\kwC{##1}}\keywordsC{}% 
   \edef\tmp{\noexpand\replacestrings{\NLh\n\string##}{\NLh\noexpand\preprocC}}\tmp 
   \doreplace{\n##1}{\numberC##1}0123456789{}% 
   \let\NLh=\par \def\n{}\def\U##1{\csname##1\endcsname}% 
   \tentt\localcolor\tmpb\egroup} 
\def\doreplace#1#2{\def\do##1{\ifx^##1^\else \replacestrings{#1}{#2}\expandafter\do\fi}% 
   \expandafter\do} 
\def\printttline{\llap{\sevenrm\Black\the\ttline\kern.9em}} % \Black added 
 
\def\commentC#1{{\Green/*#1*/}} 
\def\commentCpp#1{{\Green//#1}\NLh} 
\def\stringC#1{{\def\ {\char32 }\Magenta"#1"}} 
\def\numberC#1\n{{\Cyan#1}} 
\def\preprocC#1\n{{\Blue\##1}} 
\edef\keywordsC{{auto}{break}{case}{char}{continue}{default}{do}{double}% 
   {else}{entry}{enum}{extern}{float}{for}{goto}{if}{int}{long}{register}% 
   {return}{short}{sizeof}{static}{struct}{switch}{typedef}{union} 
   {unsigned}{void}{while}} % all keywords of C language are here 
\def\kwC#1{{\Red#1}} 
\edef\charsC{()\string{\string}+-*/=[]<>,:;\percent\string&\string^|!?} 
\let\chCcolor=\Blue 

The input string is expanded to \tmpb first and then the \replacestrings is applied to \tmpb repeatedly. The spaces are replaced by \n\ \n and end-lines by \n\NLh\n during the first expansion. The symbol \n in invisible mark which will occur at word boundaries. So, we will be able to manage the keyword "if" as replacing \n if\n by \kwC{if} and this process will not replace the part of the variable identifier "diff" (for example). Next we do the replacing:

/* foo-text */           -->   \U{commentC}{ foo-text } 
// foo-text (end-line)   -->   \U{commentCpp}{ foo-text } 
\"                       -->   \n{\"} 
"foo-text"               -->   \U{stringC}{foo-text} 

Note, that the “foo-text” is enclosed by {} after replacing, so such text is resistant to next replacing process. Finally, all characters of the type (){}+-... are replaced by \n{\chCcolor char}\n, next all keywords and preprocessor words are replaced. The non-replaced rest is printed in black and this is only identifiers (of variables, functions etc.). The \n number is replaced by \numC number in order to do the colorization of numeric constants (no numbers which are part of identifiers).

Čeština ID: 0124 Author: P. O. Published

HTML syntax highlighting

HTML example

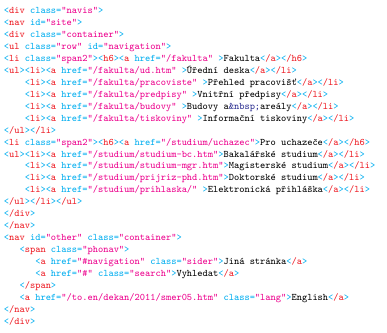
As an example of a modification of the previous OPmac trick, we show how to do the syntax highlighting of HTML or XML code. Write

\hisyntax{HTML} 
\begtt 
<div class="navis"> 
<nav id="site"> 
... 
</nav> 
</div> 
\endtt 

and you get the result as shown in the right margin here. The implementation:

\def\hisyntax#1{\bgroup\def\ptthook{\csname hisyntax#1\endcsname}} 
\def\ghisyntax#1{\def\ptthook{\bgroup\csname hisyntax#1\endcsname}} 
 
\def\hisyntaxHTML#1\egroup{\let\n=\relax \let\NLh=\relax \let\U=\relax 
   \let\TABchar=\relax % used in OPmac trick 0151 
   \adef{ }{\n\ }\adef\^^M{\n\NLh}\edef\tmpb{#1\egroup}% 
   \replacestrings{<!--}{\tmp}\def\tmp##1-->{\U{commentH}{##1}}\edef\tmpb{\tmp 
   \replacestrings{<}{\tmp}\def\tmp##1>{\U{tagH}{##1}}\edef\tpb{\tmpb}% 
   \expandafter\replacestrings\expandafter{\string&}{\entityH}% 
   \let\NLh=\par \def\n{}\def\U##1{\csname##1\endcsname}% 
   \tentt\localcolor\tmpb\egroup} 
 
\def\commentH#1{{\Green<!--#1-->}} 
\def\tagH#1{\tagHa#1\n^} 
\def\tagHa#1\n#2^{\def\tmpb{#2}\replacestrings{"}{\stringH}% 
   {\Cyan<}{\Red#1}{\Cyan\tmpb>}} 
\def\stringH#1\stringH{{\def\ {\char32 }\Magenta"#1"}} 
\def\entityH#1;{{\Blue\&#1;}} 
 
\let\hisyntaxXML=\hisyntaxHTML 

The macro \hisyntaxHTML converts the spaces to \n\␣ and end-lines to \n\NLh first. Then the comments are converted to \U{commentH}{foo} and tags to \U{tagH}{foo}. The macro \tagH separates the tag name and parameters and does the conversion of strings in the parameters.

Čeština ID: 0125 Author: P. O. Published

Python syntax highlighting

There is a term work Python syntax highlighting given in the course BI-TeX (it has been held at FIT CTU in Prague). This result was strongly inspired by previous two OPmac tricks but it is more complicated task. Student Petr Krajnik made good job.

Čeština ID: 0152 Author: Petr Krajník Published

C# syntax highlighting

There is a term work C# syntax highlighting given in the course BI-TeX (it has been held at FIT CTU in Prague). This result was strongly inspired by previous two OPmac tricks.

Čeština ID: 0168 Author: Michal Franc Published

Listings in frames

We need to print each listing produced by \begtt...\endtt or by \verbinput in a frame. The frame must be beakable when listing continues at new page.

This task is solvable without re-definition of \begtt and \doverbinput macros since OPmac version Ost. 2015. We can add the \everypar setting in the \tthook here. And we print the frame parts at the left and right side of each line by the \everypar. The rest of the code defines \ttskip as \ttskipA for the top rule of the frame and as \ttskipB for the bottom rule of the frame.

\def\srule{\line{\vrule height 3pt \hfil\vrule}} 
\def\ttskipA{\bigskip\hrule\srule \global\let\ttskip=\ttskipB} 
\def\ttskipB{\nointerlineskip\srule\hrule\bigskip \global\let\ttskip=\ttskipA} 
\let\ttskip=\ttskipA 
\def\tthook{\offinterlineskip \everypar={\rlap{\kern-\ttindent\line{\vrule\strut\hss\vrule}}}} 
Čeština ID: 0126 Author: P. O. Published

Long line breaking in listings

OPmac doesn't solve the automatic long line breaking in listings by default. The line is broken but overfull \hbox occurs. The reason: it is much better to prepare the whole code under user control. But we show in the following example, how to activate the following behavior: The lines are breakable in spaces without Overfull \hbox messages, the breakpoints are marked by given mark (the $\setminus$ in our example) and the continuing lines are indented by the same number of spaces as the first line. This mean that:

\begtt 
if i=0 
   Oops, the very long line of code is here, it does not fit into the line width unfortunately. 
fi 
\endtt 

The continuing line will be start exactly under the word “Oops”.

\def\tthook{\rightskip=0pt plus1fil 
   \def\ {\discretionary{\hbox{$\;\setminus$}}{}{\kern.5em}}% 
   \everypar={\countspaces}} 
\def\countspaces#1\fi{#1\fi\hangindent=\ttindent \countspacesA} 
\def\countspacesA{\futurelet\next\countspacesB} 
\def\countspacesB{\ifx\next\spacemacro \expandafter\countspacesC\fi} 
\def\countspacesC#1{\advance\hangindent by.5em\ \countspacesA} 
\def\spacemacro{\ } 

The macro \countspaces is invoked by \everypar. It finishes the special verbatim \par (until \fi) and then it counts the spaces at the start of the line. Each space enlarges the \hangindent by space width.

This solution is incompatible with frames around listings by the previous OPmac trick. The frame have gaps at it sides if continuous line occurs. If we need to solve this then we must to insert \offinterlineskip\everypar={\makeframe} into \tthook and to define:

{\catcode`\^^M=13 
\gdef\makeframe#1^^M{\endgraf\hbox{\vrule\vbox{% 
   \normalbaselines\everypar={}\strut\countspaces#1\strut}\vrule}^^M}% 
} 
Čeština ID: 0127 Author: P. O. Published

TABs in verbatim listings

Plain TeX sets the meaning of TAB character ^^I (ASCII 9) to one space. This is not useful when you are using these characters in verbatim listings processed by \begtt...\endtt or \verbinput. If you need to print more spaces instead each TAB then you can define

\def\tthook{\adef\^^I{\space\space\space}} % TAB = 3 spaces 

The TAB character is usually more intelligent in text files: it creates the space of variable length in order to the next text begins immediately after next “tab stop”. The positions of “tabs stops” are fixed in each line. Usually, they are positioned per 8 characters, i. e. after 8, 16, 24, etc. positions. We can do this in TeX using OPmac, as follows:

{\obeylines\gdef\everyttline#1^^M{\setbox0=\hbox\bgroup#1\egroup \box0 ^^M}}% 
\def\tthook{\everypar={\everyttline}\adef\^^I{\TABchar}} 
 
\def\TABchar{\egroup 
   \tmpdim=\TABskip \advance\tmpdim by-.1em 
   \loop \ifdim\tmpdim<\wd0 \advance\tmpdim by\TABskip\relax \repeat 
   \advance\tmpdim by-\wd0 \advance\tmpdim by.1em 
   \box0 \kern\tmpdim 
   \setbox0=\hbox\bgroup 
} 
\def\TABskip{4em} % 4em = 8 chars, because each character has .5em width 

The code mentioned here is activated using \everypar in verbatim listings. It processes each line by \setbox0=\hbox{text of line}\box0. The TAB character is active. It executes the \TABchar macro which closes the \setbox immediately, measures the \box0, puts the appropriate \kern and starts the \setbox0=\hbox\bgroup again.

If you need to control the indentation of lines of the code, then the following OPmac trick 0151 is recommended.

Čeština ID: 0150 Author: P. O. Published

Smart indentation of code lines in verbatim

There exist conventions, how many spaces to use for indentation of various levels of code lines. For example, if you use the schema 0, 4, 8, 12 etc. in your verbatim input then you can set \verbindentIN to 4. When the code is printed using \begtt...\endtt or \verbinput then different indentation can be used. For example, if you need 0, 2, 4, 6, etc. in the output then you can set \verbindentOUT to 2. All indentations will have half size than in the input.

\def\tthook{\everypar={\everyttline}\adef\^^I{\TABchar}} 
\def\everyttline#1\fi{\fi \def\TABchar{{\ }}% 
   \ifx\NLh\undefined \def\spaceGEN{\ }\def\spaceTAB{\TABchar}\else 
      \let\spaceGEN=\ \let\spaceTAB=\TABchar\fi 
   \tmpnum=0 \def\everyttlineC##1{\everyttlineA}\everyttlineA} 
\def\everyttlineA{\futurelet\next\everyttlineB} 
\def\everyttlineB{\ifx\next\n \else 
   \ifx\next\spaceGEN \advance\tmpnum by1 \else 
   \ifx\next\spaceTAB \divide\tmpnum by\TABskipIN % TAB position 
      \advance\tmpnum by1 \multiply\tmpnum by\TABskipIN \relax \else 
   \def\everyttlineC{\everyttlineD\everyttlineE}\fi\fi\fi 
   \everyttlineC 
} 
\def\everyttlineD{% maybe line numbers: 
   \ifnum\ttline<0 \else 
      \ifx\glob\undefined \global \else \glob\fi \advance\ttline by1 \printttline\fi 
} 
\def\everyttlineE{% recalculation of indentation: 
   \tmpdim=.5em \tmpdim=\the\tmpnum\tmpdim \tmpdim=\verbindentOUT\tmpdim 
   \divide\tmpdim by\verbindentIN \kern\tmpdim 
} 
\def\TABskipIN{8}     % the distance between two TAB stops in input 
\def\verbindentIN{4}  % the indentation in input 
\def\verbindentOUT{2} % the indentation in output 

The macro measures the indentation width of each line using \everypar. This width is multiplied by \verbindentOUT and divided by \verbindentIN. The corrected width is used in the output. When the input indentation is calculated then each space is calculated as one and each TAB behaves like normal TAB character: it shifts the next text to the next TAB stop. The distance of TAB stops is set in \TABskipIN. The default value 8 means that (for example) space space tab tab space generates the indentation of 17 characters in the input.

The spaces between words are unchanged. The TABs between words behave like one space. The macro cooperates with automatic highlighting mentioned in OPmac tricks 0124 and 0125.

Čeština ID: 0151 Author: P. O. Published

Notes

Catcode changes in the footnotes

For example, the text \fnote{here is "\foo"} will not work if \activettchar" is declared, because the \fnote reads its parameter without catcode changes. The problem is explained in detail in TBN, page 26. On the other hand, we can redefine \fnote in order to catcode changes work:

\expandafter\def\expandafter\afnote\expandafter{\fnote{\unhbox0}} 
\def\fnote{\setbox0=\hbox\bgroup\typobase\typoscale[800/800]\aftergroup\afnote\let\next} 

The redefined \fnote does not have the parameter, but it reads the following text as a part of \setbox0=\hbox code. After the \hbox is finished, the original \fnote from OPmac is processed with the parameter \unhbox0. Note that the fontsize have to be set when the text is read into \hbox because the font parameters is irrelevant when \unhbox0 is processed.

You can redefine \mnote and similar macros by similar way as \fnote here:

\expandafter\def\expandafter\amnote\expandafter{\mnote{\unhbox0}} 
\def\mnote{\setbox0=\hbox\bgroup\aftergroup\amnote\let\next} 
Čeština ID: 0030 Author: P. O. Published

Different formatting of the mark in text and footnote

It is possible that we need to print the footnote number by another way in text and in the footnote itself. We can use \fnotehook for this purpose and we can redefine \thefnote locally.

The example below prints a downarrow followed by a number in the text where footnote is referenced, but the footnote itself repeats the same number without the downarrow.

\def\thefnote{$\,\downarrow^{\locfnum}$} 
\def\fnotehook{\def\thefnote{\locfnum}} 
Čeština ID: 0044 Author: P. O. Published

The footnote mark connected to footnote by hyperlink

The task is to connect footnote mark in text to relevant footnote and backward the footnote to its footnote mark in the text. This could be done by:

\hyperlinks\Green\Green 
 
\let\fnmarkboth=\fnmarkx 
 
\def\fnmarkx{\link[fnx:\the\fnotenum]{\localcolor\Red} {\fnmarkboth}% 
             \dest[fny:\the\fnotenum]} 
\def\fnmarky{\link[fny:\the\fnotenum]{\localcolor\Blue}{\fnmarkboth}% 
             \dest[fnx:\the\fnotenum]} 
 
\def\fnote{\fnoteG\fnmarky} 
\def\fnotemark#1{{\advance\fnotenum by#1\relax \fnmarky}} 
 
\def\fnxborder{1 0 0} 
\def\fnyborder{0 0 1} 

The \Red and \Bue colors are used here for activated hyperlinks and the frame around active hyperlink is declared by \fnxborder and \fnyborder. You need not to declare frames.

Čeština ID: 0044 Author: P. O. Published

Paragraph shape in the footnote

OPmac prints the footnote paragraph in the same shape as main paragraphs, i.e. with the \parindent used only in the first line. The footnote mark is placed into \parindent. If you need to indent second and more lines by \parindent too (i.e. the whole paragraph is left/right aligned and indented by \parindent, only footnote mark is placed into this left “margin”) then you can do the following trick:

\addto\footstrut{\hang} 

This trick extends the plain TeX's macro \footstrut by \hangindent=\parindent setting. Of course, the \footstrut macro isn't designed for this purpose, but it is used in plain TeX's \vfootnote and it is used at only one place where such settings can be realized. If you try to set this in \fnotehook then nothing happens because \vfootnote (processed after \fnotehook) opens \insert and the \hangindent is reset during this opening (like in \par). Moreover, \leftskip, \rigtskip registers are reset in \vfootnote too, so the setting such registers in \fnotehook is irrelevant, but you can do such setting in \footstrut macro, if you need. If you plan general changes of footnotes parshape then you can redefine the whole \vfootnote.

The distance between footnote mark and the first character of the text is set in plain TeX's macro \texindent to \enspace. You can re-define the \textindent but you must know that this macro is used in plain TeX's \item and \itemitem. If these macros are not used in your document then your re-definition influences only footnote mark formating, because \begitems...\enditems environment from OPmac does not use \item, \itemitem nor \texindent. You can do, for example:

\def\texindent#1{\indent\llap{#1\kern3pt}} 
Čeština ID: 0107 Author: P. O. Published

Broken footnotes with colors

There is bad concept with colors in TeX: color switchers are used and they works in PDF rasteriser only: TeX has no idea about colors used in middle of the typesetting material when this material is broken to more pages. This problem is partially solved in pdfTeX using colorstack mechanism, but it does not work well when long footnotes with colored text are broken to more pages. Opmac uses colorstack, so the text created by {\localcolor\Red text...text} works well in main block of typesetting material even if the text is broken to more pages. But you must type {\fnotecolor\Red text...text} inside a long footnote when this footnote can be broken. The \fnotecolor macro can be defined as follows:

\def\fnotecolor#1{\expandafter\definecolor#1% 
   \expandafter\fnoteRedA\expandafter{\iffalse}\fi} 
\def\definecolor#1#2{\def\everyColor{#2 k}} 
\long\def\fnoteRedA#1{\everyspacecolor#1 {} \egroup\pdfliteral{0 g}} 
\long\def\everyspacecolor#1 {\ifx\end#1\end \unskip \else  
   \pdfliteral{\everyColor}#1 \expandafter\everyspacecolor\fi 
} 
 

The macro adds the color switcher (with the same color) before each word in the colorized text in footnote. Only first switcher does a visible action. But if the long footnote is broken to next page then the color switcher loctated at the front of the first word at the new page (in the footnote area) causes the appropriate color switching. Because the colors used by \fnotecolor don't use colorstack, there is no interferrence with colorstack used in main text.

We hope that the words in colorized footnote will be not hyphenated (when footnote is broken to more pages) and there are no complicated macro construction inside colorized text because \fnotecolor needs to decompose the text to words.

Čeština ID: 0167 Author: P. O. Published

Local notes for tables

Sometimes we need to print special notes for table cells not as footnotes but as notes under the table. The user can write, for example:

\table{lll}{ 
  aha\tnote{small understanding}  & bha & ha \cr 
  uha\tnote{wondering}            & eha & ha \cr 
  xha\tnote{extra understanding}  & fha & nha \cr 
} 
\nobreak\medskip\tnotes 

The cells aha, uha, xha will take exponents 1, 2, 3 and the same exponents including the note texts will be printed in the place of the \tnotes under the table. You can use the following macro:

\newcount\tnotenum  \newbox\tnotebox 
\def\tnote#1{\global\advance\tnotenum by1 
   \hbox{\thetnote}% 
   \global\setbox\tnotebox=\vbox{\unvbox\tnotebox 
      \typobase\typoscale[800/800] \noindent\enspace\llap{\thetnote\ }#1\strut}} 
\def\tnotes{\global\tnotenum=0 \box\tnotebox} 
\def\thetnote{$^{\the\tnotenum}$} 

If you need to use letters instead numbers in the exponents, you can write

\def\thetnote{$^{\rm\athe{\the\tnotenum}}$} 

The notes are accumulated into box \tnotebox and this box is printed under the table by \tnotes sequence. The box has the width \hsize, so you can write for centering short notes:

\centerline{\vbox{\table{...}{...}\medskip\rlap{\tnotes}}} 
Čeština ID: 0033 Author: P. O. Published

Rotated marginal notes

If you need to rotate the marginal notes by 45 or 90 degrees then you can write:

\fixmnotes\right 
\def\mnotehook#1\endgraf{\noindent\pdfsave\pdfrotate{45}\rlap{#1}\pdfrestore} 

The rotation origin is the left point of the first line at the baseline of the note text. Maybe you will need to correct the default dimensions of \mnoteindent and \mnotesize.

Čeština ID: 0071 Author: P. O. Published

Numbered marginal notes

We solve the task to do numbered marginal notes similarly like footnotes. I. e. the number is printed in the text and the same number is used at the beginning of the marginal note. Such solution is used here, for example.

We create the \note{text} macro which prints the numbered marginal note. The implementation follows:

\margins/1 a4 (2,6,2,2)cm 
\mnotesize=4.5cm 
 
\newcount\notenum 
\fixmnotes\right 
\def\note#1{\global\advance\notenum by 1 
   $^{\the\notenum}$% 
   \mnote{\typoscale[800/800]$^{\the\notenum}$\kern.3em #1}% 
} 

The right margin is enlarged by \margins, because the marginal notes will be printed here. The \notenum register is incremented by one for each \note call and this number is printed in the text and in the note.

The code doesn't solve the problems with marginal notes overlapping each other and leaving notes from the page boundary at the bottom, because simple \mnote macro is used here. I recommend to ignore such problems during document preparating but to correct the positions of \mnotes when final proofreading is performed and the final page breaking is definitely done. Then user can use \mnoteskip register for manual correction of \mnote positions by hand.

Čeština ID: 0122 Author: P. O. Published

Lists

Nested \begitems...\enditems with given item marks

The \begitems...\enditems environment works with default item mark (if no \style is used). It is possible that the default item mark depends on the level of the list. You can use the code:

\def\slet#1#2{\expandafter\let\csname#1\expandafter\endcsname\csname#2\endcsname} 
\addto\begitems{\slet{normalitem}{item:o}} 

The big bullet is set as default item mark. If you use the code above then the item mark for first level of items is big bullet and the item mark for second level is small bullet. If you need the different item marks for third level, then you can type:

\addto\begitems{\slet{normalitem}{item:o}\addto\begitems{\slet{normalitem}{item:-}}} 
Čeština ID: 0003 Author: P. O. Published

Another solution for nested \begitems...\enditems

In order to avoid the usage of \style sequence in \begitems...\enditems environment we can define the default style. This ensures the visual compatibility of the item marks in the whole document. The default \style can be declared for nested lists too.

\addto\begitems{\style a 
   \addto\begitems{\style n 
      \addto\begitems{\style i }}} 

The syntax \begitems\style x works too and this redefines the declared default behavior.

Čeština ID: 0031 Author: Jan Šustek Published

Vertical spacing in \begitems...\enditems

The vertical space from \iiskip macro is added above and below each item list. OPmac sets \iiskik to \medskip (one half of baselineskip). These spaces can be added for nested lists and this doesn't look well. You can cancel this space by:

\def\iiskip{} 

If you need to cancel this space only in nested lists, you can write:

\addto\begitems{\def\iiskip{}} 

If you need the vertical space between each item record in the list and the same space around the item list, you can do:

\newdimen\iiskipamount  \iiskipamount=3pt 
\def\iiskip{\vskip\iiskipamount} 
\addto\begitems{\removelastskip\parskip=\iiskipamount \def\iiskip{}} 

This code cancels the vertical spaces around nested lists and adds the space between each paragraph by \parskip. We need to remove the space by \removelastskip before first item in the first level of the list. But we need this space from \iiskip at the end of the list because the space from \parskip isn't here.

If we needn't the spaces between paragraphs inside one multi paragraph item record but we need the spaces between item records then we can redefine the macro \startitem which is used by OPmac at the start of each item:

\newdimen\iiskipamount  \iiskipamount=3pt 
\def\addbefore#1#2{\toks1=\expandafter{#1}\toks2={#2}\edef#1{\the\toks2 \the\toks1}} 
 
\def\iiskip{\vskip\iiskipamount} 
\addto\begitems{\removelastskip \def\iiskip{}} 
\addbefore\startitem{\vskip\iiskipamount\relax} 
Čeština ID: 0004 Author: P. O. Published

No indent after list of items

There exists the typographical rule that the first paragraph after item list isn't indented because the item records are indented in the list above and this can be the source of confusion. If you need to follow this rule then you can write at the beginning of your document:

\addto\enditems{\afternoindent} 
Čeština ID: 0019 Author: P. O. Published

Global numbering of items

We need sometimes to start the numbering of items in the list with next number not used before. We can create global counter \gitemnum where the last item number is saved. Then this value is used at the start of the next items list.

\newcount\gitemnum 
\addto\begitems{\itemnum\gitemnum} 
\addbefore\enditems{\global\gitemnum\itemnum} 

The \addbefore macro from OPmac trick 0004 is used here. This trick works only for not nested lists.

Čeština ID: 0134 Author: Jan Šustek Published

Draft

Printing labels in draft mode

When \draft is active (i.e. proofreading text is prepared), then it is usable to print the internal labels used in the document source in the place of the destination of the references of \ref and \cite. The author needn't to remember the label names when they are used in new parts of the document because they are visible in proofreading text.

\addto\draft{\let\destbox=\draftdestbox} 
\def\draftdestbox[#1#2:#3]{\vbox to0pt{\kern-\destheight 
   \ifx\pdfdest\undefined\special{pdf:dest (#1#2:#3) [@thispage /XYZ @xpos @ypos null]}% 
   \else\pdfdest name{#1#2:#3} xyz\relax\fi 
   \if#1r\llap{\localcolor\Red\tt\thefontsize[10][\detokenize\expandafter{#3}]}\vss 
   \else \if#1c\vss\llap{\localcolor\Red\tt[\detokenize\expandafter{\tmpb}] }\kern-\prevdepth 
   \else \vss \fi\fi}} 

This macro redefines \destbox form OPmac. The main reason of the \destbox is to place the destination of the link in the height \destheight above baseline. If the type of the link is ref (#1=r) then \llap followed by \vss is added. If the type is cite (#1=c) then the added \llap is on the baselineskip and it is printed in list of bibliography. The label is printed in green color. If \draft mode is deactivated, the labels disappear without any changes of the typesetting.

The \detokenize command (from e-TeX) is used in the code in order to enable printing the labels where the characters _ is used. If the eTeX isn't available then \expandafter\string\csname...\endcsname can be used for printing such labels.

When \draftmode is on then we can print the date of document processing in the footline, for example:

\addto\draft{\def\drafttext{\llap{\the\day. \the\month. \the\year\Black}}} 
\def\drafttext{} 
\footline={\hss\rm\thefontsize[10]\the\pageno\hss\drafttext} 
Čeština ID: 0005 Author: P. O. Published

Request for correction in draft mode

Sometimes is usable to write individual notes of type “attention, I have to add a picture here” into the document. These notes are printed only in \draft mode. You can use this by macros \rfc (request for correction) and \makerfc. The first one inserts into the text the numbered destination of the hyperlink (without changing of the typesetting of normal text) and the second one prints the list of all notes. They are hyperlinks. When \draft mode is off then no destinations and no list of notes is printed. The usage of the macro looks like:

There is normal text here.\rfc{check if here isn't fallacy!} 
Next text.\rfc{trace the measured results again!} 
... 
% at the end of the document: 
\makerfc 

If \draft mode is on, then the last page of the document prints:

[rfc-1] check if here isn't fallacy!
[rfc-2] trace the measured results again!

and when \hyperlinks mode is on then the texts [rfc-1] and [rfc-2] are active hyperlinks with destination in the place of the document where the problem is.

The implementation:

\newcount\rfcnum 
 
\def\rfclist{} 
\def\rfcactive#1{\global\advance\rfcnum by1 
   \dest[rfc:rfc-\the\rfcnum]\global\addto\rfclist{\rfcitem #1}} 
\def\rfc#1{} 
\def\rfcitem{\advance\rfcnum by1 
   \medskip\noindent\llap{\link[rfc:rfc-\the\rfcnum]{\localcolor\Red}{[rfc-\the\rfcnum] }}} 
 
\addto\draft{\let\rfc=\rfcactive} 
 
\def\makerfc{\ifx\rfc\rfcactive 
   \vfil\break {\secfont \noindent Requests for correction}\par 
   \bgroup\rfcnum=0 \rfclist\egroup\fi} 

The macro \rfc is empty by default but \draft adds \let\rfc=\rfcactive, i.e. the macro is activated. It adds the text of the note into \rfclist. The text of each note is started by the \rfcitem sequence. The \makerfc runs simply \rfclist.

Čeština ID: 0056 Author: P. O. Published

Numbering, references

Systematic declaration of numbers

OPmac uses the \tnum for table numbers, the \fnum for figure numbers and the \dnum for display equation numbers. The \chapnum is the number of the chapter, the \secnum is the number of the section and the \seccnum is the number for the subsection. The \tnum, \fnum and \dnum are reset to one in each section and the default printing format is chapnum.secnum.tnum or chapnum.secnum.fnum or (dnum). User can change the printing format by redefining of \thetnum, \thefnum and \thednum. The resetting strategy of these numbers can be changed too using \chaphook, \sechook and \secchook. These hooks are used in the \chap, \sec, \secc macros followed by default resetting followed by \relax. We can remove default resetting by:

\def\chaphook#1\relax{\dochaphook}  \def\dochaphook{} 
\def\sechook#1\relax{\dosechook}    \def\dosechook{} 
\def\secchook#1\relax{\dosecchook}  \def\dosecchook{} 
 
\def\chapreset#1{\addto\dochaphook{\global#1=0 }} 
\def\secreset#1{\addto\dosechook{\global#1=0 }\chapreset#1} 
\def\seccreset#1{\addto\dosecchook{\global#1=0 }\secreset#1} 
 
\chapreset\secnum   \secreset\seccnum 

The \chapreset\counter declares that the \counter will be reset at each chapter. The \secreset\num declares resetting of the \num in each chapters and sections. Finally, the \seccreset\foo declares that \foo is reset in chapters, sections and subsections.

For example, we need to reset numbers of tables, figures and equations only in each chapter and we want to print them in the format chapnum.num. The equation will be referred by (chapnum.num). Then we can write:

\chapreset\tnum   \def\thetnum{\the\chapnum.\the\tnum} 
\chapreset\fnum   \def\thefnum{\the\chapnum.\the\fnum} 
\chapreset\dnum   \def\thednum{(\the\chapnum.\the\dnum)} 

For next example, we suppose the numbering of propositions. The number will be reset in each subsection and printed in the format chapnum.secnum.seccnum.propnum.

\newcount\propnum  \seccreset\propnum 
\def\thepropnum{\the\chapnum.\the\secnum.\the\seccnum.\the\propnum} 
 
\def\proposition{\global\advance\propnum by 1 
   \noindent\wlabel{\thepropnum}{\bf Proposition \thepropnum.}\space} 
Čeština ID: 0007 Author: P. O. Published

List of figures and tables

OPmac generates the contents of chapters, sections and subsections by \maketoc macro. When we need to print the list of figures or tables then we need to do it, for example by the code:

\def\totlist{} \def\toflist{} 
\def\Xtab#1#2#3{\addto\totlist{\totline{#1}{#2}{#3}}} 
\def\Xfig#1#2#3{\addto\toflist{\tofline{#1}{#2}{#3}}} 
 
\input opmac 
 
\def\tofline#1#2#3{{\leftskip=\iindent \rightskip=\iindent plus1em 
   \noindent\llap{\bf\ref[#1].\enspace}% 
   {#3\unskip}\nobreak\tocdotfill\pgref[#1]\nobreak\hskip-\iindent\null\par}} 
\let\totline=\tofline 
 
\def\captionhook#1{\typosize[10/12]% 
   \ifx\clabeltext\undefined \else 
      \ifx#1t{\protectlist\immediate\wref\Xtab{{\lastlabel}{\thetnum}{\clabeltext}}}% 
      \else  {\protectlist\immediate\wref\Xfig{{\lastlabel}{\thefnum}{\clabeltext}}}% 
   \fi\fi 
   \global\let\clabeltext=\undefined 
} 
\def\clabel[#1]#2{\gdef\clabeltext{#2}\label[#1]} 

The REF file managed by OPmac is used here. New items will be write into this file in the form \Xtab{label}{number}{text}\Xfig{label}{number}{text}. The items are written immediately because the page number is not used here. The page number is printed by normal \pgref macro. The REF file is read during \input opmac, so we need to define \Xtab and \Xref before \input opmac. The macros save the information into the \totlist and \toflist macros in the form \totline{label}{number}{text} or \tofline{label}{number}{text}. The definition of \totline and \tofline is inspired by \tocline macro from OPmac.

The user has to write \clabel[label]{text} followed by the table or figure with the \caption/t or \caption/f macro. The macro \caption sends the information (including declared label) to the REF file using \captionhook. The usage can be:

\nonum\notoc\sec List of figures\par\toflist 
\nonum\notoc\sec List of tables\par\totlist 
 
\clabel[tabA]{Table A} 
... Table A\par\nobreak 
\caption/t This is interesting Table A. 
 
\clabel[tabB]{Table B} 
... Table B\par\nobreak 
\caption/t And this is Table B. 
Čeština ID: 0013 Author: P. O. Published

Captions for code listings

OPmac provides two caption types Witt independent numbering: figures by the \caption/f and tables by the \caption/t. We will show how to add a new caption type. For example we introduce the \caption/l for code listings.

\newcount\lnum 
\def\thelnum{\thechapnum.\the\lnum} 
\sdef{mt:l:en}{Listing} \sdef{mt:l:cs}{Výpis} \sdef{mt:l:sk}{Výpis} 
\def\chaphook#1\relax{{\globaldefs=1 \chapnums}} 
\def\chapnums{\secnum=0 \seccnum=0 \tnum=0 \fnum=0 \dnum=0 \lnum=0 } 
 
\chap Test 
 
\begtt 
int main() { ... } 
\endtt 
\nobreak \label[main] 
\caption/l This is the main function listing. 

The example declares the counter \lnum and defines the printing format \thelnum. The word “Listing” is declared for three language mutations. The \numl counter will be reset in each chapter.

Čeština ID: 0035 Author: P. O. Published

Different formatting of the table and figure captions

OPmac prints the caption with the last line of the paragraph centered. The trick from TBN, page 234, is used for this. Maybe, you want another format for captions. For example: if the caption is one line length then it is centered. Else normal paragraph is printed. The solution is here:

\def\printcaption#1#2{\leftskip=\iindent \rightskip=\iindent 
   \setbox0=\hbox\bgroup \aftergroup\docaption{\bf#1 #2.}\enspace} 
\def\docaption{\tmpdim=\hsize \advance\tmpdim by-2\iindent 
   \ifdim\wd0>\tmpdim \unhbox0 \else \hfil\hfil\unhbox0 \fi \endgraf \egroup} 

The macro measures the length of the caption text saved in \box0. If it fits into one line then \hfil\hfil is preceded (the same value of the glue is used in \parfillskip inside captions by OPmac). The result is: the text is centered. If text doesn't fit into one line, nothing is preceded and normal paragraph is printed.

IMHO, the trick similar as in “last line of paragraph centered” based on negative fill values is not possible for this task. But I have no proof that this is impossible. If somebody found the solution or the proof of the impossibility, please give me an advice.

Čeština ID: 0048 Author: P. O. Published

URL hyphenation

OPmac provides \url macro for printing URLs. This macro gives potential line breaks after slashes, dots, questions and equal signs. User can insert the \| sequences into the URL for declaration of additional allowbreaks. This macro expands to \urlspecchar which is defined as \penalty10 by default. The linebreak cannot be realized in good place because only small glue stretch/schrinkability is included in URL argument. We can redefine \urlspecchar in order to the right margin is ragged.

\def\urlspecchar{\nobreak\hskip0pt plus2em \penalty110 \hskip0pt plus-2em\relax} 

This macro gives possibility to break in the \penalty110 but the stretchable space is before this break. If the line break isn't realized then the following \hskip removes the values of the previous \hskip, so no space is printed.

Another solution of problematic URL breaking is to insert little stretchable space between each character in the URL parameter. This can be done by:

\addto\urlfont{\replacestrings{}{\nobreak\hskip0pt plus.05em minus.03em\relax}} 

If you remove the \nobreak from the code above then the \url parameter is breakable between all pairs of characters.

Čeština ID: 0050 Author: P. O. Published

Chapters, sections

Subsubsection

There are only three levels of the titles: \chap, \sec and \secc in OPmac. Maybe users want to deal with sub-sub-sections, i.e. \seccc.

\newcount\secccnum 
 
\eoldef\seccc#1{% 
   \ifx\prevseccnum\theseccnum \global\advance\secccnum by1 
   \else \global\let\prevseccnum=\theseccnum \global\secccnum=1 
   \fi 
   \edef\thesecccnum{\theseccnum.\the\secccnum}% 
   \printseccc{#1\unskip}% 
} 
\def\printseccc#1{\norempenalty-100 \medskip 
   {\bf \noindent \thesecccnum\quad #1\nbpar}% 
   \nobreak \smallskip \firstnoindent 
} 

The macro solves the task most simply: the new counter \secccnum is introduced and the title is printed simply in \bf font (without scaling). The macro above doesn't solve printing the information about such sub-sub-sections in table of contents nor in running heads. If you need this then you can use the macro \wcontents for TOC line printing and the primitive \mark for running heads.

Čeština ID: 0055 Author: P. O. Published

Different hyphenation of title in text and table of contents

The recommended macro for breaking lines in titles of chapters, sections etc. is \nl. This macro breaks line in the actual text of title but it expands to the space when TOC or running heads are printing. Why to specify the line break in TOC only? We can use:

\let\NL=\nl  \addprotect\NL 

Now, the \NL breaks line in the actual title and in the TOC. If we need to break in TOC only, we can create the macro \toconly{text} which ignores its parameter in normal title but expands to its parameter in the TOC. We can write, for example:

\sec Very\nl long\toconly\NL\ title 

and we get “Very long/title” in the TOC and “Very/long title” in the text. We can use the code:

\let\NL=\nl  \addprotect\NL 
\def\toconly#1{} \addprotect\toconly 
\let\maketocori=\maketoc \def\maketoc{{\def\toconly##1{##1}\maketocori}} 

If you want correct PDFoutlines while using \toconly then you can set \input pdfuni xor you can define \def\cnvhook{\def\toconly##1{}}.

Čeština ID: 0057 Author: P. O. Published

New level of titles (part) in the text and in the TOC

We create the macro \part which creates a numbered parts of the book. These parts include chapters, sections and subsections. All levels of titles will be printed in the TOC when \maketoc is used.

\newcount\partnum 
\def\part#1\par{% 
  \chaphook {\globaldefs=1 \chapnum=0 \secnum=0 \seccnum=0 \tnum=0 \fnum=0 \dnum=0}\relax 
  \edef\thepartnum{\the\partnum}\let\thetocnum=\thepartnum 
  \vfil\break\null 
  \vskip3cm 
  \centerline{\typosize[15/18]\bf Part \uproman\partnum} 
  \wtotoc{-1}\bfshape{#1}\xdef\tocilabel{\thepartnum}% 
  \tit #1\par 
  \vfil\break 
} 
\def\printpart#1{\vfil\break\null 
   \vskip3cm 
   \centerline{\typosize[15/18]\bf Part \uproman\partnum} 
   \tit #1\par 
   \vfil\break 
} 
\def\uproman#1{\uppercase\expandafter{\romannumeral#1}} 
\let\optocline=\tocline % original OPmac \tocline is saved. 
\def\tocline#1{\ifnum#1=-1 \let\next=\ptocline \else \def\next{\optocline{#1}}\fi \next} 
\def\ptocline#1#2#3#4{\medskip 
   \def\tocilabel{#2}% 
   \centerline{#1Part \uproman{#2}}\nobreak 
   \centerline{#1#3\unskip}\nobreak 
} 
\addto\maketoc{\def\tocilabel{}} 

The macro \part inserts the TOC information using \wtotoc (supported since OPmac version Mar. 2015) to the REF file. The first parameter of \wtotoc is the level of the title: 0 for chapters, 1 for sections and 2 for subsections. Because \part is above chapters, we have chosen the level -1. The macro \tocline is redefined here in order it runs the original \tocline when the level is 0, 1 or 2, but the \ptocline prints two lines in the TOC when the level is -1. The label \tocilabel is defined as number of the part because we need to distinguish the chapter numbers when \hyperlinks are used. The chapter numbers alone are not unique in the whole book, so they are preceeded by \tocilabel when the internal hyperlink-label is created.

If we want to use \part with \outlines then we must to do more work:

\let\outlinesAA=\outlinesA 
\def\outlinesA#1{\ifnum#1=-1 \def\next{}\else \def\next{\outlinesAA{#1}}\fi 
\next} 
\let\outlinesBB=\outlinesB 
\def\outlinesB#1{\ifnum#1=-1 \def\next{\outlinesBp}\else 
\def\next{\outlinesBB{#1}}\fi \n 
\def\outlinesBp#1#2#3#4{\def\tocilabel{#2}% 
   \pdfoutline goto name{toc:part.#2} count 0 {PART: #3}\relax 
} 
Čeština ID: 0099 Author: P. O. Published

How to prevent \topins on chapter page

We need to prevent the printing tables and figures on the top of the first page of chapter, i. e. before the chapter title. This can be done by adding the following code at the beginning of the document.

\addto\chaphook{\global\dimen\topins=0pt } 
\addto\endoutput{\global\dimen\topins=\vsize} 
Čeština ID: 0135 Author: P. O. Published

Global \nonum for all chapters and sections

We need not to write \nonum before each \chap, \sec, \secc but we need to write only one declaration at the beginning of the document. We can write

\nonum \def\nonumfalse{\pagedepth=\pagedepth} 

The trick is based on the deactivating of \nonumfalse macro which is used inside OPmac macros in order to return the false value to the \ifnonum variable. The \global primitive is prefixed before \nonumfalse macro, so we need to redefine \nonumfalse to another assignment. I chose dummy assignment applied to global register so really nothing happens.

Čeština ID: 0142 Author: P. O. Published

REF file

Checks of REF file consistency

Suppose this rare case: the changes in the text influence the changes of the REF file. When changed REF file is read in the next TeX run then this influences the changes in the text and this influence changes of the REF file and so on and so on. It is not simple to solve this problem in general but we can at least to report the problem. The user can save two consecutive versions o REF file and he can do diff UNIX command in order to show where the problem is. He can solve such problem manually.

OPmac doesn't implement such reporting about REF file inconsistency in two consecutive TeX runs. We can add this feature by this:

\let\Xend=\relax 
\long\def\readREFcontents #1\Xend{\def\REFcontents{#1}} 
\openin0=\jobname.ref 
\ifeof0 \def\REFcontents{} 
\else \expandafter \readREFcontents \input \jobname.ref 
\fi 
 
\input opmac 
 
\let\endprimitive=\end 
\def\end{% 
   \ifx\wref\wrefrelax \else 
      \vfil\break 
      \immediate\write\reffile{\string\Xend} 
      \immediate\closeout\reffile 
      \let\tmpa=\REFcontents 
      \expandafter \readREFcontents \input \jobname.ref 
      \ifx\tmpa\REFcontents \message{Congratulations, references are consistent} 
      \else                 \opwarning{Inconsistent REF file, TeX me again} 
   \fi\fi 
   \endprimitive 
} 

First, the contents of the REF file from previous TeX run is saved to \REFcontents. This is done before \input opmac because OPmac reads and rewrites the REF file. Second, the \end is redefined in order to do more actions: the check of equivalence of the REF file is performed here. The REF file is read by the \readREFcontents macro. The \Xend separator is expected at the end of the REF file.

Čeština ID: 0045 Author: P. O. Published

Data of QR code in REF file

QRcode

You can use qrcode.tex package for plain TeX when you need to print QR codes. The package is available here. The data from QR calculation are saved in \qrdata macro but the data aren't used by default in qrcode.tex package. If we were able to re-use this data (in next run of TeX, for example) then the speed is increased because QR calculation takes time. We use REF file for this purpose.

The \qrcode macro from qrcode.tex uses “hook” macros \qrbeginhook and \qrendhook. We redefine these macros in order to save to REF file the following information:

\Xqrdata{encoded-text}{size}{11111110111110...0010111001} 

where size and binary data are items from \qrdata from previous QR calculation. We need to define \Xqrdata in order to define the control sequence \qr:encoded-text as qrdata. Finally, we need to modify the \qrcode macro behavior: if \qr:encoded-text is defined then don't calculate QR code again but use the qrdata only. The implementation:

\def\Xqrdata{\bgroup\qrverbatim\XqrdataA} 
\def\XqrdataA#1#2#3{\sxdef{qr:#1}{{#2}{#3}}\egroup} 
\input qrcode 
\input opmac 
 
\openref 
\def\qrendhook{% 
   \qrmessage{<Saving calculated QR code...}% 
      \sxdef{qr:\qretext\expandafter}{\qrdata}% 
      \toks0=\expandafter{\qrtext}% 
      \immediate\wref\Xqrdata{{\the\toks0}\qrdata}% 
   \qrmessage{done>^^J}% 
} 
\def\qrbeginhook#1\qrendhook{% 
   \expandafter \ifx \csname qr:\qretext\endcsname \relax 
      #1%                  %%% do calculation 
   \else 
      \qrmessage{<Restoring QR code from saved \string\qrdata...}% 
         \global\expandafter\let \expandafter\qrdata \csname qr:\qretext\endcsname 
         \qrrestore\qrdata %%% printing QR code from saved data 
      \qrmessage{done>^^J}% 
   \fi 
   \qrendhook 
} 

Note that the order is important. First we need to define \Xqrdata, second do \input qrcode before \input opmac and finally we can redefine “hook” macros. Then the normal documment (which uses \qrcode macro) follows.

Čeština ID: 0116 Author: P. O. Published

Printing selections

Underlining, overlining, letterspacing

We implement the macro \ul{this is text} which creates underlined or overlined text. We add the macro \ltsp{this is text} which creates letterspaced text. The features of the large LaTeX package soul.sty is implemented here on the ten lines of the code. The macro is unable to use hyphenation algorithm for breaking words. User can hint the text by \ul{these se\-qences in\-cluded in the text}. And the following OPmac trick 0065 does this work automatically.

\def\ul#1{{\ulRedefine\leavevmode\wordscanA #1 {} }} 
\def\wordscanA#1 {\ifx^#1^\unskip\else \wordscanB#1\-\end \expandafter\wordscanA\fi} 
\def\wordscanB#1\-#2\end{\ifx^#2^\wordprintA{#1}\else 
   \wordprintB{#1}\def\next{\wordscanB#2\end}\expandafter\next\fi} 
\def\wordprintA#1{\setbox0=\hbox{#1}\hbox{\rlap{\copy0}\uline\wd0}\uline\uspace\relax} 
\def\wordprintB#1{\setbox0=\hbox{#1}\hbox{\rlap{\copy0}\uline\wd0}\-} 
\def\uline{\leaders \vrule height-1.9pt depth2.3pt\hskip} 
\def\uspace{\fontdimen2\font plus\fontdimen3\font minus\fontdimen4\font} 
\def\ulRedefine{\def~{\egroup\hbox{\rlap{\copy0}\uline\wd0}\nobreak\uline\uspace\relax 
         \setbox0=\hbox\bgroup}} 

The macro repeats the \wordscanA to each word in the parameter and the \wordscanB divides the words marked by \-. The whole word or its last part is printed by the \wordprintA macro while the parts ended by \- are printed by the \wordprintB. The \uline macro sets the height and the thickness of the underline or overline. The value 1.9pt and thickness 0.4pt is used in our example. The macro \uspace defines the size of the underlined/overlined space between words including the glue part. The example reads the same values as normal space from appropriate \fontdimen registers.

The tie as non-breakable space can be present in the parameter text and this is solved by \ulRedefine macro. We need to keep the stretch/schrinkability of this space because we don't accept the Word's feature of the nonbreakable space (that it is only in fixed size). This feature is totally bad from typographical point of view.

The macro \ltps{letterspaced text} works in similar way but the macros \prointscanA and \printscanB are defined differently. These macros decompose the words to the letters and add the spaces declared in \ltspA, \ltspB and \ltspC.

\def\ltsp#1{\ifhmode\hskip\ltspA \else\leavevmode\fi \wordscanA #1 {} \hskip\ltspA} 
\def\wordscanA#1 {\ifx^#1^\unskip\else \wordscanB#1\-\end \expandafter\wordscanA\fi} 
\def\wordscanB#1\-#2\end{\ifx^#2^\wordprintA{#1}\else 
   \wordprintB{#1}\def\next{\wordscanB#2\end}\expandafter\next\fi} 
\def\wordprintA#1{\letterspaceA #1{}\unskip\unpenalty\hskip\ltspB} 
\def\wordprintB#1{\letterspaceA #1{}\-} 
\def\letterspaceA#1{\if^#1^\else\hbox{#1}\nobreak\hskip\ltspC \expandafter\letterspaceA\fi} 
 
\newskip\ltspA \ltspA=6pt   % the space at beginning of the text 
\newskip\ltspB \ltspB=5pt plus2pt minus1pt  % the space between words 
\newskip\ltspC \ltspC=2pt   % the space between letters in the word 
Čeština ID: 0063 Author: P. O. Published

Hyphenation preprocessing

We create the macro \hyphenprocess{word} which returns its parameter in the \listwparts macro in the form hy\-phen\-ated by the actual \language register and by the preloaded hyphenation patterns.

\newdimen\hyphdim 
\let\hyphentt=\tentt  \hyphdim=\fontdimen6\hyphentt \divide\hyphdim by2 
 
\def\hyphenprocess#1{\def\tmp{#1}\let\listwparts=\undefined 
   \setbox0=\vbox\bgroup\hyphenpenalty=-10000 \hsize=0pt \hfuzz=\maxdimen 
      \edef\hychar{\hyphenchar\hyphentt=\the\hyphenchar\hyphentt}\hyphenchar\hyphentt=45 
      \def~{\nobreak\hskip.5em\relax}\hyphentt\noindent\hskip0pt\relax #1\par \hychar 
      \hyphenprocessA 
   \expandafter\let\expandafter\listwparts\expandafter\empty 
      \expandafter\hyphenprocessB\listwparts 
} 
\def\hyphenprocessA{\setbox2=\lastbox 
   \ifvoid2 \egroup \else \unskip \unpenalty 
      \setbox2=\hbox{\unhbox2}% 
      \tmpnum=\wd2 \advance\tmpnum by100 \divide\tmpnum by\hyphdim 
      \ifx\listwparts\undefined \xdef\listwparts{,}% 
      \else \advance\tmpnum by-1 \xdef\listwparts{\the\tmpnum,\listwparts}\fi 
              \expandafter\hyphenprocessA \fi 
} 
\def\hyphenprocessB#1,{\if^#1^\expandafter\hyphenprocessC 
   \else \tmpnum=#1 \expandafter\hyphenprocessD\tmp\end 
   \fi 
} 
\def\hyphenprocessC{\expandafter\addto\expandafter\listwparts\expandafter{\tmp}} 
\def\hyphenprocessD#1#2\end{\addto\listwparts{#1}% 
   \advance\tmpnum by-1 
   \ifnum\tmpnum>0 \def\next{\hyphenprocessD#2\end}% 
   \else 
   \def\tmp{#2}\def\next{\addto\listwparts{\-}\expandafter\hyphenprocessB}\fi 
   \next 
} 

The macro processes the word in the temporary \vbox in the font \hyphentta and with \hsize=0pt. The hyphenated word is re-boxed by \hyphenprocessA macro. The dimensions of these boxes are used for calculation of the number of letters in each part of the hyphenated word. These numbers are saved to the \listsparts macro. For example after processing the word “hyphenated” we get 2,4,, in the \listwpars. The last part of the word is not represented here. The macros \hyphenprocessB, C and D read these data and read the appropriate number of letters from the \tmp (where the word is saved) and save these letters into \listwparts. The \- sequence is inserted between the parts of the word.

We can improve the macro \ul or \ltsp from the previous example 0063 in order to the words are auto hyphenated in the parameters of these macros:

\def\wordscanA#1 {\ifx^#1^\unskip\else 
   \hyphenprocess{#1}\expandafter\wordscanB\listwparts\-\end \expandafter\wordscanA\fi} 
Čeština ID: 0065 Author: P. O. Published

Background-colored text

There is an example about background-colored text directly in the OPmac documentation (the \coloron macro). But this macro creates unbreakable box with specified background. The macro \coltext here keeps the text breakable into lines of the paragraph. The usage is

\coltext\ColorA\ColorB{text} 

where \ColorA is the color of the text and \ColorB is the color of the background. For example:

Zde je běžný text odstavce. 
\coltext\Yellow\Blue{Tady je podbarvený textík, který se láme do řádků.} 
A pokračujeme v běžném textu odstavce. 

gives:

Colored text example

The macro is only a slight modification of the macro \ul from OPmac trick 0063. It uses the macro \hyphencodes from OPmac trick 0064.

\def\coltextstrut{height2ex depth.6ex} 
\def\coltext#1#2#3{{\localcolor\let\Tcolor=#1\let\Bcolor=#2\relax 
   \setbox1=\hbox{-\kern.05em}% 
   \setbox1=\hbox{{\Bcolor\vrule\coltextstrut width\wd1}\kern-.05em\llap{\Tcolor -}}% 
   \def\-{\discretionary{\copy1}{}{}}% 
   \def\uline##1{\skip0=##1\advance\skip0 by.05em 
      \Bcolor\leaders \vrule\coltextstrut\hskip\skip0 \hskip-.05em\relax}% 
   \def\uspace{\fontdimen2\font plus\fontdimen3\font minus\fontdimen4\font}% 
   \def~{\egroup\hbox{\uline{\wd0}\llap{\copy0}}\nobreak{\uline\uspace}\relax \setbox0=\hbox\bgroup\Tcolor}% 
   \leavevmode\coltextA #3 {} }} 
\def\coltextA#1 {\ifx^#1^\unskip\unskip\else 
   \hyphenprocess{#1}\expandafter\coltextB\listwparts\-\end 
\expandafter\coltextA\fi} 
\def\coltextB#1\-#2\end{\ifx^#2^\coltextC{#1}\else 
   \coltextD{#1}\def\next{\coltextB#2\end}\expandafter\next\fi} 
\def\coltextC#1{\setbox0=\hbox{\Tcolor#1}\hbox{\uline{\wd0}\hbox{\llap{\copy0}}}\uline\uspace\relax} 
\def\coltextD#1{\setbox0=\hbox{\Tcolor#1}\hbox{\uline{\wd0}\llap{\copy0}}\-} 

There is a difference between the \ul and \coltext macro: the order of typesetting is reverted: firstly is typeset the line and secondly the text by \coltext macro. And the “line” is somewhat more wide than the line in the \ul macro. It creates the background. The \box1 is prepared as hyphenchar at the beginning of the macro \coltext.

Čeština ID: 0085 Author: P. O. Published

Marginal line around selected text

The user encloses the selected text by \beginspec...\endspec. The selected text may start in the middle of the paragraph and the last selected word can be somewhere in next paragraphs, for instance. The macro draws the line in the right margin starting from the vertical position of the first selected word and ending at the vertical position of the last selected word.

The implementation uses the pdfTeX's primitive \pdfsavepos and the REF file from OPmac for reading the positions of the first and the last selected word. This means that the marginal lines can be created after second run of TeX, after the data from REF file are read. The implementation follows:

\def\preparespec#1{\expandafter\ifx \csname spec:#1\endcsname \relax \sdef{spec:#1}{}\fi} 
\def\XspecB#1{\preparespec{\the\lastpage} 
    \expandafter\addto\csname spec:\the\lastpage\endcsname{,\specdraw{#1}}} 
\def\XspecE#1{\preparespec{\the\lastpage} 
    \expandafter\addto\csname spec:\the\lastpage\endcsname{{#1}}} 
 
\input opmac % OPmac input must be done after the \XspecB and \XspecE are defined 
 
\newif\ifspecenv \specenvfalse 
\def\beginspec{\ifspecenv \opwarning{\noexpand\beginspec inside spec environment, ignored}% 
   \else \global\specenvtrue \openref 
      \ifvmode \pdfsavepos \else \vbox to0pt{\vss\pdfsavepos\kern\ht\strutbox}\fi 
      \wref\XspecB{{\the\pdflastypos}}\fi 
} 
\def\endspec{\ifspecenv \global\specenvfalse 
      \ifvmode \pdsavepos \else\vbox to0pt{\kern\dp\strutbox \pdfsavepos\vss}\fi 
      \wref\XspecE{{\the\pdflastypos}}% 
   \else \opwarning{\noexpand\endspec outside spec environment, ignored}\fi 
} 
\def\prepghook{\moveright\hsize\vbox to0pt{\preparespec{\the\pageno} 
   \expandafter\expandafter\expandafter 
   \specdrawB\csname spec:\the\pageno\endcsname \botypos\relax}\nointerlineskip 
} 
\def\specdraw#1#2#3{\moveright 5pt\vbox to0pt{ 
   \tmpnum=\topypos \advance\tmpnum by-#1 \kern\tmpnum sp 
   \tmpnum=-#2 \advance\tmpnum by#1 \hrule height\tmpnum sp width 2pt \vss}\nointerlineskip 
   \ifx#3\relax \global\let\specdrawB=\specdrawBrun \fi 
} 
\def\specdrawB#1{} 
\def\specdrawBrun#1#2{\gdef\specdrawB##1{}\specdraw{\topypos}{#1}{#2}} 
 
\tmpdim=\pdfpageheight \advance\tmpdim by-1in \advance\tmpdim by-\voffset \edef\topypos{\number\tmpdim} 
\advance\tmpdim by-\vsize \advance \tmpdim by-\dp\strutbox \edef\botypos{\number\tmpdim} 

The macros \XspecB{from} and \XspecE{to} save the information to the macros \spec:pageno (where pageno is the relevant page number) when REF file is read. The information in the \spec:pageno is in the form:

,\specdraw{from}{to},\specdraw{from}{to},\specdraw{from}{to} 

The output routine uses such information in \prepghook: The \specdrawB is run followed by expanded \spec:pageno followed by two tokens \botypos\relax. In general, the \specdrawB only ignores the first comma and the \specdraw reads {from} and {to} and following comma or \botypos (which is ignored). The \specdraw draws the marginal line {from}--{to}.

The interesting situation is the case, when the marginal line isn't closed at the current page. Then the {to} parameter is missing and \specdraw reads \botypos instead {from}. The \botypos includes the bottom position of the page, so the line is normally drawn. The third (ignored) parameter is \relax in this case and this is an indicator for redefining the \specdrawB to \specdrawBrun for the next page. Then the next page begins by the line created by \specdrawBrun. As an exercise, you can think about the empty \spec:pageno. This works in the normal mode (no line is created) and in the interrupted-line mode too: the line is drawn from the top to the bottom.

Next exercise: modify the macro in order to it creates the colored frames around the text. Suppose the usage of \begspec and \endspec beween paragraphs in vertical mode.

Čeština ID: 0128 Author: P. O. Published

Macro tricks

Usage of \replacestrings

OPmac provides the \replacesrings macro which is used for \url parameter processing. The \replacestrings macro replaces the substrings of the string saved in the \tmpb macro. The another usage of \replacestrings is here. I needed to generate the genitive of the faculty name. The faculty is set by the user only as an abbreviation (F1, F2, ..., F8). This is saved to \faculty toks string. The \mtext macro (from OPmac) converts this abbreviation to the full name of the faculty depending on the actual language. It his language id Czech then genitive of this name is different than the nominative. I used the following code:

\def\facultygenitiv{\edef\tmpb{\mtext{\the\faculty} }% 
   \replacestrings{ulta }{ulty }% 
   \replacestrings{á }{é }% 
   \tmpb} 

When the \faculty={F4} for example and the language is set as Czech then \mtext{\the\faculty} expands to the nominative: “Fakulta jaderná a fyzikálně inženýrská”. If the \facultygenitiv is used, the string above is replaced to “Fakulty jaderné a fyzikálně inženýrské”. The code above solves the genitive of all eight faculties at the CTU in Prague.

Čeština ID: 0060 Author: P. O. Published

Calculation of the direction of given vector

The vector in a plane is given. We need to find the angle between this vector and the axis x in degrees. This is needed when we need to rotate some graphics element (the spike of the arrow, for example) by the given direction. We create the macro

\calculateargofvector (X0 Y0) (X Y)  % (X0 Y0) is the origin, (X Y) is the end 
for example 
\calculateargofvector (0 0) (2 3) 
\calculateargofvector (1.1 2.7) (-4.7 6.3) 

The result is returned and saved in the macro \argofvector. Because TeX doesn't provide the internal functions sqrt, arccos or arctan, the macro is somewhat more complicated.

\newdimen\dimX  \newdimen\dimY 
 
\def\processatan #1 {\tmpdim=\ifx\relax#1\maxdimen \else.#1pt\fi\relax 
   \ifdim\dimY<\tmpdim\expandafter\processatanE 
   \else \advance\tmpnum by1 \def\tmp{#1}\expandafter \processatan \fi} 
\def\processatanE #1\relax{} 
 
\def\calculateargofvector (#1 #2) (#3 #4){\def\tmp{0}\tmpnum=0 
   \dimX=#3pt \advance\dimX by-#1pt \dimY=#4pt \advance\dimY by-#2pt 
   \ifdim\dimX=0pt \ifdim\dimY=0pt \dimX=1pt \dimY=0pt \fi \fi 
   \ifdim\dimY<0pt \dimY=-\dimY \dimX=-\dimX \advance\tmpnum by180 \fi 
   \ifdim\dimX<0pt \tmpdim=\dimX \dimX=\dimY \dimY=-\tmpdim \advance\tmpnum by90 \fi 
   \ifdim\dimY>\dimX \tmpdim=\dimX \advance\tmpdim by\dimY 
                   \advance\dimY by-\dimX \dimX=\tmpdim \advance\tmpnum by45 \fi 
   \ifdim\dimX<63pt \multiply\dimX by256 \multiply\dimY by256 
   \else \ifdim\dimX<1023pt \multiply\dimX by16 \multiply\dimY by16 \fi\fi 
   \divide\dimX by256 \divide\dimY by\dimX \multiply\dimY by256 
   \processatan 017 035 052 07 087 105 123 14 158 176 194 21 23 25 268 287 306 325 344 364 
                384 404 424 445 466 488 51 532 554 577 6 625 649 675 7 727 754 781 81 839 
                869 9 932 966 99999 {\relax} \relax 
   \edef\argofvector{\the\tmpnum}% 
   \ifdim\tmpdim=\maxdimen \tmpnum=0 \else 
      \advance\tmpdim by-.\tmp pt \advance\dimY by-.\tmp pt \multiply\dimY by10 
      \tmpnum=\dimY \divide\tmpnum by\tmpdim 
   \fi 
   \ifnum\tmpnum>0 \edef\argofvector{\argofvector.\the\tmpnum}\fi 
} 

The vector is rotated by 180 or 90 degrees first in order to get it to the first quadrant. This rotation (in degrees) is added to the \tmpnum. Second, we rotate the vector to the first half of the first quadrant by (possibly) rotating it by 45 degrees. The vector is resized by this operation but this doesn't matter because next step is the normalization of the vector so that it has the first coordinate equal to one. This means that the Y coordinate of the vector is equal to the tangent of the desired angle. The tangents of the angles 1, 2, 3, ..., 45 degrees are written after \processatan macro. This macro finds the right value and skips the rest to the \relax. Finally, the linear approximation is used for the calculation of the fraction part of the angle value.

Čeština ID: 0061 Author: P. O. Published

Defining a macro with optional parameter

We want to define the \macro with two various syntax of usage:

\macro parameters 
or 
\macro [optional] parameters 

We define the \optdef macro wit the following feature:

\optdef\macro [default] #1 #2 {opt=\opt, 1=#1, 2=#2.} 
 
\macro first second        ... expands to: opt=default, 1=first, 2=second. 
\makro [foo] third fourth  ... expands to: opt=foo, 1=third, 2=fourth. 

For example, it is possible to redefine the \chap, \sec and \secc macros in order to the label can be written as optional parameter:

\let\chapOri=\chap  \let\secOri=\sec   \let\seccOri=\secc 
\optdef\chap [] {\ifx\opt\empty\else\label[\opt]\fi \chapOri} 
\optdef\sec  [] {\ifx\opt\empty\else\label[\opt]\fi \secOri} 
\optdef\secc [] {\ifx\opt\empty\else\label[\opt]\fi \seccOri} 

The \optdef macro can be defined as:

\def\optdef#1[#2]{% 
   \def#1{\def\opt{#2}\isnextchar[{\csname oA:\string#1\endcsname}{\csname oB:\string#1\endcsname}}% 
   \sdef{oA:\string#1}[##1]{\def\opt{##1}\csname oB:\string#1\nospaceafter\endcsname}% 
   \sdef{oB:\string#1\nospaceafter}% 
} 
\def\nospaceafter#1{\expandafter#1\romannumeral-`\.} 

The \optdef defines \macro as \isnextchar[{\oA:\makro}{\oB:\makro} and defines \oA:\makro[text] as \def\opt{text}\oB:\makro and finally defines \oB:\makro as the real macro declared after \optdef[default]. The space (sometimes presented) after the right bracket in the macro declaration has to be ignored. This is done by the expansion of the \rommannumeral-\. -- this primitive expands to nothing and the possible space is consumed during this expansion.

Čeština ID: 0067 Author: P. O. Published

Removing the last space in the parameter

For example the parameters of \chap, \sec and \secc includes the unwanted space at the end. But not every time. For example \sec Damned \LaTeX doesn't generate the space at the end. OPmac solves the removing of this space by \unskip when the parameter is used. This example removes the last space at macro level. It is sufficient to save the parameter to the \tmpb macro by \def\tmpb{#1} and to do:

\addto\tmpb\end \replacestrings{ \end}{}\replacestrings{\end}{} 

Now, the \tmpb includes the parameter without the last possible space.

Čeština ID: 0068 Author: P. O. Published

Macro with a parameter to the end of line

The macro \eoldef gives possibility to define a macro with one parameter separated by the end of current line. For example

\eoldef\foo#1{\message{param: "#1"}} 
 
\foo this is parameter 
and this is next text. 

We can see that \eoldef has the same syntax as \def for macros with one unseparable parameter, but the declared macro takes its parameter to eol. In the example above, the parameter #1 is the text “this is parameter”.

**Warning**. Since OPmac version Apr. 2016, the \eoldef macro is a part of the OPmac macros and the macros \tit, \chap, \sec and \secc are defined by it. The previous version of these macros were simply separated by \par. This is not 100% backward compatible but I hope that the advantages beat disadvantages. Advantages: The “last-space in the parameter disappears. User can write \sec something as the last line in the file. Disadvantages: if your source file divides the title text to more lines then you must hide the end of each line (but not the last line) by %. If you are using \sec indside your own macro then you cannot write ... \sec#1\par ... because the error message occurrs:

! Paragraph ended before \eoldefA was complete. 

You can use \bracedparam from OPmac trick 0036 and write ... \bracedparam\sec{#1} ... in your macro.

If you want to deactivate the EOL separation of parameters of \tit, \chap, \sec, \secc macros and to return to the original behavior (separation by empty line), you can use:

\def\eoldefA{\endgroup\eoldefB} 
\def\eoldefB#1#2\par{\csname\string#1:M\endcsname{#2}} 
Čeština ID: 0121 Author: P. O. Published

The key=value dictionaries

We want to set the data in the form keyA=valueA, keyB=valueB etc. i.e. the comma separated list of equations. The macro \kv{key} expands to the appropriate value or to \kvunknown, if the key is not set. The list of key=value pairs is read by \kvscan macro and it has to be terminated by comma, comma, equal sign, comma. The macros \kv and \kvscan are usable for macro programmer. For example:

\def\mymacrodefault          {color={}, width=0.4pt} 
\optdef\mymacro [] {\bgroup 
   \expandafter \kvscan\mymacrodefault,,=,% default values 
   \expandafter \kvscan\opt,,=,%  valuse given by user 
   \if^\kv{color}^\else \localcolor\kv{color}\fi % color setting 
   \let\vruleprimitive=\vrule 
   \def\vrule{\vruleprimitive width\kv{width}}% wule width setting 
   ... 
   \egroup 
} 

The \optdef macro is used here from the trick 0067. User can write the \mymacro without parameters or (for example) \mymacro[width=.7pt] or \mymacro[width=.8pt, color=\Red].

The macros \kv and \kvscan can be implemented by the code:

\def\kv#1{\expandafter\ifx\csname kv:#1\endcsname \relax \expandafter\kvunknown 
   \else \csname kv:#1\expandafter\endcsname\fi 
} 
\def\kvunknown{???} 
\def\kvscan #1#2=#3,{\ifx#1,\else \kvdef{kv:#1#2}{#3}\expandafter\kvscan\fi} 
\let\kvdef=\sdef 

The \kvscan macro reads the key in two parameters #1#2 in order to give the possibility to ignore the spaces after commas in the comma separated list. But spaces around equal sign are not allowed. If you need to allow them then you can pre-process the list of key=value pairs by the code:

... \let\tmpb=\opt \replacestrings{ =}{=}\replacestrings{= }{=}% 
    \expandafter \kvscan\tmpb,,=,% 

You can use the following code instead \let\kvdef=\sdef

\def\kvdef#1{\expandafter\edef\csname#1\endcsname} 

if you wish to expand the values in the time of the setting. If you need to ask if the key is set already, you can use \isdefined{kv:key}\iftrue.

Čeština ID: 0069 Author: P. O. Published

The options in key=value dictionaries

We want to mix comma separated key=value items with single options, i. e. single words not followed by the equal sign and a value. For example:

\mymacroset {width=0.8pt, draft, silent} 

The \replacestrings can help with this task, as in the following example:

\def\mymacroset#1{\def\tmpb{#1,}\replacestrings{ =}{=}\replacestrings{= }{=}% 
   \replacestrings{draft,}{my-final=0,}% 
   \replacestrings{final,}{my-final=1,}% 
   \replacestrings{silent,}{my-message=0,}% 
   \replacestrings{verbose,}{my-message=1,}% 
   \expandafter\kvscan\tmpb,=,% 
   \if1\kv{my-message}\let\mymessage=\message \else \def\mymessage##1{}\fi 
   ... 
} 
\mymacroset {width=0.7pt, final, silent} % default values 

The single options are transformed internaly to key=value format and then the \kvscan from previous OPmac trick 0069 is used. We can ask to used option by \if1\kv{...} as follows:

\if1\kv{my-final}The "final" option was used.\else The "draft" option was used.\fi 
Čeština ID: 0114 Author: P. O. Published

Nested brackets of another type than {}

TeX checks the nested brackets only for one type of brackets: {}. OPmac uses the macros sometimes with the parameters surrounded by [] brackets, but hey cannot be simply nested. If you write (for example) \label[a[b]c] then you get the label a[b and the text c] is printed. You can check the pairs and nesting of another type of brackets than {} by the \ensurebalanced macro:

\def\macro[#1]{\ensurebalanced[]\macroA{#1}} 
\def\macroA#1{the parameter "#1" has balanced brackets [].} 
for example: 
\macro[a[b]c] prints: the parameter "a[b]c" has balanced brackets []. 

The \label macro can be redefined in order to balanced [] brackets can be nested:

\def\tmp{\def\labelA##1} 
\expandafter\tmp\expandafter{\label[#1]} 
\def\label[#1]{\ensurebalanced[]\labelA{#1}} 

The \ensurebalanced macro is defined by:

\def\ensurebalanced#1#2#3#4{% 
   \isbalanced#1#2{#4}\iftrue #3{#4}% 
   \else 
      \def\ensurebalancedA##1##2#2{% 
         \isbalanced#1#2{##1#2##2}\iftrue #3{##1#2##2}% 
         \else \def\next{\ensurebalancedA{##1#2##2}}\expandafter\next\fi 
      }% 
      \def\next{\ensurebalancedA{#4}}\expandafter\next\fi 
} 
\def\isbalanced#1#2#3\iftrue{\tmpnum=0 \isbalancedA#1#2#3\isbalanced} 
\def\isbalancedA#1#2#3{% 
    \ifx\isbalanced#3\def\next{\csname ifnum\endcsname\tmpnum=0 }% 
    \else \def\next{\isbalancedA#1#2}% 
        \isonetoken#3\iftrue 
           \ifx#3#1\advance\tmpnum by1\fi 
           \ifx#3#2\advance\tmpnum by-1\fi 
     \fi\fi\next 
} 
\def\isonetoken#1#2\iftrue{\ifx\isbalanced#2\isbalanced} 

The macro \ensurebalanced checks the balanced text by \isbalanced wit used brackets [=#1 and ]=#2. If the text is balanced then \macroA is executed, i.e #3 followed by read parameter. Else the \ensurebalancedA macro is executed (maybe recursively). It reads the next part of the parameter.

Čeština ID: 0077 Author: P. O. Published

Reading parameter text token per token

We create a macro \readtoks{parameter} which read its parameter token per token and does arbitrary processing for each token. The default version of the macro simply reads tokens and saves them to the \readtoksO token list. The usage of slight modification of this principle can be found in the next OPmac trick 0079, where \readtoks scans the list of the tokens and doubles the hash token (category 6) and converts the control sequence \internalXpram to one hash token. For example:

\readtoks{aha # uff {\internalXparam1 {a}} \line} 
is converted to: 
\toks1={aha ## uff {#1 {a}} \line} 

A slight modification of this macro is used here or here at tex.stackexchange.com

The main problem of the \readtoks macro if the fact, that we cannot simply read token per token by the macro with one unseparated parameter because this processing consumes spaces and behaves bad when braces are occurred in the parameter. These situations need to be managed by futurelet.

\newtoks\readtoksT \newif\ifreadtoksG 
\def\readtoks{\begingroup \let\bgroup=\relax \let\egroup=\relax 
   \readtoksT={}\readtoksGfalse \afterassignment\readtoksA \let\next= } 
\def\readtoksA{\futurelet\tmpc\readtoksB} 
\def\readtoksB{\let\next=\readtoksD \csname readtoksX\endcsname 
   \ifcat\space\noexpand\tmpc \let\next=\readtoksC \def\nexxt{\readtoksD{ }}\fi 
   \ifcat{\noexpand\tmpc      \let\next=\readtoksC \let\nexxt=\readtoksE \fi 
   \ifcat}\noexpand\tmpc      \let\next=\readtoksC \let\nexxt=\readtoksF \fi 
   \next 
} 
\def\readtoksC{\afterassignment\nexxt \let\next= } 
\def\readtoksD#1{\readtoksT=\expandafter{\the\readtoksT#1}\readtoksA} 
\def\readtoksE{\begingroup \readtoksGtrue \readtoksT={}\readtoksA} 
\def\readtoksF{\ifreadtoksG 
   \expandafter\endgroup\expandafter\readtoksT\expandafter\expandafter\expandafter 
      {\expandafter\the\expandafter\readtoksT\expandafter{\the\readtoksT}}% 
      \expandafter\readtoksA 
   \else 
      \expandafter\endgroup\expandafter\readtoksO\expandafter{\the\readtoksT}% 
   \fi 
} 
\def\readtoksO{\toks1} 

The macro scans single tokens and runs the user defined macro \readtoksX where the processing for each token can be programmed. If this macro isn't defined then the \readtoks only saves the tokens to the output register \readtoksO (which is defined as \toks1) and the result is the same as simple setting \toks1={parameter}. Note how the braces are processed. If there is an open brace then we open new group by \begingroup and start the filling of \readtoksT from empty begin. The tokens between braces are saved to the \readtoksT in such case. When the closing brace is encountered then the actual \readtoksT is expanded and surrounded by braces and put after the contents of \readtoksT from previous processing at previous level of group. And the group is finished, of course.

Čeština ID: 0088 Author: P. O. Published

Expandable reading text token per token

Previous OPmac trick reads the given text token per token at main processor level. Now, we'll do the same at expand processor level. There is a problem with spaces which are ignored by macro with non-separated parameter. So the loop:

\def\apply#1{[#1]} 
\def\readtokens#1{\ifx\end#1\else\apply{#1}\expandafter\readtokens\fi} 
\readtokens This is some text.\end 

behaves the same as \readtokens Thisissometext.\end. We need to create a macro which respect the spaces and it is full expandable. Moreover, the macro must respect the braces. Braces is second problem of macros with non-separated parameter: {abc} is read as one parameter and braces are removed. Both these problems are solved by the \etoks{tokens} macro which is full expandable, executes \eapply to each token of its parameter and respects spaces and braces. For example:

\def\eapply#1{[#1]} % what to do for each token 
\message{... \etoks{ab c{ aa bc {bb}}cb}} 

prints ... [a][b][ ][c]{[ ][a][a][ ][b][c][ ]{[b][b]}}[c][b].

The implementation:

\def\etoks#1{\etoksA #1{\end}} 
\def\etoksA#1#{\etoksB#1 {\end} } 
\def\etoksB#1 #2 {\etoksC#1\end 
    \ifx\end#2\empty\expandafter\etoksD\else\eapply{ }\fihere{\etoksB#2 }\fi} 
\def\etoksC#1{\ifx\end#1\else\eapply{#1}\expandafter\etoksC\fi} 
\def\etoksD#1{\ifx\end#1\empty\else\fihere{{\etoks{#1}}\etoksA}\fi} 
\def\fihere#1\fi{\fi#1} 

The code is based on the construction \def\x#1#{...} where #1 is separated by open brace. The \etoksB reads a “words” separated by a space and \etoksC reads tokens of each such “word”. When all words are read then open brace follows and it is processed by \etoksD. The contents of the braces is processed by \etoks recursively here.

Čeština ID: 0153 Author: P. O. Published

An improved \addto for macros with parameters

The \addto macro form OPmac adds it parameter to the body of the given macro, but given macro have to be parameterless and without hash token of category 6. This trick suggests more general macros \appendto and \prependto. They append or prepend the parameter to the given macro and the macro can be defined with parameters. Examples of usage:

\def\a#1==#2{#1 is equal #2} 
\appendto\a{ and this means that #1=#2.} 
% \a is macro: #1==#2 -> #1 is equal #2 and this means that #1=#2. 
\prependto\a{We have (#1) and (#2). The } 
% \a is macro: #1==#2 -> We have (#1) and (#2). 
%                        The #1 is equal #2 and this means that #1=#2. 

You can set \let\appendprefix=\long or \let\appendprefix=\global in order to declare the new macro with the prefix \long or define it globally. Tip:

\def\appendtoprefix{\protected\long}\appendto\makro{} 

re-declares the type of the defined \macro.

\let\appendtoprefix=\relax 
\def\appendto#1#2{\appendtoA#1% 
   \appendtoprefix\expandafter\def\expandafter#1\the\toks0\expandafter 
      {\the\toks1 #2}} 
\def\prependto#1#2{\appendtoA#1\toks2={#2}% 
   \appendtoprefix\expandafter\def\expandafter#1\the\toks0\expandafter 
      {\the\toks2\expandafter\space\the\toks1}} 
\def\appendtoA#1{\edef\tmpb{\expandafter\appendtoB\meaning#1\end}% 
   \scantokens\expandafter{\expandafter\toks\expandafter0\expandafter{\tmpb}}% 
   \expandafter\replacestrings\expandafter{\string##}{\#}% 
   {\def\###1{{\noexpand\internalXparam##1}}\xdef\tmpa{\toks1={\tmpb}}}\tmpa 
   \scantokens\expandafter{\expandafter\toks\expandafter1\expandafter{\the\toks1}}% 
   \toks1=\expandafter\expandafter\expandafter{\expandafter#1\the\toks1}% 
   \expandafter\readtoks\expandafter{\the\toks1}% 
} 
\def\appendtoB#1:#2->#3\end{#2} 
\def\readtoksX{% 
   \ifcat##\noexpand\tmpc   \let\next=\readtoksC \def\nexxt{\readtoksD{########}}\fi 
   \ifx\internalXparam\tmpc \let\next=\readtoksC \def\nexxt{\readtoksD{####}}\fi 
} 
\def\internalXparam{\internalXparam} 
 

The macros \appendto and \prependto first prepare the parameter mask into \toks0 and the macro body into \toks1 by calling of \appanedtoA. The parameter mask is read from detokenized \meaning and it is retokenized by \scantokens. But the macro body is processed by slightly different way because we needn't to detokenize and tokenize it because this is error prone. We prepare an alternative of the parameter mask where each #number is replaced by {\internalXparam number} and this is temporary saved to \toks1. For example the parameter mask #1x#2::#3 is converted to the {\internalXparam1}x{\internalXparam2}::{\internalXpram3}. This is done by \replacestrings #->\# and by local definition of \# as a macro which creates {\internalXparam number}. This special parameter mask is used after calling of the original macro during expansion of this macro. This means that #1 is saved as \internalXparam1, #2 as \intenralXparam2 etc. The result of this expansion is processed by the \readtoks macro from the previous OPmac trick 0088. The output in \toks1 is now the token list ready to use as the macro body in a new definition of the original macro. Note, that LaTeX package etoolbox.sty does not keep all catcodes in the macro body as our macros. Our macros are more robust.

Čeština ID: 0079 Author: P. O. Published

The \patchto macro can modify another macro

We need to implement the \patchto macro which replaces the text by another text in the given macro wit the syntax:

\patchto\macro {original text}{replaced text} 

We can use previous OPmac trick 0079 but for more simplicity we do detokenization of the macro body before replacement. The replacement is done by \replacestrings and the macro body is tokenized by \scantokens. This means that this is analogical as in LaTeX command \patchcmd from LaTeX's etoolbox.

\def\patchto#1#2#3{\appendtoA#1% 
   \edef\tmpb{\detokenize\expandafter{\the\toks1}}% 
   \edef\tmpa{\noexpand\replacestrings{\detokenize{#2}}{\detokenize{#3}}}\tmpa 
   \edef\tmpa{\noexpand\replacestrings{\string##\string##}{\string##}}\tmpa 
   \scantokens\expandafter{\expandafter\toks\expandafter1\expandafter{\tmpb}}% 
   \appendtoprefix\expandafter\def\expandafter#1\the\toks0\expandafter{\the\toks1 }} 
Čeština ID: 0087 Author: P. O. Published

The for-loop

We create the macro \for \i=X to Y by Z {loop body} which allocates the loop variable (\i in this example), sets it to X and repeats the loop body until loop variable exceedes the Y. The loop variable is increased by Z after each loop body processing. For example

\for \i=1 to 10 by 1 {\for \j=1 to 10 by 1 {\message{a[\the\i,\the\j]}}} 

prints a[1,1] a[1,2] ... a[1,10] a[2,1] a[2,2] ... a[10,9] a[10,10].

The whole loop is hidden in the group and it begins by allocation of loop variable (first parameter). User needn't to allocate this variable explicitly. This global allocation is typically undesirable because control sequences \i, \j have another meaning defined by plainTeX. When the for-loop ends then the group is closed and the \i, \j have their original meaning.

The \for macro can be defined for example:

\def\for#1=#2to#3by#4#{\forA{#1}{#2}{#3}{#4}} 
\long\def\forA#1#2#3#4#5{\begingroup 
   {\escapechar=`\\ % allocation of #1 as counter: 
      \expandafter \ifx\csname for:\string#1\endcsname \relax 
         \csname newcount\expandafter\endcsname \csname for:\string#1\endcsname\fi 
    \expandafter}\expandafter\let\expandafter#1\csname for:\string#1\endcsname 
   #1=#2% 
   \def\forB{#5\advance#1by#4\relax \expandafter\forC}% 
   \ifnum#4>0 \def\forC{\ifnum#1>#3\relax\else\forB\fi}% 
   \else      \def\forC{\ifnum#1<#3\relax\else\forB\fi}% 
   \fi 
   \ifnum#4=0 \let\forC=\relax \fi 
   \forC \endgroup 
} 

First, we scan parameters and we callocate (globally) the \for:\i variable (if #1=\i) or \for:\j varibale (if #1=\j) etc. This allocation is done only if the same variable were not allocated before. This means that second usage of \for\i=... doesn't allocate the same variable twice. Then the declared loop variable is set locally to the allocated variable (i.e. \let\i=\for:\i).

The second part of the macro sets the loop variable to X. The loop is processed by repeatedly calling of \forC macro. This macro does: if \i doesn't exeed the Y then do \forB. And \forB processes the loop body #5, increases loop variable by Z and repeats \forC recursively. There are two types of conditional: it depends on the fact that the Z is positive or negative. And if Z is zero then no loop is processed.

Čeština ID: 0115 Author: P. O. Published

The loop at expand processor only

While loop processing, we need to increment the loop variable and this needs setting new value. This is impossible to do it at expand processor. We show two solutions how to overcome it. The first solution uses \romannumeral primitive and works in classical TeX. The second solution uses \numexpr primitive from eTeX. It works at expand processor level.

We create the macro \rep{how-many}{what}. It repeats the what parameter how-many times. For example \rep{5}{uf} expands to ufufufufuf.

The \rep macro in classical TeX looks like:

\def\rep#1#2{\expandafter\repA\romannumeral#1000.{#2}} 
\def\repA#1.#2{\repB{#2}#1.} 
\def\repB#1#2{\ifx.#2\expandafter\repC\else#1\expandafter\repB\fi{#1}} 
\def\repC#1{} 

First, the \rep{5}{uf} expands to \repA mmmmm.{uf} (5-times m) and the parameters are reordered by \repA to \repB {uf}mmmmm. The \repB does the loop: it gets one m in each loop step and ends when period is found.

Using eTeX we can iplement the \rep macro as this:

\def\rep#1#2{\repA 0{#1}{#2}} 
\def\repA#1#2#3{\ifnum#2>#1 #3\expandafter\repB\else\expandafter\repC\fi{#1}{#2}{#3}} 
\def\repB#1{\expandafter\repA\expandafter{\the\numexpr#1+1}} 
\def\repC#1#2#3{} 

In this case, the \repA macro does the loop with parameters {how-many-pre}{how-many}{what}. This macro inserts what to the output if how-many-pre < how-many. Then the macro \repB increments how-many-pre by one using \numexpr and repeats \repA.

The second solution allows to use registers or constants in how-many parameter, for example \chardef\x=10 \rep\x{hello}. The first solution needs such parameter to be prefixed by \the.

Čeština ID: 0120 Author: P. O. Published

\newcommand like in LaTeX

Maybe we need to read the LaTeX-like code where \newcommand is used. This macro has somewhat obscure syntax: the square bracket can follow after \newcommand\macro where the number of unseparated parameters are given. If second square brackets follows than the first parameter is set as optional with default value given in this second pair of square brackets. After this, the normal macro body in the braces follows. If the optional parameter is declared, then usage of the \macro is \macro parameters or \macro[first-param] parameters. The #1 is given as default or by the contents in the square brackets. The normal unseparated parameters are #2, #3 etc in such case. Uff.

When we needn't the checking if the macro is defined already and without starred version of the \newcommand then we can define:

\def\newcommand#1{\isnextchar[{\newcommandA#1}{\newcommandA#1[0]}} 
\def\newcommandA#1[#2]{\edef\tmpp{\ifcase#2% 
   \or1\or12\or123\or1234\or12345\or123456\or1234567\or12345678\or123456789\fi}% 
   \edef\tmpp{\expandafter\addhashs\tmpp.}% 
   \isnextchar[{\newcommandB#1}{\long\expandafter\def\expandafter#1\tmpp}% 
} 
\def\newcommandB#1[#2]{% 
   \def#1{\isnextchar[{\runcommand#1}{\runcommand#1[#2]}}% 
   \long\expandafter\def\csname\string#1X\expandafter\endcsname\tmpp 
} 
\def\addhashs#1{\ifx.#1\else #####1\expandafter\addhashs\fi} 
\long\def\runcommand#1[#2]{\csname\string#1X\endcsname{#2}} 

For illustration, suppose \newcommand\macro[4]{foo}. The macro \newcommandA reads the number of the parameters in #2 and this number is converted to #1#2#3#4 into \tmpp macro. Because the optional parameter isn't declared the \macro (i.e #1) is defined directly. If the optional parameter is declared then the control sequence \\macroX is defined as the real macro. And the \macro is defined as \isnextchar[...

Čeština ID: 0086 Author: P. O. Published

Testing text Lorem ipsum dolor sit

Sometimes we need to put a text with no extra meaning to the typesetting area just for testing. Such texts can be generated by the macro \lipsum[number] or \lipsum[from-to]. For example:

\lipsum[13] 
\lipsum[3-27] 

The parameter is the number (numbers) from the range 1 to 150 because there are 150 prepared paragraphs in the file lipsum.sty. The chosen paragraph (paragraphs) is (are) printed.

{\long\def\lipsumskip#1\newcommand\lipsum@i{\newcommand\lipsum@i} 
 \def\lips@par{\lipsumpar}\let\lipsumpar=\relax 
 \def\newcommand#1#{\advance\tmpnum by1 \sxdef{lips:\the\tmpnum}} 
 \tmpnum=0 
 \expandafter\lipsumskip\input lipsum.sty } 
\def\lipsum[#1]{\lipsumA #1\empty-\empty\end} 
\def\lipsumA #1-#2\empty#3\end{\tmpnum=#1 \edef\tmp{\ifx^#2^#1\else#2\fi}% 
   \loop \csname lips:\the\tmpnum\endcsname 
         \ifnum\tmpnum<\tmp \advance\tmpnum by1 \repeat 
} 
\let\lorem=\lipsum 
\let\lipsumpar=\par 

The macro reads an existing file lipsum.sty from LaTeX distribution. The file includes the desired texts. The macro skips the unusual macros from the file first and then the texts are read by the redefined \newcommand.

Čeština ID: 0100 Author: P. O. Published

Hidden text from unprivileged readers

We need to print some text only if the mentioned reader is allowed to print it. We can select a reader who as allowed reader by the macro \showallow{who}. We can select another allowed readers (if needed) by more \showallow commands. Then the command

\showif {admin,students} {text} 

prints the text only if at least one of the mentioned readers (in the comma separated list) is allowed by previous \showallow. The macro works at expansion level only. It means that it expands to {text} if the condition above is passed else it expands to nothing.

\showifbegin {admin,students,others} 
text 
\showifend 

This construction expands to the pure text (not {text}) under the same circumstances: only if at least one mentioned reader is allowed. The verbatim constructions in the text parameter are possible.

I did do this implementation during the talk by Boris Veytsman “TeX and controlled access to information” at TUG 2015 because I was inspired by his idea.

\def\showif#1{\showifA#1,s:!,} 
\def\showifbegin#1{\showifA#1,l:!,} 
\def\showifA#1#2,{\expandafter\ifx\csname s:#1#2\endcsname\relax 
   \expandafter\showifA \else \csname s:#1#2\expandafter\endcsname \fi} 
\long\def\showifT#1:!,{\romannumeral-`\.} 
\long\expandafter\def\csname s:s:!\endcsname#1{} 
\long\expandafter\def\csname s:l:!\endcsname#1\showifend{} 
\def\showifend{} 
 
\def\showallow#1{\expandafter\let\csname s:#1\endcsname=\showifT} 
\def\showdeny#1{\expandafter\let\csname s:#1\endcsname=\relax} 
Čeština ID: 0117 Author: P. O. Published

Linked lists

We implement (as an exercise) the linked lists structure in TeX. The macro \addtolist{name}{data} adds new node with the data to the end of the list name (if the list name is empty then the first node is created). Each node points to the previous and next nodes in the list. The macro \printlist{name} expands to the list of data separated by \seplist in the order from first to the last node of the list name. The macro \printlistrev{name} does the same but expands in reverse order from the last node to the first. These macros work at expand processor level.

\newcount\listnum 
 
\def\addtolist#1#2{\advance\listnum by1 
   \expandafter\ifx\csname l:#1:1\endcsname \relax 
      \setlistnode \relax \relax {#2}{\the\listnum}% 
      \expandafter\edef\csname l:#1:0\endcsname{\the\listnum}% 
   \else 
      \edef\lastnodenum{\csname l:#1:1\endcsname}% 
      \expandafter\resetlistnode \csname l:\the\listnum\endcsname 2\lastnodenum 
      \expandafter\setlistnode \csname l:\lastnodenum\endcsname \relax {#2}{\the\listnum}% 
   \fi 
   \expandafter \edef\csname l:#1:1\endcsname{\the\listnum}% 
} 
\def\setlistnode #1#2#3#4{\expandafter\def\csname l:#4\endcsname{#1#2{#3}}} 
\def\resetlistnode #1#2#3{\def\tmp{\expandafter\def\csname l:#3\endcsname}% 
   \expandafter\expandafter\expandafter\resetlistnumA \csname l:#3\endcsname #2#1} 
\def\resetlistnumA #1#2#3#4#5{\ifcase #4\or\tmp{#5#2{#3}}\or\tmp{#1#5{#3}}\or\tmp{#1#2{#5}}\fi} 
 
\def\printlist#1{\expandafter\ifx\csname l:#1:0\endcsname \relax \else 
   \expandafter\expandafter\expandafter\printlistA 
      \csname l:\csname l:#1:0\endcsname\expandafter\endcsname \fi} 
\def\printlistA#1#2#3{#3\ifx#2\relax \else \listsep 
   \expandafter\expandafter\expandafter\printlistA\expandafter#2\fi} 
 
\def\printlistrev#1{\expandafter\ifx\csname l:#1:1\endcsname \relax \else 
   \expandafter\expandafter\expandafter\printlistAr 
      \csname l:\csname l:#1:1\endcsname\expandafter\endcsname \fi} 
\def\printlistAr#1#2#3{#3\ifx#1\relax \else \listsep 
   \expandafter\expandafter\expandafter\printlistAr\expandafter#1\fi} 
 
\def\listsep{;} 

The list name is implemented as a couple of two macros \l:name:0 (includes the number of the first node) and \l:name:1 (includes the number of the last node). Each node is the macro with name \l:number and with the contents {\prev \next {data}}. The number is unique for each node and the \prev and \next items are another control sequences of the type \l:number and they are the previous and next node in the list or \relax, if there is no previous or next node.

The temporary macro \setlistnode\prev\next{data}{number} creates the next node \l:number with given contents. The temporary macro \resetlistnode{what}{how}{number} replaces only one item in the \l:number node by what. Which item it is depends on the how which is the nuber from 1 to 3. For example \resetlistnode{data}3{number} sets new data to the node number and keeps the pointers \prev and \next untouched.

Čeština ID: 0118 Author: P. O. Published

The list expanded in revesed order

If we need to expand a list of items in reversed order then we needn't to create the linked list from previous OPmac trick. The linked list was mentioned only as an academical problem. We can write, for example

\revlist{aa,bb,ccc,dddd} 

and we get the output dddd,ccc,bb,aa at expansion level, if the \revlist is implemented by:

\def\revlist#1{\revlistA{}#1,,} 
\def\revlistA#1#2,{\ifx,#2,\expandafter\revlistB\else \expandafter\revlistA\fi {#2,#1}} 
\def\revlistB#1{\revlistC #1,} 
\def\revlistC,#1,,{#1} 

Let n denotes the number of items to be reversed. The \revlist macro has its complexity n^2 but linked list can be read in reversed order in linear complexity. On the other hand we need to allocate n control sequences in linked list but only four control sequences when \revist macro is used. This is usual dilemma between speed and memory demands.

Čeština ID: 0119 Author: P. O. Published

Normal underscore outside the math mode

The catcode of the _ (underscore) is set to 8 in plain TeX, so it can be used as a constructor of subscripts in math mode. But the usage of such character outside math mode gives an error. It is less known that you can set normal catcode to underscore (for example 12) but this character works as subscripts constructor in math mode constantly. You can try:

\catcode`_=13 \let_=\sb \catcode`_=12 
 
% test: 
Here is {\tt foo_bar}. And math mode still works: $a_i^2$. 

The main idea is that mathcode of underscore is set to "8000 by plain TeX, so this character behaves as an active character in math mode and only in math mode. Plain TeX sets catcode of the _ to 8, so the mathcode "8000 of this character isn't used (it works only for characters of catcode 11 or 12). The “active behavior” of undescore is declared as \sb and \sb is an alternative to the character of catcode 8, i.e. math subscripts constructor. The result: underscore works as math subscripts constructor only in math mode.

The simple line of code mentioned above gives freedom to the undercore character outside the math mode, but it cannot work porperly if a font with Knuth's obscure encoding is used. This is typical for default fonts CM with one exception: the \tt font respects ASCII encoding. Knuth decided (unfortunately) that ASCII slot for undercore is used for dot accent in other CM fonts. You can leave such curiously encoded fonts for example when you load OTF font in Unicode (in XeTeX) or T1 encoded font (in pdfTeX). If you are using csplain with UTF-8 support then you can do this by adding the following lines at beginning of your document:

in pdfTeX:  \input t1code  % T1 encoding is set 
            \input lmfonts % LM fonty (alternative of CM fonts) in T1 encoding 
 
in XeTeX:   \input ucode   % Unicode encoding is set 
            \input lmfonts % LM fonty (alternative of CM fonts) in Unicode 
Čeština ID: 0156 Author: P. O. Published

Stripping last space from parameter

When a parameter (for example separated by \par) is read then we cannot be sure that there is or isn't a last space in such parameter. We create the expandable macro \stripspace which removes the last space if exists. Another spaces inside the parameter are untouched. Example of usage:

\def\foo#1\par{% maybe #1 ends by an unwanted space 
    \stripspace\fooA{#1}} 
\def\fooA#1{% now, #1 does not include the terminating space. 
    ... \message{"#1"}} 

The \stripspace macro has the following code:

\def\stripspace#1#2{\stripspaceA#2\end/ \end/!#1{#2}} 
\def\stripspaceA#1 \end/#2!#3#4{% 
   \ifx!#2!\stripspaceB{#3{#4}}\else\stripspaceB{#3{#1}}\fi 
} 
\def\stripspaceB#1#2\fi{\fi#1} 

The \end/␣\end/ is added at the end of parameter #1 and this parameter is scanned again separated by ␣\end/. If the rest is empty, then #1 is without terminating space else #1 includes terminating space.

Čeština ID: 0164 Author: P. O. Published

Variant separators of parameters

We can use more variant separators of a queue of parameters. For example comma, semicolon and --. We need to process each parameter individually. For example:

\macro {AAA,BBB;CCC--DDD,EEE} 

must be processed by

\macroX{AAA}{,}\macroX{BBB}{;}\macroX{CCC}{--}\macroX{DDD}{,}\macroX{EEE}{} 

The \macroX gets the separated parameter in #1 and used separator in #2.

We solve this problem using \replacestrings macro. Each separator is replaced by the & character followed by the separator. Next, we read parameters separated by & and the original separator follows immediately. The definition of the \macro from previous example can look like:

\def\macro#1{\def\tmpb{#1}% 
   \replacestrings {,}  {&,}% 
   \replacestrings {;}  {&;}% 
   \replacestrings {--} {&{--}}% 
   \expandafter\macroA\tmpb&{}% 
} 
\def\macroA#1&#2{\macroX{#1}{#2}\ifx&#2&\else\expandafter\makroA\fi} 

Note that the composed separator (from more than one token) must be placed in braces when \replacestrings is used. And the final parameter has no separator, so #2 in \macroX is empty.

Čeština ID: 0165 Author: P. O. Published

Parameter delimited by variant separator

The previous OPmac trick 0165 reads a block of parameters and then the parameters are separated in such block. We need another approach when we are reading only one parameter separated by variant separator and then the next text must be processed normally.

For example, \mymacro have to read a text to the end of current paragraph or to the \enditems token. We can use \vardelim{list of separators} as an prefix of \def\mymacro or \edef\mymacro which is defined with one nonseparated parameter.

\vardelim{\par\enditems}\def\mymacro#1{\message{param:"#1"}} 
 
usage: \mymacro text text 
       \enditems 

The #1 includes text text in this example and the reading of the parameter is finished by \enditems. Warning: the delimiter is kept in the input queue and it is processed after \mymacro is executed. This is important difference from usage of \def\foo#1\separator{...}. If you need to remove the separator, then yo can define \mymacro with two parameters:

\vardelim{\par\enditems}\def\memakro#1#2{\message{param:"#1", separator: "\noexpand#2"}} 

The variant separator must be sigle token in the solution here. If you need more complex macros with multiple-token separators and with more variants then you can use my solution presented here at TeX stackexchange

\long\def\vardelim#1#2#3{% 
   \def#3{\expandafter\vardelimA\csname var\string#3\endcsname{#1}}% 
   \long\expandafter#2\csname var\string#3\endcsname 
} 
\long\def\vardelimA#1#2{\bgroup \let\bgroupT=\bgroup \let\bgroup=\relax \def\tmp{}% 
   \def\vardelimF##1\vardelimN{\fi\expandafter\egroup\expandafter#1\expandafter{\tmp}}% 
   \def\vardelimP{}% 
   \vardelimB#2\vardelimB 
} 
\long\def\vardelimB#1{% 
   \ifx\vardelimB#1\expandafter\vardelimC\else 
      \addto\vardelimP{\vardelimH#1}\expandafter\vardelimB \fi 
} 
\def\vardelimC{\futurelet\next\vardelimD} 
\def\vardelimD{% 
   \ifx\next\bgroupT \vardelimG \fi 
   \expandafter\ifx\space\next \vardelimS \fi 
   \vardelimP 
   \vardelimN 
} 
\long\def\vardelimG#1\vardelimN#2{\fi\addto\tmp{{#2}}\vardelimC} 
\def\vardelimS#1\vardelimN{\fi\addto\tmp{ }\afterassignment\vardelimC\let\next= } 
\long\def\vardelimN#1{\addto\tmp#1\vardelimC} 
\long\def\vardelimH#1{\ifx\next#1\vardelimF\fi} 

The macro reads the parameter token per token {the exception is the token list in the braces} and saves it to \tmp macro. Then the defined macro is processed with {expanded \tmp} as its parameter. The macro works like the \long prefix was used.

Čeština ID: 0166 Author: P. O. Published

Markup

LaTeX markup of chapters and sections

Some text editors are able hide or extract the whole text of chapters, sections, subsections etc. and provides the clickable tree oriented menu for this. Unfortunately, OPmac is here 30 years later than LaTeX and editors don't support the structure markup of chapters, sections and subsections given by OPmac today. If you needn't to solve the reconfiguration of your text editor, you can simply define the basics macros and use the LaTeX markup. For example:

\def\bracedparam#1{\csname\string#1:M\endcsname} 
\def\chapter{\bracedparam\chap} 
\def\section{\bracedparam\sec} 
\def\subsection{\bracedparam\secc} 

If somebody will tune the configuration of used text editor in order to it accepts the OPmac markup, I'll welcome information about it and I'll give the link at my web pages to such solution with pleasure.

Čeština ID: 0036 Author: P. O. Published

Name conflict with \sec macro

OPmac redefines the plain TeX original \sec (secans) to \sec (section). This was an intention of OPmac author because the original meaning \sec (like secans) is almost not used anytime. On the other hand, if you need to use \sec as secans in math mode and \sec as section outside math mode then you can do this by:

\let\section=\sec 
\def\secans{\mathop{\rm sec}\nolimits} 
\def\sec{\relax\ifmmode\secans \else \expandafter\section\fi} 
\addprotect\sec 

Note that \sec is \addproteced. The reason is for working $\sec$ in table of contents, for example:

\sec The meaning of the math function $\sec$ 
Čeština ID: 0129 Author: P. O. Published

Languages

Multilingual texts

OPmac generates the words Chapter/Kapitola/Kapitola, Table/Tabulka/Tabuľka and Figure/Obrázek/Obrázok. There are three variants of each word for English, Czech and Slovak languages. The right variant is used dependent on the current value of the \language register. How to add or modify these words by \sdef can be found in the documentation.

The templates CUstyle and CTUstyle use much more words in three language variants. I used a shorthand macro \mtdef instead or repeated use of \sdef:

\def\slet#1#2{\expandafter\let\csname#1\expandafter\endcsname\csname#2\endcsname} 
\def\mtdef#1#2#3#4{\sdef{mt:#1:en}{#2} \sdef{mt:#1:cs}{#3} 
  \if$#4$\slet{mt:#1:sk}{mt:#1:cs}\else \sdef{mt:#1:sk}{#4}\fi} 
 
\mtdef {abstract}     {Abstract}          {Abstrakt}       {} 
\mtdef {author}       {Author}            {Autor}          {} 
\mtdef {thanks}       {Acknowledgement}   {Poděkování}     {Poďakovanie} 
\mtdef {declaration}  {Declaration}       {Prohlášení}     {Prehlásenie} 
\mtdef {keywords}     {Keywords}          {Klíčová slova}  {Kľúčové slová} 
\mtdef {title}        {Title}             {Název práce}    {Názov práce} 
\mtdef {contents}     {Contents}          {Obsah}          {} 
\mtdef {tables}       {Tables}            {Tabulky}        {Tabuľky} 
\mtdef {figures}      {Figures}           {Obrázky}        {} 
\mtdef {supervisor}   {Supervisor}        {Vedoucí práce}  {Vedúci práce} 
\mtdef {supervisorD}  {Supervisor}        {Školitel}       {Školiteľ} 
\mtdef {bibliography} {References}        {Literatura}     {Literatúra} 
\mtdef {appendix}     {Appendix}          {Příloha}        {Príloha} 
\mtdef {specifi}      {Specification}     {Zadání}         {Zadanie} 
 
\mtdef {B} {Bachelor's thesis} {Bakalářská práce}  {Bakalárska práca} 
\mtdef {M} {Master's thesis}   {Diplomová práce}   {Diplomová práca} 
\mtdef {D} {Ph.D. thesis}      {Dizertační práce}  {Dizertačná práca} 

If the item for Slovak language is missing then it means that it ti the same as for Czech language.

The word is specified by the \mtext macro, for example \mtext{abstract}, \mtext{author}, \mtext{B} etc. The right variant is used depending on the \ehyph, \chyph or \shyph switchers, i.e. depending on the \language register.

Čeština ID: 0014 Author: P. O. Published

Adding a new language

The language management is described in the file hyphen.lan from CSplain package. For the following example we suppose, that the German and Polish languages are added. The \delang and \pllang hyphenation selectors are available after that. We can enlarge the \mtdef macro from previous OPmac trick, we create \mtdefx and we put the word variants in the new languages.

\sdef{lan:21}{de}  \sdef{lan:121}{de} 
\sdef{lan:23}{pl}  \sdef{lan:123}{pl} 
\def\mtdefx#1#2#3{\sdef{mt:#1:de}{#2}\sdef{mt:#1:pl}{#3}} 
 
             % German              % Polish 
\mtdefx {D}  {Ph.D. Dissertation}  {Praca doktorska} 
... 

When the \pllang is active (for example) then \mtext{D} expands to the phrase “Praca doktorska”.

Čeština ID: 0049 Author: P. O. Published

Uppercase of German ß

The UTF-8 character ß is encoded by \ss control sequence in CSplain by encTeX. If we need to print texts converted to upper case, we need to change the ß to SS. This can be done by:

\def\Uppercase#1{\begingroup 
   \def\ss{SS}\uppercase{\edef\tmp{#1}}% 
   \expandafter\endgroup\tmp 
} 
 
\Uppercase{Mainstraße} 
Čeština ID: 0083 Author: P. O. Published

Uppercase \mtext phrases

The \mtext{id} is expanded to the right text in three expansion steps:

\mtext{id} -> \csname mt:id:\csname lan:\the\language\endcsname\endcsname 
\csname mt:id:\csname lan:\the\language\endcsname\endcsname -> \mt:id:cs 
\mt:id:cs -> the declared text 

If we need to convert the declared text to upper case, we need to do it by seven \expandafter's:

\def\exseven{\expandafter\expandafter\expandafter 
             \expandafter\expandafter\expandafter\expandafter} 
...\uppercase\exseven{\mtext{id}}... 
Čeština ID: 0091 Author: P. O. Published

Hebrew -- right to left typesetting

The right to left typesetting is possible by TeXXeT module which is a part of eTeX extension of pdfTeX, for example. CSplain is usually initialized with eTeX extension, so this module is available. The TeXXeT module works with \beginR...\endR commands where right to left typesetting is done, but you need to initialize this by \TeXXeTstate=1 at the beginning of your document.

We prepare the macros \hebrew{...text in Hebrew...} and \hebrewpar{... more paragraphs in Hebrew ...} for typesetting a short parts of text in Hebrew language. We use 8bit font rcjhbltx.tfm which is available in TeX distributions and pdfTeX is able to work with it. The UTF-8 to font encoding is processed by encTeX.

Note: You type the Hebrew characters in the normal order in the UNICODE text editor, but the editor prints the text in reversed order on the screen because it is well known what UNICODE characters can be printed in this reversed order. The characters are saved in normal order into the file. This is reason, why we need to reverse them again in TeX by \beginR...\endR commands.

\TeXXeTstate=1 
\font\hebrewfont=rcjhbltx 
\def\texthebrew#1{\leavevmode\beginR{\hebrewfont#1}\endR} 
\long\def\hebrewpar#1{\par\hbox{\beginR\vbox{\hebrewfont#1}\endR}} 
 
%      sequvence            UTF-8 code                               code in the font 
\mubyte\HEBalef             ^^d7^^90\endmubyte      \chardef\HEBalef              39 
\mubyte\HEBbet              ^^d7^^91\endmubyte      \cahrdef\HEBbet               98 
... 
\mubyte\HEBshin             ^^d7^^a9\endmubyte      \chardef\HEBshin             152 
\mubyte\HEBshinshindotdages ^^ef^^ac^^ab\endmubyte  \chardef\HEBshinshindotdages 153 
... 

The code in the font can be found out in the file cjhebltx.enc which is a part of the TeX distributions. If you are lazy to find UTF-8 codes of all Hebrew alphabet and you are able to write the raw Hebrew characters in the text editor then you can declare the encoding by writing these raw characters directly (without knowledge of their UTF-8 codes). The abbreviation heb-char is used instead raw Hebrew characters in the following example because this WWW page doesn't support Hebrew characters.

\mubytein=0 
%      sequvence           raw character                         code in the font 
\mubyte\HEBalef             heb-char\endmubyte  \chardef\HEBalef              39 
\mubyte\HEBbet              heb-char\endmubyte  \cahrdef\HEBbet               98 
... 
\mubyte\HEBshin             heb-char\endmubyte  \chardef\HEBshin             152 
\mubyte\HEBshinshindotdages heb-char\endmubyte  \chardef\HEBshinshindotdages 153 
... 
\mubytein=1 

If somebody is willing to release the whole encoding file of Hebrew characters using this OPmac trick, I'll be happy to give the link here.

The similar technique (but without right to left typesetting) is used in the file cyrchars.tex for Cyrillic characters. This file is the part of the CSplain package and the documentation and examples are included in this file.

Čeština ID: 0092 Author: P. O. Published

Math

Czech texts in math

The accented characters from Czech alphabet (č, á, ř etc.) don't work in math because they have no class 7 and they are no a part of the math alphabet. In the fraction $cena \over výkon$ (i.e. $price \over performance$) we need to print the texts in script size. The solution $\hbox{cena}\over\hbox{výkon}$ doesn't set the right size of the texts. The solution $\rm cena\over výkon$ does work with CSfonts but when we switch to another font family, the ý will not print. We can put the Czech alphabet into math class 7 by:

\def\setmathalphabetcode#1{\ifx\XeTeXmathcode\undefined 
     \tmpnum=\itfam \multiply\tmpnum by256 \advance\tmpnum by`#1 
     \advance\tmpnum by"7000 \mathcode`#1 = \tmpnum \relax 
   \else \XeTeXmathcode`#1 = 7 \itfam `#1 \fi 
} 
\def\mathalphabetchars#1{\if^#1^\else 
   \setmathalphabetcode#1\expandafter\mathalphabetchars\fi} 
 
\mathalphabetchars ÁáÄäČčĎďÉéĚěÍíĹ弾ŇňÓóÖöÔôŔŕŘřŠšŤťÚúŮůÜüÝýŽž{} 

Now, all Czech characters have the same property as another characters for math typesetting. The are default in math italics and they are switchable to another math families. It is needed to load the math fonts wit these characters, of course. This cannot be always implemented (unfortunately).

The macro \setmathalphabetcode sets the class 7 with the default family \tifam. If there isn't present Unicoded TeX-engine then the \mathcode primitive is used else \XeTeXmathcode primitive is used.

Čeština ID: 0025 Author: P. O. Published

The reference to the previous equation

We need to refer to the immediate previous equation in our math text very often. It is less comfortable to create labels for such references. It is sufficient to write \eqmark in the equation and to do the reference by \lasteq sequence and to do the reference to the previous last or pre-previous last equation by \preveq2 or \preveq3 sequences. For example:

$$a^2 + b^2 = c^2  \eqmark$ 
Previous equation \lasteq\ is the assertion of the Pythagoras Theorem. 

We can implement the \lasteq and \preveq by the code:

\newcount\eqlabnum 
\addto\eqmark{{\global\advance\eqlabnum by1 
               \edef\lastlabel{.eqlab:\the\eqlabnum}\wlabel\thednum}} 
\def\preveq#1{\tmpnum=\eqlabnum\advance\tmpnum by-#1\advance\tmpnum by1 
              \ref[.eqlab:\the\tmpnum]} 
\def\lasteq{\preveq1} 

The global register \eqlabnum is introduced here. The internal label .eqlab:\the\eqlabnum is saved by \eqmark and \eqlabnum is incremented.

Čeština ID: 0028 Author: P. O. Published

Expandable tilde over math formula of arbitrary size

The plain TeX's macro \widetilde provides three sizes of the tilde used by font pointers. No more. This isn't sufficient when we need to set the tilde above a large formula. The macro \overtilde is suggested here. It measures the formula width and set the appropriate tilde scaled by \pdfscale. For example:

$$\displaylines{ 
  \overtilde{b} + \overtilde{ab} + \overtilde{a+bc}+{}\cr 
  {}+\overtilde{b+c+d}+ \overtilde{a+b+c+df} 
}$$ 

gives the result:

overtilde example

The macro \overtilde is defined by:

\mathchardef\widetildemax="0367 
 
\def\widetildeto #1{\bgroup\tmpdim=#1\setbox0=\hbox{$\widetildemax$}% 
   \tmpdim=16\tmpdim \tmpnum=\tmpdim \tmpdim=\wd0 \divide\tmpdim by16 
   \divide\tmpnum by\tmpdim 
   \hbox to#1{\pdfsave\rlap{\pdfscale{\the\tmpnum}{\ifnum\tmpnum<588 1\else\the\tmpnum\fi}% 
                            \pdfscale{.00390625}{\ifnum\tmpnum<588 1\else.0017\fi}% 
                            \vbox to0pt{\hbox{$\widetildemax$}\vss}}\pdfrestore\hss}% 
   \egroup 
} 
\def\overtilde#1{\setbox1=\hbox{$#1$}% 
  \vbox{\offinterlineskip \halign{\hfil##\hfil\cr 
        \widetildeto{\wd1}\cr\noalign{\kern.5ex\kern.02\wd1}\box1\cr}}% 
} 

The macro \widetildeto does resizing of \widetildemax to the desired size #1. The numerator for the ratio calculation is scaled by 16 and the denominator is scaled by 1/16. So, the result is scale by 256 than the real ratio. This is the reason why the \pdfscale{ratio} id followed by \pdfscale{.00390625} which is 1/256. The height of the tilde is unscaled up to the ration 588/256. If the ratio is greater then the height is scaled by 0.4352 times original height. The macro \overtilde measures the formula in \box1 and calls the \widetildeto. The tilde is typeset above the formula by \halign.

Čeština ID: 0070 Author: P. O. Published

Math text (in box) depending on mathstyle

LaTeX provides the \text{foo} macro which prints foo in math mode similarly as \hbox{foo} but the size of the text depends on the math style (text/script/scriptscript). The outer math context is saved, so the $...$ inside the \text parameter opens the math typesetting in the same context (displaystyle, textstyle, etc.).

We create the similar macro \mathbox{text} which behaves as described above. Only three lines of code is needed when OPmac is used:

\def\mathbox#1{{\mathchoice{\mathboxA\displaystyle[]{#1}}{\mathboxA\textstyle[]{#1}} 
    {\mathboxA\textstyle[700]{#1}}{\mathboxA\textstyle[500]{#1}}}} 
\def\mathboxA#1[#2]#3{\hbox{\everymath={#1}\if^#2^\else\typoscale[#2/]\relax\fi #3}} 
Čeština ID: 0078 Author: P. O. Published

Repeating math symbols at break points

There is a rule about repeating math binary operators and relations at break points in traditional Czech typesetting (maybe elsewhere too). We prepare a macro \mrepeatchar char, it re-declares the char as math-active and the character repeats itself at break points in paragraph. Also, we prepare a macro \mrepeatcs \seqA \seqB \seqC ... \relax, it re-declares given control sequences in similar manner. For example:

\mrepeatchar+ \mrepeatchar- \mrepeatchar= \mrepeatchar< \mrepeatchar> 
\mrepeatcs \approx \asymp \bot \cap \cdot \circ \cup \diamond 
   \div \equiv \geq \gg \in \leq \ll \odot \oplus \oslash \otimes \paralell 
   \perp \pm \prec \peceq \sim \simeq \subset \subseteq \supset \supseteq 
   \top \triangle \triangleleft \triangleright \uplus \vdash \vee \wedge \relax 
 
\hsize=5cm 
Test $a\sim b\sim c\sim d\sim e\sim f\sim g\sim i\sim k\sim l\sim m$. 
 
Also test $a+b+c+d+e+f+g+h+y+f<e<w<e$. 

When a character is re-declared (for example \mrepeatchar+) then you can use \NR+. This behaves as normal + in math typesetting. When a sequence is re-declared (for example \mrepeatcs \sim \relax) then the \NRsim control sequence is available with the original meaning of \sim.

The implementation follows:

\def\NR#1{\csname NR:\string#1\endcsname} 
\def\mrepset#1{\begingroup \lccode`\~=`#1\lowercase{\endgroup\edef~}} 
\def\mrepeatchar#1{% 
   \isNRno\NR#1{\mathchardef\NR#1=\mathcode`#1 }% 
   \mrepset#1{\NR#1\nobreak \discretionary{}{\hbox{$\NR#1$}}{}} 
   \mathcode`#1="8000 
} 
\def\NRs#1{\csname NR\expandafter\NRx\string#1\endcsname} \def\NRx#1{} 
\def\mrepeatcs#1{\ifx#1\relax \else 
   \isNRno\NRs#1{\let\NRs#1=#1}% 
   \edef#1{\NRs#1\noexpand\nobreak \discretionary{}{\hbox{$\NRs#1$}}{}}% 
   \expandafter\mrepeatcs\fi 
} 
\def\isNRno#1#2#3{\expandafter\expandafter\expandafter\ifx#1#2\relax 
   \expandafter\expandafter\expandafter#3\else 
   \message{\string#2\space declared already}\fi} 

The solution is robust. You can use smart characters in titles of chapters or sections without problems.

Čeština ID: 0148 Author: P. O. Published

Intelligent \dots like in AMSTeX

AMSTeX provides interesting macros. You can do \input amstex *before* \input opmac and you can utilize these macros. But you must write \catcode\@=12 immediately after \input amstex because AMSTeX sets this character as active and this brings only problems.

Or you can use your own macros. For example the \dots macro works by the context in AMSTeX. It behaves as normal \dots in text mode, as \cdots or \ldots in mathmode. The result depends on the fact, what characters are surrounded by the \dots. It means:

$$ 
  a_1,\dots a_n, \quad           % behaves like \ldots 
  a_1 + \dots + a_n, \quad       % behaves like \cdots 
  A_1 \subset \dots \subset A_n  % behaves like \cdots 
$$ 

This intelligence can be given to the \dots macro by the code:

\let\textdots=\dots 
\def\dots{\ifmmode \expandafter\mathdots \else \expandafter\textdots \fi} 
\def\mathdots{\futurelet\next\mathdotsA} 
\def\mathdotsA{\mathdotsB +-=<>()[]\{\}\langle\rangle \end 
   \edef\tmpb{!\meaning\next}% 
   \expandafter\isinlist\expandafter\tmpb\expandafter{\expandafter!\string\mathchar"}% 
   \iftrue \expandafter\mathdotsC\tmpb \end \else \ldots \fi 
   \relax 
} 
\def\mathdotsB#1{\ifx\end#1\else 
      \ifx\next#1\cdots \expandafter\expandafter\expandafter\skiptorelax 
      \else \expandafter\expandafter\expandafter\mathdotsB 
   \fi\fi 
} 
\def\mathdotsC#1"#2#3\end{\let\next=\ldots 
   \ifnum#2=1 \let\next=\cdots \fi % Big OP 
   \ifnum#2=2 \let\next=\cdots \fi % Bin 
   \ifnum#2=3 \let\next=\cdots \fi % Rel 
   \ifnum#2=4 \let\next=\cdots \fi % Open 
   \ifnum#2=5 \let\next=\cdots \fi % Close 
   \next 
} 

The \mathdots macro inserts to the \next the following token in math mode. The test is processed by \mathdotsA and \mathdotsB: if the following token is one of +-=<>()[]{} then \cdots is inserted and the \skiptorelax finishes the work. Else the token is tested to \matchar type (like \le). If no, \ldots is inserted. Else the class of the \matchar is examined. If the class is 1, 2, 3, 4 or 5 then \cdots is inserted else \ldots is used.

Čeština ID: 0084 Author: P. O. Published

\dddot for third derivation

Plain TeX provides only \ddot x for second derivations of x by t. The macro \ddot is implemented by \mathaccent. But there is no triple dot as an accent in math fonts. So, the macro \dddot for third derivations is slight more complicated:

\def\dddot#1{{\mathpalette\dddotA{#1}}} 
\def\dddotA#1#2{\setbox0=\hbox{$#2$}\tmpdim=\ht0 \mathop{#2\kern0pt}\limits 
   ^{\vbox to0pt{\kern-.04em\hbox to0pt{\hss\it$#1.\mkern-1.5mu.\mkern-1.5mu.$% 
     \kern-\slantcorr\hss}\vss}}} 

The macro works in all math sizes due to \mathpalette. The \slantcorr macro from OPmac is used for horizontal placement of the accent with respect to the slanted axis of the base character. The constants used in the macro were chosen in order to reach the maximal likeness with \ddot output. You can compare the quality of the output of this \dddot and the LaTeX output with amstex.sty package...

Čeština ID: 0145 Author: P. O. Published

Greek letters in \bbchar family

OPmac uses ams-math.tex file where the msbm*.tfm fonts (from AMS) are loaded for \bbchar math family. The letters are better, but the blackboard lowercase Greek letters are missing here. These are included in bbold*.tfm fonts, but the letters are more ugly. If you need the bb Greek letters then we show here how to replace one math family by another font. Specially the font msbm* by bbchar*. Then you can write:

$\alpha = {\bbchar\alpha}$ 

and the result is “normal alpha is equal to blackboard alpha”. The file ams-math.tex shows that \bbchar is math family 5 with the label msbm, so you can use the following macros:

\regtfm msbm 0 bbold5 5.5 bbold6 6.5 bbold7 7.5 bbold8 8.5 bbold9 
             9.5 bbold10 11.1 bbold12 15 bbold17 * % using bbchar from bbold*.tfm 
 
\mathchardef\bbalpha="50B   \mathchardef\bbbeta="50C    \mathchardef\bbgamma="50D 
\mathchardef\bbdelta="50E   \mathchardef\bbepsilon="50F \mathchardef\bbzeta="510 
\mathchardef\bbeta="511     \mathchardef\bbtheta="512   \mathchardef\bbiota="513 
\mathchardef\bbkappa="514   \mathchardef\bblambda="515  \mathchardef\bbmu="516 
\mathchardef\bbnu="517      \mathchardef\bbxi="518      \mathchardef\bbpi="519 
\mathchardef\bbrho="51A     \mathchardef\bbsigma="51B   \mathchardef\bbtau="51C 
\mathchardef\bbupsilon="51D \mathchardef\bbphi="51E     \mathchardef\bbchi="50F 
\mathchardef\bbpsi="520     \mathchardef\bbomega="57F 
 
\addto\bbchar{\let\alpha\bbalpha \let\beta\bbbeta \let\gamma\bbgamma 
   \let\delta\bbdelda \let\epsilon\bbepsilon \let\zeta\bbzeta \let\theta\bbtheta 
   \let\iota\bbiota \let\kappa\bbkappa \let\lambda\bblambda \let\mu\bbmu 
   \let\nu\bbnu \let\xi\bbxi \let\pi\bbpi \let\rho\bbrho \let\sigma\bbsigma 
   \let\tau\bbtau \let\upsilon\bbupsilon \let\phi\bbphi \let\chi\bbchi 
   \let\psi\bbpsi \let\omega\bbomega 
} 
Čeština ID: 0144 Author: P. O. Published

Upright greek letters in math

The $\beta$ and $\rm\beta$ prints the same result: italic beta. This behavior can be changed by \smartgreek declaration. Then the \rm selector prints greek lowercase letters in math upright. The \smartgreek macro looks like:

\def\setsmartgreek{% 
   \expandafter\ifx\csname updelta\endcsname\relax \eurmgreek \fi 
   \escapechar=-1 \setsmartgreekA 
      \alpha\beta\gamma\delta\epsilon\zeta\eta\theta\iota\kappa\lambda\mu\nu\xi\pi\rho\sigma 
      \tau\upsilon\phi\chi\omega\varepsilon\vartheta\varpi\varrho\varsigma\varphi\relax 
   \escapechar=`\\ 
} 
\def\setsmartgreekA#1{\ifx#1\relax \else 
   \expandafter \let \csname ori\string#1\endcsname = #1% 
   \edef#1{\relax \noexpand\ifnum\fam=0 \thecsname up\string#1\endcsname 
           \noexpand\else \noexpand\ifnum\fam=\rmfam \thecsname up\string#1\endcsname 
           \noexpand\else \thecsname ori\string#1\endcsname 
           \noexpand\fi \noexpand\fi}% 
   \expandafter\setsmartgreekA \fi 
} 
\def\thecsname{\expandafter\noexpand\csname} 
\def\eurmgreek{\regtfm eurm 0 eurm5 6 eurm7 8.5 eurm10 * 
   \csname newfam\endcsname \eurmfam \tmpnum=\eurmfam \advance\tmpnum by-10 
   \edef\eurmh{\ifcase\tmpnum A\or B\or C\or D\or E\or F\fi}% 
   \addto\normalmath{\loadmathfamily {\eurmfam} eurm }\normalmath 
   \addto\boldmath{\loadmathfamily {\eurmfam} eurm }% 
   \mathchardef \upalpha "0\eurmh 0B    \mathchardef \upbeta  "0\eurmh 0C 
   \mathchardef \upgamma "0\eurmh 0D    \mathchardef \updelta "0\eurmh 0E 
   \mathchardef \upepsilon "0\eurmh 0F  \mathchardef \upzeta  "0\eurmh 10 
   \mathchardef \upeta   "0\eurmh 11    \mathchardef \uptheta "0\eurmh 12 
   \mathchardef \upiota  "0\eurmh 13    \mathchardef \upkappa "0\eurmh 14 
   \mathchardef \uplambda "0\eurmh 15   \mathchardef \upmu    "0\eurmh 16 
   \mathchardef \upnu   "0\eurmh 17     \mathchardef \upxi   "0\eurmh 18 
   \mathchardef \uppi   "0\eurmh 19     \mathchardef \uprho   "0\eurmh 1A 
   \mathchardef \upsigma   "0\eurmh 1B  \mathchardef \uptau   "0\eurmh 1C 
   \mathchardef \upupsilon "0\eurmh 1D  \mathchardef \upphi   "0\eurmh 1E 
   \mathchardef \upchi   "0\eurmh 1F    \mathchardef \uppsi   "0\eurmh 20 
   \mathchardef \upomega   "0\eurmh 21  \mathchardef \upvarepsilon "0\eurmh 22 
   \mathchardef \upvartheta "0\eurmh 23 \mathchardef \upvarpi   "0\eurmh 24 
   \let \upvarrho=\varrho \let \upvarsigma=\varsigma 
   \mathchardef \upvarphi   "0\eurmh 27 
} 

If tx-math is loaded then \upalpha, \upbeta etc. are ready and they are used. Else the upvariants are declared using eurm font and using macro \eurmgreek. The \setsmartgreek macro redefines characters \alpha, \beta, etc. by the following way:

\let\orialpha=\alpha 
\def\alpha{\relax \ifnum\fam=0 \upalpha \else \ifnum\fam=\rmfam \upalpha \else \orialpha \fi\fi} 
Čeština ID: 0130 Author: P. O. Published

Normal \bf and \bi in math mode

OPmac uses ams-math.tex macro (from CSplain) to load the math fonts. This file sets math \bf and \bi as *sans serif* variants of bold fonts becaue it is common in Czech math typesetting. If you need to use normal \bf and \bi in math mode then you can write:

\addto\normalmath{% 
   \setmathfamily {\bffam} \tenbf  \setmathfamily {\bifam} \tenbi 
} 
\addto\boldmath{% 
   \setmathfamily {\bffam} \tenbf  \setmathfamily {\bifam} \tenbi 
} 
\normalmath 

It is very uncommon to have super-bold variants in font family, thus \boldmath is declared with the same fonts as \normalmath. If you have superbold variants (say heavy-bf and heavy-bi) then you can write:

\addto\boldmath{% 
   \loadmathfamily {\bffam} heavy-bf \setmathfamily {\bifam} heavy-bi 
} 
Čeština ID: 0146 Author: P. O. Published

Vectors in sansserif bold including greek letters

The OPmac trick above mentions the bahavior of \bf and \bi in math as sansserif bold because this is more common in Czech traditional typesetting of math. Sometimes we need to use upright sansserif bold letters for matrices and slanted for vectors, but both will be marked by the same way: \_A\_x = \_b. Moreover, default \bf nor \bi does not work with greek letters, but we need to use \_\gamma for bold sansserif gamma, for instance. This should be done by the following code:

\addto\normalmath{\loadmathfamily 12 cmbrmb10 \loadmathfamily 13 cmssbx10 } 
\normalmath 
 
\def\_#1{{\expandafter\vecboldify\string#1\end}} 
\addto\boldmath{\loadmathfamily 12 cmbrmb10 \loadmathfamily 13 cmssbx10 } 
\def\vecboldify#1#2\end{% 
   \ifx\relax#2\relax 
      \ifnum\lccode`#1=`#1\bi#1\else\bf#1\fi % skolněná malá, stojatá velká  
   \else 
      \expandafter\expandafter\expandafter\vecboldifyG % tučný sans pro řečtinu 
      \expandafter\meaning \csname #2\endcsname\end 
   \fi 
} 
\def\vecboldifyG #1"#2#3\end{\ifx7#2\fam13\mathchar"7#3 \else \mathchar"C#3 \fi} 

First, the font cmbrmb10 with greek sansserif bold is included as math family 12. It does not include upright uppercase greek letters, unfortunately. So, the font cmssbx10 with such letters is loaded too.

The \_ macro checks if given parameter is letter or control sequence using \string. If it is letter then \bi or \bf is used. Else we need to know the mathcode of given control sequence: the \meaning is used. If such code begins by 7 then it is uppercase greek (family 13 is used} else it is lowercase greek (family 12=C is used).

Čeština ID: 0170 Author: P. O. Published

Dynamically allocated math families

Classical TeX and pdfTeX have a limit of maximal 16 math families of fonts in one formula. OPmac uses ams-math.tex or tx-math.tex and these macros allocate 12 resp. 14 math families statically (for whole document). But you can allocate less math families statically and other families will be allocated dynamically (on demand) inside each formula. The result: you can have arbitrary number of math families in your document (but the limit 16 to one formula is still valid).

We create a macro \dfam{family-name} which behaves similar as \fam=family-number inside formula, but the family is dynamically allocated. Moreover, we create a macro

\dmathchardef \sequence class{family-name}hexa-code 

which declares the \sequence similarly as \matchardef does it, but the appropriate math family is dynamicaly allocated only if the \sequence is used in the formula. For example, we suppose that the families eufm (for fractur) and rsfs (for script) are not loaded statically. Then you can declare families at beginning of your document:

% in general: \sdef{dfam:family-name}{font-name-as-in-\loadmathfamily} 
\sdef{dfam:fractur}{eufm}   \def\fractur{\dfam{fractur}} 
\sdef{dfam:script}{rsfs}    \def\script{\dfam{script}} 
% ... 
\dmathchardef\foo 0{fractur}00  % character class 0 code 00 (hex) from fractur family 
% ... 

and next you can use it:

$a \times {\script B} = {\fractur C}$, a taky $ \beta = \foo^2 $. 

Two formulae are in this example. The script and fractur families are loaded in the first formula and only fractur is loaded in the second formula. Of course, the statically loaded families are used in both formulae too.

The implementation:

\chardef\numfamilies=\count18  % the number of statically loaded families 
\everymath={\dfamstart} \everydisplay{\dfamstart} \def\dfamlist{} 
\def\dfamstart{\aftergroup\dfamreset \let\dfamstart=\relax} 
\def\dfamreset{\global\count18=\numfamilies \gdef\dfamlist{}} 
 
\def\dfam#1{\relax 
   \expandafter\ifx\csname dfam:#1\endcsname \relax 
      \opwarning{dynamic math family "#1" is not declared}% 
   \else 
      \isinlist\dfamlist{,#1,}\iftrue \else 
         \begingroup \def\wlog##1{}% 
            \csname newfam\expandafter\endcsname \csname dmn:#1\endcsname 
            \globaldefs=1 
            \loadmathfamily{\csname dmn:#1\endcsname} {\csname dfam:#1\endcsname} 
         \endgroup 
         \global\addto\dfamlist{,#1,}% 
         \tmpnum=\csname dmn:#1\endcsname 
         \ifnum \tmpnum<10 \sxdef{dmh:#1}{\the\tmpnum}\else 
            \advance\tmpnum by-10 
            \sxdef{dmh:#1}{\ifcase\tmpnum A\or B\or C\or D\or E\or F\fi}% 
      \fi\fi 
      \fam=\csname dmn:#1\endcsname\relax 
   \fi 
} 
\def\dmathchar#1#2#3#4{\relax 
   \ifnum#1=0{\fi  % 2^\foo will work, don't need to write 2^{\foo} 
   \isinlist\dfamlist{,#2,}\iftrue\else\begingroup\dfam{#2}\endgroup\fi 
   \mathchar"#1\csname dmh:#2\endcsname#3#4 
   \ifnum#1=0}\fi 
} 
\def\dmathchardef #1#2#3#4#5{\def#1{\dmathchar#2{#3}#4#5}} 
\addprotect\dfam \addprotect\dmathchar 

Dynamically allocated families are loaded by \loadmathfamily on demand and with global settings. The names of such families are stored into \famlist. The control sequence \dmn:name includes the number of the family and \dmh:name includes the hexa digit of such number. The data about loaded families are reset at the end of the formula using \dfamreset. The nested formulae (like \hbox{...$formula$...} inside another formula) don't reset the data because the \dfamstart is set to \relax temporary.

When \dfam is used then small number of statically allocated families are recommended. You do this by redefining \normalmath and \boldmath and by decreasing the \count18 number. The families 0, 1, 2 ad 3 must be loaded statically because the metric information from these families is used by TeX in each formula.

If the family have the bold variant then you can declare such family like this:

\newif \ifboldmath   \boldmathfalse 
\addto\normalmath{\boldmathfalse}  \addto\boldmath{\boldmathtrue} 
% příklad eufm a eufb: 
\sdef{dfam:fractur}{\ifboldmath eufb\else eufm\fi} 
Čeština ID: 0131 Author: P. O. Published

Matrices with one column outside

MatrixR

We create a macro \matrixR for matrices with typical large brackets, but the last column insn't placed inside these brackets, but alongside the right bracket. For example

$$ 
  \matrixR(){ccc}{1&2&3&první řádek\cr 4&5&6&druhý\cr 7&8&9\cr 10&11&12&poslední} 
$$ 

creates the matrix like in the image. The syntax rule for \matrixR is

\matrixR left-bracket right-bracket {declaration} {data} 

where declaration includes a declaration of the inside columns only but data includes next undeclared column which will be printed in text mode outside the matrix brackets.

The implementation:

\def\matrixR#1#2#3#4{% 
   \bgroup \def\tabiteml{$\ }\def\tabitemr{\ $}\dimen0=0pt 
   \def\tabdeclareR{\setbox0=\hbox{\,####\unsskip}\ifdim\dimen0<\wd0 \global\dimen0=\wd0 \fi}% 
   \setbox1=\vbox{\table{#3R}{#4}}% 
   \setbox2=\hbox{$\left#1\vcenter{\copy1}\right#2$}% 
   \dimen1=\wd2 \advance\dimen1 by-\wd1 \divide\dimen1 by2 
   \def\tabdeclareR{\rlap{\kern\dimen1 \,####\unsskip}}% 
   \left#1\vcenter{\table{#3R}{#4}}\right#2\kern\dimen0 
   \egroup 
} 

The printing is done in two steps. The \table with additional declarator R is used in the first step. The R declaration doesn't print the column, only measures the maximal width and stores it to \dimen0. The result of the first step is saved to box1. The box2 includes the large brackets around box1. We calculate the width of the large bracket (from the difference between box2 and box2) and save this width to \dimen1. The second step prints the matrix. The last column R is printed as \rlap with \kern\dimen1. Finally the \kern\dimen0 is added after matrix is printed in order to the (possibly) next printing material be placed after the last column.

You can create \matrixL or \matrixLR macros analogically.

Čeština ID: 0137 Author: P. O. Published

Matrices with one row outside

We create a macro \matrixA which behaves the same as \matrixR from previous OPmac trick 0137, but the first row is above the matrix. The user can combine this feature with the last undeclared column which is alongside the matrix. If the undeclared column isn't used then only first row is outside the matrix. The macro \matrixB acts like \matrixA, but first row is normally inside the matrix and the last row is below the matrix.

The syntax rule for \matrixA and \matrixB is the same as for \matrixR:

\matrixA left-bracket right-bracket {declaration} {data} 

The implementation:

\def\matrixA#1#2#3#4{% 
   {\mathop{\matrixI#1#2{#3}{\noalign{\kern-\normalbaselineskip}#4}}% 
    \limits^{\textstyle\mathstrut}}} 
\def\matrixB#1#2#3#4{% 
   {\mathop{\matrixI#1#2{#3}{#4\crcr\noalign{\kern-\normalbaselineskip}}}% 
    \limits_{\textstyle\mathstrut}}} 
\let\matrixI=\matrixR  % use \matrixR from OPmac trick 0137 

The matrix has the row outside because of \kern-\normalbaselineskip. The matrix is typeset as \mathop and the invisible sup/super-script is added above/below the matrix in order to the lapped row have its common height. The user can say \let\matrixI=\matrixL or \let\matrixI=\matrixLR if the left-outside column is needed and if \matrixL and \matrixLR macros are defined.

Čeština ID: 0138 Author: P. O. Published

Visual marks in math

mspecdef example

It is more comfortable to use <= instead \leq, ==> instead \Rightarrow, +- instead \pm etc. in source file in math. For example:

$$ a <= b <= c ==> a <= c $$ 

This feature can be declared by \mspecdef macro, for example:

\mspecdef <<   \ll 
\mspecdef <>   \neq 
\mspecdef <=   \leq 
\mspecdef <=>  \Leftrightarrow 
\mspecdef >>   \gg 
\mspecdef >=   \geq 
\mspecdef -+   \mp 
\mspecdef +-   \pm 
\mspecdef ==   \equiv 
\mspecdef =.   \doteq 
\mspecdef ==>  \Rightarrow 

The \mspecdef macro is defined as follows:

\def\skipnext#1#2{#1} 
\def\trynext#1{\trynextA#1.\relax\relax} 
\def\trynextA#1#2\relax#3\relax#4#5{% 
   \ifx\relax#2\relax \def\next{#4}\else 
      \def\next{\isnextchar#1{\skipnext{\trynextA#2\relax#3#1\relax{#4}{#5}}}{#5#3}}\fi 
   \next 
} 
\def\mspecdefA#1#2#3 #4{\ifx#2\undefined 
   \def#2{\trynext{#3}{#4}{#1}}\else 
   \toks0={\trynext{#3}{#4}}\toks1=\expandafter{#2}% 
   \edef#2{\the\toks0{\the\toks1}}\fi 
} 
\def\mspecdef#1{% 
   \ifcat_#1 \expandafter\let\csname m:#1\endcsname=X \catcode`#1=12 \fi 
   \expandafter\ifx\csname m:#1\endcsname\relax 
      \expandafter\mathchardef\csname m:#1\endcsname=\mathcode`#1 \fi 
   \mathcode`#1="8000 \begingroup \lccode`~=`#1 
   \lowercase{\endgroup\expandafter\mspecdefA\csname m:#1\endcsname~}% 
} 

The idea: when we do \mspecdef ax \U \mspecdef axy \V \mspecdef abcd \W then the a character is set as math-active (i.e. \matcode is "8000) and it is defined as

\def a{\trynext{bcd}\W{\trynext{xy}\V{\trynext{x}\U{normal a}}}} 

This macro does test if the following string is bcd (using repeatedly called \isnextchar). If it is true then next part of the macro is skipped and \W is processed. Else next part of the macro is processed. This means, that xy is tested. If fails then x is tested and if fails then normal a is printed. Note that the declared strings with the same beginning part (ax, axy here) must be declared in the order from shortest string to longer.

Čeština ID: 0149 Author: P. O. Published

Math style dependent macros

For various typesetting in mathematical mode (display, text, script, scriptscript), the primitive command \mathchoice is used. And plain TeX defines the macro \mathpalette. Both are awkward. The \mathchoice feature could be implemented in TeX using a delayed argument (as in \write) without having to typeset all four math style variations in the TeX. But we cannot do this without interfering with the TeX itself. On the other hand, the macro \mathpalette can be abandoned. We make the macro \varstyle, which is more user-friendly and with far wider options. Macro \varstyle has one parameter to create a math list. Within this parameter it is possible to use \usestyle to switch to math style active at the time of use \varstyle, and it is also possible to use \mathaxis for the distance of the baseline from the mathematical axis and we can define another style-dependent macros using \ifcase\mstylenum D \or T \or S \or SS \fi. For example, a double sum macro (two summation characters across) may look like this:

\def\dbsumR{\ifcase\mstylenum .35\or.25\or.21\or.15\fi em} 
\def\dbsumU{\ifcase\mstylenum .15\or.12\or.09\or.07\fi em} 
\def\doublesum{\mathop{\varstyle{\raise\dbsumU\rlap{$\usestyle\sum$}{\kern\dbsumR\sum}}}} 
 
$\displaystyle \doublesum_{ij}^{DN} \textstyle \doublesum_{ij}^{DN}$ 

The makro \varstyle and friends are defined by \mathchoice:

\newcount\mstylenum 
\def\varstyle#1{\mathchoice{\mstylenum=0 #1}{\mstylenum=1 #1}{\mstylenum=2 #1}{\mstylenum=3 #1}} 
\def\usestyle{\ifcase\mstylenum \displaystyle\or\textstyle\or\scriptstyle\or\scriptscriptstyle\fi} 
\def\mathaxis{\fontdimen22\ifcase\mstylenum \textfont\or\textfont\or\scriptfont\or\scriptscriptfont\fi2 } 
Čeština ID: 0157 Author: P. O. Published

Tables

Table which spans to more columns and rows

New features of the \table macro are introduced in OPmac version Jun. 2017: repeating of declaration parts, the p declarator for paragraphs, the \crlp macro for end rows with partial horizontal line after it and the \mspan macro for table cells over more columns.

We show how to prepare the table

Table example

using \table macro. The example is inspired by the StackExchange question. You can compare the complexity of the LaTeX code mentioned at the StackExchange with the code shown here.

\def\low#1{\vbox to 0pt{\kern1.5ex\hbox{#1}\vss}} 
\def\tabstrut{\vrule height 20pt depth10pt width0pt} 
 
\table{|8{c|}}{\crlp{3-8} 
   \mspan2[c|]{} &\mspan3[c|]{Singular} &\mspan3[c|]{Plural} \crlp{3-8} 
   \mspan2[c|]{} & Neuter & Masculine & Feminine & Masculine & Feminine & Neuter \crl 
   \low I    & Inclusive &\mspan3[c|]{\low O} &\mspan3[c|] X \crlp{2,6-8} 
             & Exclusive &\mspan3[c|]{} &\mspan3[c|] X \crl 
   \low{II}  & Informal  &\mspan3[c|] X &\mspan3[c|] X \crlp{2-8} 
             & Formal    &\mspan6[c|] X \crl 
   \low{III} & Informal  & \low O & X & X &\mspan2[c|] X & \low O \crlp{2,4-7} 
             & Formal    & &\mspan4[c|] X & \crl 
} 

The \tabstrut is redefined here in order to make better table. The \mspan macro is used for spanning cells to more columns and the \crlp macro is used for partial horizontal lines. The \low macro is used for lowering the text to achieve the visual illusion that the text is verticaly aligned over two rows. More general macro for such cases is described in the following OPmac trick 0159.

Čeština ID: 0158 Author: P. O. Published

Vertical centered text in more rows

We create the \crow number {text} macro which lowers the given text to achieve the visual illusion that it is aligned verticaly in number rows, the first of them is the actual row. Then we can replace the ad hoc macro \low {text} (from previous example) by more general \crow2 {text}.

\def\crow{\afterassignment\crowA \tmpnum=} 
\def\crowA#1{\setbox0=\hbox{\tabstrut}\tmpdim=\ht0 \advance\tmpdim by\dp0 
   \tmpdim=\the\tmpnum\tmpdim 
   \vbox to0pt{\kern-\ht0 \vbox to\tmpdim{\vss\hbox{#1}\kern-\prevdepth\vss}\vss}% 
} 
 

The \crow macro saves the number in \tmpnum and starts \crowA. The \tmpdim is saved as number times the total height of the \tabstrut and the \vbox to\tmpdim is constructed hidden in \vbox to0pt.

Note that the \crow macro works properly only when all table rows have the same \tabstrut height. It will not work when table rows include a multirow cells (paragraphs), where we don't know the exact rows height beforehand. Then you must return to a macro like \low from previous OPmac trick and you must set the position of the text manually. If you insist on automatic calculation for such vertical centering then you can replace \halign by the “transposed” primitive \valign, see this thread for more information about it.

Čeština ID: 0159 Author: P. O. Published

Variations of paragraphs with p declarator

The OPmac manual writes that the paragraph in the table cell declared by p{size} is left-right aligned as default paragraphs. But this can bring some problems in narrow columns. This is a reason why p{size\raggedright} is mentioned in the manual as an alternative which declares left aligned paragraps. We can define more alternatives:

\let\fL=\raggedright 
\def\fR{\leftskip=0pt plus 1fill} 
\def\fC{\leftskip=0pt plus1fill \rightskip=0pt plus 1fill} 
\def\fX{\leftskip=\iindent plus1fil 
        \rightskip=\iindent plus-1fil 
        \parfillskip=0pt plus2fil} 

and then the p declaration gives following paragraps:

p{42mm}     ... left-right alligned, 
p{42mm\fL}  ... left aligned, 
p{42mm\fR}  ... right aligned, 
p{42mm\fC}  ... no aligned, centered lines, 
p{42mm\fX}  ... left-right aligned but last line centered. 

Note that left aligned alternative allows word hyphenation but right aligned alternative not (for good typographical reasons). If you want to deny the word hyphenation when \fL is used then you can define simply

\def\fL{\rightskip=0pt plus 1fil} 
Čeština ID: 0160 Author: P. O. Published

Vertical alignment of p cells in table row

OPmac provides only p{size} declarator for pararaph-like table cells. If there are more such cells in one table row then they are aligned vertically by the first line (like \vtop). If you need another alignment (\vcenter or \vbox from TeX primitive point of view), you can define LaTeX like declarators m{size} for vertical centering and b{size} for alignment by the last line. The following code solves it.

\def\paramtabdeclarem#1{\tabiteml{$\vcenter{\hsize=#1\relax 
   \baselineskip=\normalbaselineskip \lineskiplimit=0pt 
   \noindent\vbox{\hbox{\tabstrutA}\kern-\prevdepth}##\unsskip 
   \vbox to0pt{\vss\hbox{\tabstrutA}}}$}\tabitemr 
} 
\def\paramtabdeclareb#1{\tabiteml\vbox{\hsize=#1\relax 
   \baselineskip=\normalbaselineskip \lineskiplimit=0pt 
   \noindent\vbox{\hbox{\tabstrutA}\kern-\prevdepth}##\unsskip}\tabitemr 
} 

Note that we add one strut at the beginning of the text with zero depth and second strut at the end of the text with zero height. The interline spacing in the paragraph is given by \normalbaselineskip.

Čeština ID: 0161 Author: P. O. Published

\crlp and double vertical lines

The \crlp{list} ends the table row and adds the horizontal lines only in selected columns given by the list. It behaves like \crli, it means that the double vertical lines are not intersect. We have the alternative to \crli with the name \crl (including intersections). Is there something similar alternative to \crlp?

The alternative is following: finish the line by \cr and draw the partial horizontal line by \multispan's in each columns. The \multispan can be with empty data cell or with \hrulefill. For example:

\cr \multispan2 & \multispan3\hrulefill & \multipan1 & \mutispan4\hrulefill \cr 

This example behaves like \crlp { 3-5, 7-10 }, but double vertical lines are intersect. You can try:

\def\spankern{\kern-\vvkern\kern-\drulewidth} 
 
\table{||c||c||l}{\crl 
  a & b & c \crli 
  d & e & f \crlp{1-2} 
  g & h & i \cr \multispan2\hrulefill & \multispan1 \cr 
  j & k & l \cr \multispan1\hrulefill & \multispan2 \cr 
  m & n & o \crlp{1} 
  p & q & r \cr \multispan1 & \multispan1\spankern\hrulefill & \multispan1 \cr 
  s & t & u \crlp{2} 
  v & w & x \crl 
} 

See carefully the result---there is another problem: the line created by \multispan's behaves like a little strut, so the another vertical lines are not continuous. We need to hide the horizontal line into typesetting by negative vertical kern. Insert \noalign{\kern-\drulewidth} at the end of the j&k&l and p&q&r lines (after the second \cr in both cases). The \crlp macro inserts such kern automatically, so we need not to solve such problem when using \crlp macro.

Note the definition and usage of \spankern macro. It is used in order to intersect the double line in the previous column.

Čeština ID: 0163 Author: P. O. Published

Verbatim text in tables

We cannot use verbatim text (or another catcode dancing) in the \table data because the parameters \table {declaration}{data} are read before typesetting, the {data} parameter is not read during typesetting. But you can use a slight modified macro \verbtable:

\activettchar" 
 
\tableverb{declaration} 
data including "#&$" verbatim 
\etable 

Note that there is a differnece: data is not in the barces but it is closed by \etable macro.

\def\tableverb{\vbox\bgroup \catcode`\|=12 \tableB} 
\def\tableB#1{\offinterlineskip \colnum=0 \def\tmpa{}\tabdata={}\scantabdata#1\ 
   \halign\expandafter\bgroup\the\tabdata\cr} 
\def\etable{\crcr\egroup\egroup} 
Čeština ID: 0162 Author: P. O. Published

Tables like in booktabs package

The orthodox advocates of LaTeX booktabs package don't like the tables form the example above and they point out that I am loser because I don't know that the vertical rules in the table are out. Only horizontal rules are allowed but not double rules. And less rules is better than more. They have the following example in the documentation:

Table example

we can create such table by OPmac and without booktabs package:

\table{llr}{                            \crtop 
  \multispan2\hfil Item\hfil&           \cr 
  \multispan2\tablinefil\kern.5em       \cr 
   Animal    & Description & Price (\$) \crmid 
   Gnat      & per gram    &      13.65 \cr 
             & each        &       0.01 \cr 
   Gnu       & stuffed     &      92.50 \cr 
   Emu       & stuffed     &      33.33 \cr 
   Armadillo & frozen      &       8.99 \crbot} 

We only need to define \crtop, \crmid, \crbot macros and to change the width of the \tablinefil:

\def\crtop{\crcr \noalign{\hrule height.6pt \kern2.5pt}} 
\def\crbot{\crcr \noalign{\kern2.5pt\hrule height.6pt}} 
\def\crmid{\crcr \noalign{\kern1pt\hrule\kern1pt}} 
\def\tablinefil{\leaders\hrule height.2pt\hfil\vrule height1.7pt depth1.5pt width0pt } 

Finally, we need to remove the spaces left in the first cell and right in the last cell because the rules have to be aligned wit the text. I've added \kern-.5em to left and right into the line declaration because \tabiteml and \tabitemr are defined by \enspace. This is the reason why the internal OPmac macro \tableA is slightly redefined:

\def\tableA#1#2{\offinterlineskip \def\tmpa{}\tabdata={\kern-.5em}\scantabdata#1\relax 
   \halign\expandafter{\the\tabdata\kern-.5em\tabstrutA\cr#2\crcr}\egroup} 
Čeština ID: 0009 Author: P. O. Published

Colored lines in the table

We can see the trend to use colored tables like this:

Table example

The table above can be created by the \table macro from OPmac:

\frame{\table{llllll}{\crx 
  aa & bb & cc & dd & ee & ff \crx 
  gg & hh & ii & jj & kk & ll \crx 
  mm & nn & oo & pp & qq & rr \crx 
  ss & tt & uu & vv & ww & xx \crx 
  ab & cd & ef & gh & ij & kl \crx 
  mn & op & qr & st & uv & wx}} 

We need to define the \crx macro which inserts the grey rule before each odd line into the vertical list:

\newcount\tabline  \tabline=1 
\def\crx{\crcr \ifodd\tabline \colortabline \fi 
         \global\advance\tabline by1 } 
\def\colortabline{\noalign{\localcolor\LightGrey 
   \hrule height\ht\strutbox depth\dp\strutbox \kern-\ht\strutbox \kern-\dp\strutbox}} 
\def\tabiteml{\quad}\def\tabitemr{\quad} 
Čeština ID: 0010 Author: P. O. Published

Colored cells in the table

We create the column declarators C, R and L with similar behaviour as c, r and l, but the background of each cell can be cloered by chosen color. If the first item in the cell data is color switcher then this color is used for the background of the cell. For example:

   ... & \Blue Text &        ... % blue background and black text 
   ... & \Green \Red  Text & ... % green background and red text 
   ... & \relax \Blue Text & ... % blue text and default background 

The color of the background will stretch as spaces in the common cells in normal table, i.e. C declarator means that colored space will stretch from both sides, L declarator means right stretching and R declarator means left stretching. The spaces from \tabiteml and \tabitemr are colored too.

If \cellcolor sequence is set by \let to the color (example \let\cellcolor=\Yellow) then this color will be used as default background. If the \cellcolor is undefined then default background is transparent.

You can insert the white space between columns by nonzero \tabskip and you can insert the white space between lines by \noalign{\kern...}. Example:

\def\tabstrut{\lower4pt\vbox to15pt{}} 
\tabskip=2pt \def\cskip{\noalign{\kern2pt}} \let\cellcolor=\Yellow 
\table{CLR}{first item      & second & \Blue \White third item \cr\cskip 
            next long item  & \Red X & \Green       YES } 

creates the table:

Table example

Implementation:

\def\tabdeclareC{\futurelet\next\setcellcolor##\end\hfil\hfil} 
\def\tabdeclareL{\futurelet\next\setcellcolor##\end\relax\hfil} 
\def\tabdeclareR{\futurelet\next\setcellcolor##\end\hfil\relax} 
\def\setcellcolor{\ifx\next\global \expandafter\setcellcolorC\else \expandafter\setcellcolorD\fi} 
\def\setcellcolorC#1\fi#2\end#3#4{% 
   \setbox0=\hbox{{\tabiteml\localcolor#2\unskip\tabitemr}}% 
   {\localcolor#1\fi\tabstrut\leaders\vrule\hskip\wd0 \ifx#3\hfil plus1fil\fi}% 
   \kern-\wd0 \box0 
   \ifx#4\hfil {\kern-.2pt \localcolor#1\fi\leaders\vrule\hskip.2pt plus1fil}\fi 
} 
\def\setcellcolorD{\ifx\cellcolor\undefined \let\next=\setcellcolorN 
   \else \def\next{\expandafter\expandafter\expandafter\setcellcolorC\cellcolor}% 
   \fi \next 
} 
\def\setcellcolorN#1\end#2#3{#2\tabiteml{\localcolor#1\unskip}\tabitemr#3} 

The \setcellcolor macro scans the first token from the cell data. The macro works in declaration part of the \halign, so the first token is scanned as the first unexpandable token after expansion. This token is \global when color macro is presented here (see the \setcmykcolor definition). If this is true then the \setcellcolorC macro is executed, #1 is the expanded part of \setcmykcolor (to the last \fi), #2 is the rest of the cell data, #3 and #4 include the message about the align style. This macro measures the cell text in the box0 and does the colored backround by \leaders. If the first token isn't \global then the macro \setcellcolorD decides if the \cellcolor is defined. If it is true then \setcellcolorC is execuded (with patrially expanded \cellcolor as parameter). Else the \setcellcolorN is executed. This macro prints no background.

Čeština ID: 0094 Author: P. O. Published

Colored multispan

We follow the previous OPmac trick and we add the macro \multispanc{number} \Color {Text} which creates the colored cell by \Color background over number columns. If you need to use default background color, write \relax instead \Color.

Example:

\def\tabstrut{\lower4pt\vbox to15pt{}} 
\tabskip=2pt \def\cskip{\noalign{\kern2pt}} \let\cellcolor=\Yellow 
\table{CLR}{\Black\White\bf Table &\multispanc2 \Black {\White\bf Title} \cr\cskip 
            first item      & second & \Blue \White third item \cr\cskip 
            next long item  & \Red X & \Green       YES } 

creates:

Table example

The makro \multispanc can be defined by:

\def\multispanc#1#2#3{\multispan{#1}% 
   \expandafter\expandafter\expandafter\cellcolexp#2#3\end\hfil\hfil\ignorespaces} 
\def\cellcolexp{\futurelet\next\setcellcolor} 
Čeština ID: 0103 Author: P. O. Published

Tables with the given width

We create the macro \tableto{width}{declaration}{data} which prints the table with the given width. The intercolumn spaces will be adjusted to this width. The macro is inspired by \table macro from OPmac and the \tabskip primitive is used here.

\def\tableto{\vbox\bgroup \catcode`\|=12 \tableAto} 
\def\tableAto#1#2#3{\offinterlineskip \def\tmpa{}% 
   \tabdata={\tabskip=0pt plus1fil minus1fil}\scantabdata#2\relax 
   \halign to#1\expandafter{\the\tabdata\tabskip=0pt\tabstrutA\cr#3\crcr}\egroup} 

The spaces \tabiteml and \tabitemr are used only at the left boundary and right boundary of the table. The intercolumn spaces are adjusted.

You can use this macro for example for tables from previous two OPmac tricks. The vertical rules between cells don't work. If you are not the orthodox advocate of the LaTeX booktabs package (and I am not) then you need (we need) to use another macro for vertical rules between cells:

\newdimen\tabw 
\def\countcols#1{\ifx#1\relax\else 
   \ifx#1|\else\advance\tmpnum by2 \fi \expandafter\countcols \fi} 
\def\tableto#1#2#3{{\def\tabiteml{}\def\tabitemr{}\setbox0=\table{#2}{#3}% 
   \tmpnum=0 \countcols#2\relax \tabw=#1\advance\tabw by-\wd0 \divide\tabw by\tmpnum 
   \def\tabiteml{\kern\tabw}\def\tabitemr{\kern\tabw}\table{#2}{#3}}} 

This macro does printing into the box0 first and the \tabiteml and \tabitemr are empty at this state. The desired width is subtracted by width of the box0 and divided by the double number of columns. The result is used in \tabiteml and \tabitemr and the table is printed again.

The advantage of such solution (in comparison to the solution form TBN, page 141) is that we needn't to change the markup of the table in the data. The number of the internal columns is kept.

Čeština ID: 0011 Author: P. O. Published

The cells with paragraph-like formatting

The LaTeX users know the column declaration p and they call this as “parbox” declaration. OPmac provides only c, l and r declarations but user can create another declarations. The following code defines the declaration P for the columns where the text is formatted as paragraph with the given \Pwidth.

\newdimen\Pwidth 
\def\tabdeclareP {\tabiteml\vtop{\hsize=\Pwidth \rightskip=0pt plus1fil 
   \baselineskip=1.2em \lineskiplimit=0pt \noindent ##\tabstrutA}\hss\tabitemr} 

The example of the usage:

\Pwidth=3cm \table{|c|P|}{\crl \tskip3pt 
   aaa & This is text which is divided to more lines. \crl \tskip3pt 
    bb & And here is another long long text. \crl} 

Now, we create the macro \tableto{width}{declaration}{data} similar as in the previous OPmac trick. We suppose that only one P declaration is used in the declaration. The width of the P column will be calculated in order to the whole width of the table is the same as given width.

\newdimen\tabw 
\def\tableto#1#2#3{{\Pwidth=.5\hsize \setbox0=\table{#2}{#3} 
   \tabw=#1\relax \advance\tabw by-\wd0 \advance\Pwidth by\tabw \table{#2}{#3}}} 

This macro prints the table into box0 first with \Pwidth=\hsize. The width of the box0 is measured and the \Pwidth is corrected to the final value. Then the table is printed again.

Čeština ID: 0012 Author: P. O. Published

The extended multiletter column declarations

You can define the column declaration which consist from more than one letter. If such declaration is used then it have to be surrounded by {braces} in the declaration. This keeps the clarity of the declaration. For example we define the set of ic,ir,il declarations which behave as c,r,l, but the italics font is used.

\def\tabdeclareic{\tabiteml\it\hfil##\unsskip\hfil\tabitemr} 
\def\tabdeclareil{\tabiteml\it##\unsskip\hfil\tabitemr} 
\def\tabdeclareir{\tabiteml\it\hfil##\unsskip\tabitemr} 

The example of the usage:

\table{cc{ic}c}{first & second & third & fourth \cr 
                    a &     b &     c &      d } 

The third column will be in the italics but other columns use the current font.

Čeština ID: 0015 Author: P. O. Published

The decimal point aligned in the table

We create the D declaration which provides the typesetting of the aligning of the decimal numbers with decimal comma (the decimal comma is used instead decimal point in Czech).

\def\tabdeclareD{\tabiteml\hfil\scandecnumber##&##\hfil\tabitemr} 
\def\scandecnumber#1,{#1\ifdim\lastskip>0pt \unskip\phantom,\else,\fi&} 

The example of the usage:

\table{lDr}{číslo &   3,24   & první \cr 
            jiné  & 112,1    & druhé \cr 
            celé  &  13     ,& čárka vzadu \cr 
            další &   0,123  & malé} 

Note that if there is a number without decimal comma we need to treat wit this as an exception, i. e. to put the comma at the end of the cell. Such comma will be ignored.

If we need to treat this exception automatically without the decimal comma at the end of the cell then the macro will be much more complicated. It will be outside the slogan “simplicity is power”. We needn't to create useless complicated macros.

The D declaration declares two internal columns of the table. This have to be considered when we skip the cells by \multispan, for example.

Čeština ID: 0016 Author: P. O. Published

The decimal point aligned, another solution

The Opmac trick 0016 solves the aligning of decimal digits in tables with respect to decimal points using two internal columns. But this solution is incompatible with using of \tskip, for example. This is a reason of this new one-column solution.

The new declarator of table column N is created (for example N3). The denotes the maximal number of digits after decimal point used in printed numbers of declared column. Each printed number si completed to this maximal using invisible digits and such modified numbers are aligned to right. So, the decimal points are aligned. The output can be decimal comma instead decimal point (usable in other languages than English) if you re-define the \decimalpoint macro.

The numbers are printed in math mode, so the minus character is printed as real minus.

If the printed item does not include any dot then such text is printed in text mode and it is aligned to center with respect to all decimal numbers in the column. But if such non-dot text is wider than decimal numbers then it is right-aligned. You can declare more decimal digits than they are in real, for example if you need to print wider non-dot text visually better than simply right-aligned. Example:

\table{c|N3}{ 
  Ingredients      & w/w (\%) \crl \tskip.2em 
  Water            & -97.5    \cr 
  Agar powder      &  2.0     \cr 
  Solidum chloride &  0.43  
} 

If the number of digits after decimal points are more than 9 then you must use brackets: N{12}. Finally, you can use non-integer number of decimal digits (N{2.5} for example), if you need to do fine tuning of aligning. The implementation follows:

\def\decimalpoint{.} 
 
\def\paramtabdeclareN#1{\tabiteml\hfil\aligndecdigit#1##.\relax\tabitemr} 
\def\aligndecdigit#1#2.#3{% 
   \ifx\relax#3\hfil#2\unsskip\hfil \else 
   \dimen0=.5em \dimen0=#1\dimen0 $#2$\decimalpoint 
   \expandafter\aligndecdigitA\expandafter#3\fi 
} 
\def\aligndecdigitA#1.\relax{\hbox to\dimen0{$#1$\hss}} 
 
\def\tableA#1#2{\offinterlineskip \colnum=0 \def\tmpa{}\tabdata={}\scantabdata#1\relax 
   \def\tmpb{#2}\replacestrings{\crl}{\crcr\crl}% 
      \replacestrings{\crli}{\crcr\crli}\replacestrings{\crll}{\crcr\crll}% 
      \replacestrings{\crlli}{\crcr\crlli}\replacestrings{\crlp}{\crcr\crlp}% 
   \halign\expandafter{\the\tabdata\cr\tmpb\crcr}\egroup} 
 

The N declarator is defined by \paramtabdeclareN macro, it means a declarator with parameter. The \aligndecdigit macro prints first part of decimal number and \aligndecdigitA does the rest.

The items must be terminated by & or by \cr when N column is created. Using a macro which includes such terminators is unsufficient. But OPmac manual menitons macros \crl, \crli etc., they include \cr terminator. So, we re-define the \Atable preprocessor in order to each occurrence of such \crl (and others) is replaced by \crcr\crl which does the same work in the table. There is another way: you need not to redefine \tableA macro but you must to type \cr\crl instead \crl itself when the N column is the last column of the table.

Čeština ID: 0171 Author: P. O. Published

The table over more than one page

The primitive \halign creates the lines of the table and puts them to the vertical list. This list is breakable to the pages if it is not included in the internal \vbox. This feature can be demonstrated by the simple long table. We need to have the horizontal rules between each line and we needn't to repeat the header of the table at each new page (the header repeating is solved by the next OPmac trick). The user write:

\longtable{|c|c|}{data & data \cr 
                  data & data \cr 
                  ... much more & data ... \cr} 

and the centered table over more pages is printed. The usage of \raggedbottom is recommended for this situation because the lines of the table are not vertically stretchable. The \longtable can be implemented by few lines of the code:

\def\longtable{\goodbreak \bgroup \catcode`\|=12 \tableL} 
\def\tableL#1#2{\setbox0=\table{#1}{#2}\setbox0=\hbox to\wd0{} % table draft 
   \tmpdim=\hsize \advance\tmpdim by-\wd0 \divide\tmpdim by2   % calculation of indent 
   \def\tabstrut{\vrule height1.1em depth.5em width0pt }       %  baselineskip 
   \everycr={\longtablecr}\offinterlineskip                    % \everycr 
   \def\tmpa{}\tabdata={\kern\tmpdim}\scantabdata#1\relax      % \tabdata 
   \halign\expandafter{\the\tabdata\tabstrutA\cr#2\crcr}\egroup\goodbreak} 
\def\longtablecr{\noalign{\nobreak\ltrule\penalty0\kern-.4pt\ltrule\nobreak}} 
\def\ltrule{\moveright\tmpdim\hbox to\wd0{\hrulefill}} 

The main idea of this macro is in the \everycr which inserts after each \cr the code: \noalign{\hrule\penalty0\kern-.4pt\hrule\nobreak}. Two equal rules are printed between each two lines, one rule overlap the second. The penalty 0 between the rules is the point of potential page break. The first rule keeps on the previous page and the second rule starts the new page if the penalty 0 is real page break.

The next trick of this code solves the centering of this long table. This is the reason why we print the draft of the table first in the box0 and we calculate the indentation of the table in \tmpdim. This indentation is inserted into the table declaration before the first cell. The \ltrule is the \hrule shifted by the indentation.

Čeština ID: 0023 Author: P. O. Published

Long tables with the repeated title

The \longtableT macro creates the long table over more pages with repeated title at the start of each page with rules above and below the title and the rule below the part of the table at each page. The usage:

\def\strutT {\vrule height1.1em depth.8em width0pt} % strut for the title 
\longtableT {|c|c|c|}{ head1 & head2 & head22 \cr \tskip3pt  % title 
                       data  & data  & data   \cr 
                       data  & ... much more & data ...\cr} 

The \strutT have to be defined for the header. The header will be surrounded by the horizontal rules and the normal interline strut seems to be small in such special case. The \tskip usage after the header is mandatory, it is used after each occurrence of the header and before the closing rule at the bottom of the pages. The horizontal rule between data lines isn't allowed. The \longtableT macro is implemented by:

\def\longtableT#1#2{\goodbreak \bgroup \setbox0=\table{#1}{\strutT\relax#2} 
   \setbox1=\vbox{\unvbox0 \setbox2=\vbox{}\revertbox} 
   \setbox2=\vbox{\unvbox2 \global\setbox4=\lastbox\unskip \global\setbox5=\lastbox\unskip} 
   \whatfree4 \advance\tmpdim by-.8pt \ifdim\tmpdim<\baselineskip \vfil\break \fi 
   \offinterlineskip \crule\center4\crule\center5 \printboxes 
   \center5\crule \egroup \goodbreak 
} 
\def\whatfree#1{\tmpdim=\vsize \advance\tmpdim by-\pagetotal 
   \advance\tmpdim by-\prevdepth \advance\tmpdim by-.4pt 
   \advance\tmpdim by-\ht#1 \advance\tmpdim by-\dp#1 \advance\tmpdim by-\ht5 } 
\def\revertbox {\setbox0=\lastbox\unskip 
   \ifvoid0 \else \global\setbox2=\vbox{\unvbox2\box0} \revertbox\fi } 
\def\printboxes{\setbox2=\vbox{\unvbox2 \global\setbox0=\lastbox\unskip} 
   \ifvoid0 \else \whatfree0 
      \ifdim\tmpdim<0pt \center5\crule\vfil\break \crule\center4\crule\center5 \fi 
      \center0 \nobreak \printboxes \fi } 
\def\crule{\centerline{\hbox to\wd4{\hrulefill}}\nobreak} 
\def\center#1{\centerline{\copy#1}\nobreak} 

The macro creates the draft of the table in the box0. This box is reassembled by \revertbox and saved to box2. The header is saved to box4 and the \tskip after header is in the box5. The macro \printboxes takes the lines from box2 and puts them into the page by \center. The \whatfree macro measures the rest of the free space on the page. If there isn't free space here then \box5\crule is added, new page is started and \crule\box4\crule\box5 is printed at the begin of the next page.

Čeština ID: 0024 Author: P. O. Published

Images

The space as a separator of \inspic parameter

OPmac supposes that the name of the image file (i.e. the parameter of the \inspic macro) is separated by space. This is similar (but not exactly the same) as behavior of the primitive command \input. We needn't to use braces, only the space (or the end of line) must be inserted after the end of the filename. If you need to read the file with the space inside its name then braces can be used but space after right brace must be inserted too:

\inspic {special file with spaces in the name.pdf} % <- mandatory space here 

If you hate to use space at the end of filename and you like to use only braces then you can deactivate the mandatory space separator from \inspic macro by this trick:

\expandafter\def\expandafter\inspic\expandafter#\expandafter1\expandafter{\inspic{#1} } 
Čeština ID: 0141 Author: P. O. Published

The Inkscape labels for pictures

The program Inkscape is able to split the text labels from the rest graphics: you need to specify PDF+LaTeX option in the dialog window when the image is saved. Th rest graphics is saved into file.pdf and the additional file with the name file.pdf_tex is created where the labels and their positions are saved by the LaTeX syntax. We can write in our document:

\inkinspic file.pdf 

This macro loads the file.pdf with the graphics and the file.pdf_tex with the text labels. The width of the image will be \picw like the normal OPmac \inspic is used.

The text labels are printed in the same font family as the surrounded text. Inkscape doesn't solve this font. We can use arbitrary font in arbitrary size in the preview in the Inkscape. This is irrelevant for the final typesetting. You can write TeX commands into labels when Inkscape is used (for example the math symbols between dollars). The text label position can be left aligned, right aligned or centered (see the menu items in the Inkscape). This alignment defines the point which will be at the same place in the final typesetting. You can rotate or colorize the text.

In order we can use these feature (prepared with LaTeX syntax) in OPmac we need to emulate some LaTeX macros which are present in the exported file: \begin{picture}, \put, \makebox, etc. The following code is sufficient for this:

\def\inkinspic #1 {\bgroup 
  \ifdim\picw=0pt 
    \setbox0=\hbox{\inspic#1 }% 
    \picw=\wd0 
  \fi 
  \the\inkdefs \input \picdir#1_tex \egroup 
} 
\newtoks\inkdefs  \inkdefs={%  
  %\ifdim\picw=0pt \message{inkinspic: \picw set to \hsize}\picw=\hsize \fi  
  \def\makeatletter#1\makeatother{}%  
  \def\includegraphics[#1]#2{\inkscanpage#1,page=,\end \inspic #2 \hss}%  
  \def\inkscanpage#1page=#2,#3\end{\ifx,#2,\else\def\inspicpage{page#2}\fi}%  
  \def\put(#1,#2)#3{\nointerlineskip\vbox to0pt{\vss\hbox to0pt{\kern#1\picw  
      \pdfsave\hbox to0pt{#3}\pdfrestore\hss}\kern#2\picw}}%  
  \def\begin#1{\csname begin#1\endcsname}% 
  \def\beginpicture(#1,#2){\vbox\bgroup\hbox to\picw{}\kern#2\picw \def\end##1{\egroup}}% 
  \def\begintabular[#1]#2#3\end#4{\vtop{\def\\{\cr}\def\tabiteml{}\def\tabitemr{}\table{#2}{#3}}}% 
  \def\color[#1]#2{\scancolor #2,}%  
  \def\scancolor#1,#2,#3,{\pdfliteral{#1 #2 #3 rg}}%  
  \def\makebox(#1)[#2]#3{\hbox to0pt{\csname mbx:#2\endcsname{#3}}}%  
  \sdef{mbx:lb}#1{#1\hss}\sdef{mbx:rb}#1{\hss#1}\sdef{mbx:b}#1{\hss#1\hss}%  
  \sdef{mbx:lt}#1{#1\hss}\sdef{mbx:rt}#1{\hss#1}\sdef{mbx:t}#1{\hss#1\hss}%  
  \def\rotatebox#1#2{\pdfrotate{#1}#2}% 
  \def\lineheight#1{}% 
  \def\setlength#1#2{}% 
} 

Warning, space syntax: the \nkinspic macro (similar as \inspic) experts one parameter as file name separated by space. This is analogical behavior as \input command. But the space is needed always when \inspic, \inkinspic macros are used. If you need the picture to be centered, you have to write:

\centerline{\picw=7cm \inkinspic picture.pdf } 
Čeština ID: 0032 Author: P. O. Published

Caption beside of the image

Caption side by image

If the image is more tall than wide then it is more convenient to put the caption beside of the image, no above or below. This can be done by the following code:

\hbox to\hsize{\picw=.4\hsize \inspic mapa.jpg 
  \hfil\vbox{\hsize=.55\hsize \iindent=0pt \emergencystretch=2em 
    \caption/f Lorem ipsum dolor sit amet, consectetur adipiscing elit. 
       ... 
       Fusce sagittis lobortis nisi sed consectetur. 
   \par}} 

Note that the internal \vbox must be finished by \par because OPmac redefines \par in \caption macro. The first usage of \par returns the original meaning of \par. Next issue is setting \iindent=0pt because we need not to print the narrower text here.

Čeština ID: 0136 Author: P. O. Published

\inspic loads the same image only once

We know that \pdfximage primitive provides the possibility to insert ti image only once and if you need to thow it at different places in the document then all such occurrences are realized only by pointer \pdfrefximage. But \inspic macro from OPmac doesn't provide this feature. If you print the same image using \inspic, then the PDF file has bigger size.

We implemented the partial show of slides (see OPmac trick 0022 and CTUstyle). The \inspic macro was modified for this purpose: the data of each unique image are stored only once in the PDF file. The solution is simple:

\let\oriinspic=\inspic 
\def\picdim{\the\picwidth:\the\picheight} 
\def\inspic#1 {% 
   \expandafter\ifx\csname pic:#1:\picdim\endcsname \relax 
      \oriinspic#1 % first insertion of the image 
      \global\expandafter\mathchardef\csname pic:#1:\picdim\endcsname=\pdflastximage 
   \else \expandafter\pdfrefximage \csname pic:#1:\picdim\endcsname % second and more 
   \fi 
} 

We see that the reference number of the image is a part of control sequence with the values of \picwidth and \picheight registers. The different values of these registers needs new loading of the image or user can use it but with a linear transformation.

The solution is based on the features of pdfTeX (available in LuaTeX too) but this isn't usable in XeTeX. The XeTeX implementation isn't done.

Čeština ID: 0110 Author: P. O. Published

Paragraph

Comfortable \parshape setting

The common shape of a paragraph can be declared by \parshape primitive, but the parameters for this primitive has non-comfortable syntax. Thus, TBN page 236 mentions the macro \oblom which can be used for rectangular croppings. The macro \setparshape presented here is able to set more general croppings. Examples:

\setparshape\left (3*0, 7*35)mm  % three normal lines, then 7 shorten lines 
% or 
\setparshape\right (4*0, 5,10,15,20,25,20,15,10,5)mm % triangular cropping right 

The macro \setparshape reads \left or \right first in order to decide the side where margins will be modified. The parentheses include the comma separated list of items in the form number*dimen, where number denotes the number of lines which are shorten by dimen value. If there isn't the * operator then only one line is shorten by dimen specified. The unit associated for all dimens is included after the closing parenthesis and it is separated by space. If you want to specify the unit explicitly in the data, you can use (...){} syntax, it means:

\setparshape\left (3*0pt, 7*.4\hsize){} 

This creates rectangular cropping over seven lines after three untouched lines and the same result can be achieved by

\setparshape\left (3*0, 7*.4){\hsize} 

The \setparshape setting is local in only one following paragraph (like \parshape does). If you need to influence more than one paragraph then you must to write \globalshape before, for example:

\globalshape\setparshape\left (3*0, 12*55)mm 

The implementation follows:

\newcount\parshapenum \newcount\globpar 
 
\def\setparshape#1(#2)#3 {\def\parshapedata{}\parshapenum=1 
   \let\parshapeside=#1\def\parshapeunit{#3}\setparshapeA#2,,% 
} 
\def\setparshapeA#1,{\ifx,#1,\parshape=\parshapenum\parshapedata0pt\hsize 
   \else\fihere\setparshapeB#1\empty*\empty\end\fi 
} 
\def\setparshapeB#1*#2\empty#3\end{% 
   \ifx,#3,\tmpnum=1 \tmpdim=#1\parshapeunit \relax 
   \else \tmpnum=#1\tmpdim=#2\parshapeunit \relax \fi 
   \loop \ifnum\tmpnum>0 
      \advance\tmpnum by-1 \advance\parshapenum by1 
      \dimen0=\hsize \advance\dimen0 by-\tmpdim 
      \ifx\parshapeside\left 
          \edef\parshapedata{\parshapedata\the\tmpdim\space\the\dimen0}% 
      \else\edef\parshapedata{\parshapedata0pt\the\dimen0}\fi 
   \repeat 
   \setparshapeA 
} 
\def\fihere#1\fi{\fi#1} 
\def\globalshape{% TBN page 237 
   \global\globpar=0 \gdef\par{\ifhmode\shapepar\fi}% 
} 
\def\shapepar{\prevgraf=\globpar \parshape=\parshapenum\parshapedata0pt\hsize 
   \endgraf \global\globpar=\prevgraf 
   \ifnum\prevgraf<\parshapenum \else \global\let\par=\endgraf\fi 
} 
Čeština ID: 0154 Author: P. O. Published

Rectangular text-cropping with an image

Sample duck

We create the macro \putshape side number {object}. It inserts an object into the next paragraph with rectangular copping for the object after number lines at left side (side is \left) or right side (side is \right). The number of indented lines and the indentation size are computed from the dimensions of the object automatically. The typical usage looks like:

\putshape\right 4 {\picw=3cm \inspic duck.png } 

The macro from this example inserts the image at right side after four normal lines of the paragraph. There are margins above and below the object given by \putvargin register and the space alongside the object and the the text is given by \puthmarhin. Both registers are set to 5pt by default.

The implementation is based on \setparshape macro from previous OPmac trick 0154:

\newdimen\putvmargin \newdimen\puthmargin 
\putvmargin=5pt \puthmargin=5pt 
 
\def\putshape#1#2#{\let\tmpa=#1\def\tmpb{#2}\putshapeA} 
\def\putshapeA#1{\vskip\parskip 
   \setbox0=\vbox{\kern\putvmargin\hbox{#1}\kern\putvmargin}\tmpnum=\ht0 
   \advance\tmpnum by-10 \divide\tmpnum by\baselineskip \advance\tmpnum by1 
   \dimen0=\wd0 \advance\dimen0 by\puthmargin 
   \hbox to\hsize{\ifx\tmpa\right \hfill\fi 
      \vbox to0pt{\kern\tmpb\baselineskip\kern-.8\baselineskip 
         \vbox to\the\tmpnum\baselineskip{\vss\box0\vss}\vss}\hss} 
   \nobreak\vskip-\parskip\vskip-\baselineskip 
   \edef\tmpb{\tmpa(\tmpb*0pt,\the\tmpnum*\the\dimen0)} 
   \globalshape\expandafter\setparshape\tmpb{} 
} 
Čeština ID: 0155 Author: P. O. Published

Slides

Simple slides

If we need to use data projector for displaying our text then we need landscape format and sufficiently big size of the font. The sans-serif font is recommended. If you needn't more specials then you can simply do this:

\input opmac 
 
\margins/1 a5l (1,1,1,1.2)cm        % landscape format 
\input chelvet  \typosize[17/22]    % big sansserif font 
 
\def\sec#1\par{\centerline 
     {\secfont#1\unskip}\bigskip}   % sections centered without numbers 
\def\pg{\vfil\break}                % the new-page macro 
\begitems                           % whole document is an item list 

The text is structured by stars to the individual shouts. The \sec can be used for titles and \pg creates new slide.

\sec Some good idea 
 
* first shout 
* second shout 
* third shout 
 
\pg 
\sec Next amazing idea 
 
* fourth shout 
* fifth shout 
 
\enditems\end 

If you need logos at every slide, interesting graphics etc then you have to tune this and create a special template. I recommend to use the OPmac trick about background image.

Čeština ID: 0017 Author: P. O. Published

Slideshow -- partial exposure

Some projectionists prefer the gradual uncovering of their ideas: first only a part of the slide, next uncover another part etc. These projectionists can write \kuk in the place, where the next idea could be hidden first. The page will be created from the beginning of the page to the \kuk. The next page copies all information from previous page but adds the text after \kuk (from this \kuk to another \kuk or to the end of the page). The next page follows this principle, i.e copies previous page, if the \kuk was used. The definitive end of the page is marked by \pg\kuk (no \kuk\pg) and the document ends by \enditems\end\kuk. We have to use the \kukstart at the begin of the document (after all macro definitions are read and after the first \begitems). If the \kukstart sequence is commented out then normal slides are generated and \kuk sequences are ignored.

The \kuk implementation follows the previous OPmac trick and adds the following macros after first \begitems:

\let\kuk=\relax 
\def\kukdata{} 
\long\def\kukstart#1\kuk{\addto\kukdata{#1}% 
   \tmpnum=0 \def\endkukdata{}\expandafter\sumkuk \kukdata\sumkuk 
   \kukdata\endkukdata \vfil\break \kukstart 
} 
\long\def\sumkuk#1{\ifx\sumkuk#1% the end of the list 
   \loop \ifnum\tmpnum>0 \addto\endkukdata{\enditems}\advance\tmpnum by-1 \repeat 
   \else 
     \ifx\begitems#1\global\advance\tmpnum by1 \fi 
     \ifx\enditems#1\global\advance\tmpnum by-1 \fi 
     \expandafter\sumkuk \fi 
} 
\count1=1 
\def\advancepageno{\ifx\kukdata\empty \global\advance\pageno by1 \global\count1=1 
                   \else \global\advance\count1 by1 \fi} 
\def\pg{\def\kukdata{}\vfil\break} 
\kukstart 

The macro \kukstart repeats in the loop and reads the text to the \kuk sequence. It adds the read parameter to the \kukdata from previous step of the loop and prints the pages. The \pg macro removes the \kukdata. If the \kuk is used inside the next level of the \begitems...\enditems environment then special care is needed. The \sumkuk macro calculates the level of the nesting and inserts the right number of closing \enditems into \endkukdata.

**Note**: More elaborate solution of creating slides with OPmac can be found in CTUslides which is a part of the CTUstyle package.

Čeština ID: 0022 Author: Mirek + P. O. Published

Bibliography

Cites with the inserted text

Sometimes we need to print the citation with inserted note, for example with the page of the cited book. For example

The flowing the text around the picture is solved in [27, p. 236].

We can do this by \rcite:

The flowing the text around the picture is solved in~[\rcite[tbn], p.~236]. 

Maybe we found usable the extended syntax of the \cite macro: when the [label] is followed by slash:

The flowing the text around the picture is solved in~\cite[tbn]/{p.~236}. 

then the result [27, p. 236] is generated. The feature is implemented here:

\def\cite[#1]{\isnextchar/{\pcite[#1]}{[\rcite[#1]]}} 
\def\pcite[#1]/#2{[\rcite[#1],~#2]} 

Now, the \cite macro is sensitive to the presence of the following slash. If slash isn't present then \rcite surrounded by [...] is used. Else \pcite is executed.

Čeština ID: 0038 Author: P. O. Published

The [name year] condensed cites

When \nonumcitations is declared and the marks are in the form [name, year] then it is convenient to avoid the repetition of the same name in one bundle of citations. For example:

TeX is mentioned in Czech books \cite[tst,tbn,tpp,lpp]. 

we get [Olšák, 1995, Olšák, 1997, Olšák, 2013, Satrapa, 2011] but we want something like [Olšák, 1995, 1997, 2013, Satrapa, 2011]. This is possible to solve it by \ecite, for example:

[\rcite[tst], \ecite[tbn]{1997}, \ecite[tpp]{2013}, \rcite[lpp]] 

but more comfortable is to leave this work to TeX. The following code solve it.

\nonumcitations 
\def\printcite#1{\citesep 
   \prepcitelink{#1}\citelink{#1}{\the\bibmark}\def\citesep{,\hskip.2em\relax}% 
} 
\def\prepcitelink#1{% 
   \isdefined{bim:#1}\iftrue 
      \expandafter\expandafter\expandafter \ppclink \csname bim:#1\endcsname!\relax 
   \else \opwarning{condensed cites: empty bibmark}\bibmark={#1}% 
   \fi 
} 
\def\ppclink #1, #2!\relax{\def\tmpa{#1}% 
   \ifx \lastcitedname\tmpa \bibmark={#2}% 
   \else \let\lastcitedname=\tmpa \if^#2^\bibmark={#1}\else\bibmark={#1, #2}\fi 
   \fi 
} 

This code redefines the \printcite macro (from OPmac) in order to the \citelink is called with the parameter \the\bibmark. The \bibmark contents is prepared by \prepcitelink. The \prepcitelink macro decomposes the mark (using \ppclink) to the prat before comma-space and the rest. The macro \lastcitedmane is undefined at the start and it is set to the last cited name. If the next name is the same then only the year is saved to \bibmark. Else name plus year is saved. Because \cite is processed inside the group, the \lastcitedname is returned back to undefined meaning so the first item in the next \cite bundle will have name plus year always.

The code above works only if all marks are prepared in the form name, year (comma+space between them). When the year is empty then the name must be terminated by comma+space. The BibTeX style apalike is compatible with this.

Čeština ID: 0039 Author: P. O. Published

The modification of (name year) cites

Sometimes somebody needs to print cite marks in the form “name year” (without comma between them), for example [Olšák 2013]. You can use the code from previous OPmac trick and correct it in one aspect:

\def\ppclink #1, #2!\relax{\def\tmpa{#1}% 
   \ifx \lastcitedname\tmpa \bibmark={#2}% 
   \else \let\lastcitedname=\tmpa \if^#2^\bibmark={#1}\else\bibmark={#1 #2}\fi 
   \fi 
} 

The BibTeX style apalike generates the commas between items but the \ppclink macro defined above removes them during printing.

Sometimes somebody wants to surround the mark(s) in rounded brackets as (Olšák 2013). If you needs to do it too then you can define:

\def\cite[#1]{(\rcite[#1])} 
Čeština ID: 0043 Author: P. O. Published

Cite-marks in the bibliography when \nonumcitations is used

OPmac (by default) doesn't print the cite-marks in the bibliography list when \nonumcitations is used. We suppose that the bibliography list is sorted by the name of the first author and the same is in the cite-mark. So, the copy of the cite-mark in the bibliography list is redundant, especially when the marks have long format like (Olsak, 2001). But when the marks are short [Ol01] then the copy of the mark may be usable in the bibliography list.

If you need to repeat the cite-marks in bibliography list when \nonumcitations is used then you have to re-define the \printbib macro. This macro is processed at the begin of each bibliography entry when the list is printed. Example:

\def\printbib{\hangindent=2\iindent 
   \noindent\hskip2\iindent \llap{[\the\bibmark] }% 
} 
Čeština ID: 0096 Author: P. O. Published

Short cite-marks generated by opmac-bib

The \cite prints cite-marks (called bibmark) instead numbers when \nonumcitations is set. The opmac-bib.tex macro for direct reading of .bib databases provides two style files (simple and iso690). They generate long bibmarks by default, like (Knuth, 1984). Sometimes we need to generate the marks in the short form, like [Kn84]. We can set such marks as an exception using bibmark field in .bib file and we can use OPmac trick 0096 to print them in the bibliography list. Now, we show how to redefine the bibmark generator in order to it generates the marks in short form. We needn't use bibmark exception field.

\def\mysetbibmark{% 
   \ifx\dobibmark\undefined \def\dobibmark{}\fi 
   \RetrieveFieldIn{bibmark}\tmp 
   \ifx\tmp\empty 
      \RetrieveFieldIn{year}\tmp 
      \edef\tmp{\expandafter\bibmarkA\dobibmark{}{}\relax\expandafter\bibmarkB\tmp{}{}{}{}\relax} 
   \fi 
   \bibmark=\expandafter{\tmp}% 
} 
\def\bibmarkA#1#2#3\relax{#1#2}     % first two letters from the author name 
\def\bibmarkB#1#2#3#4#5\relax{#3#4} % last two digits from the year 
 
\def\bibtexhook{\let\setbibmark=\mysetbibmark} 

The macro uses the last name of the first author saved in \dobibmark by the style file and extracts two first tokens from it by \bibmarkA and two digits from the year by \bibmarkB.

If you have generated two equal marks (citing a fertile author with more publications in one year) then you can declare an exception by bibmark field in the .bib file to distinguish the bibmarks. Another possibility is to create more intelligent macro which generates unique bibmarks by adding the letters a, b, c etc if needed. This is an exercise for a skilful macro programmer.

Čeština ID: 0097 Author: P. O. Published

Are cite-marks unique?

If you have no contact to a skilful macro programmer mentioned in the previous OPmac trick then you can use the \bibmarkcheck macro. It checks if all used bibmarks (printed by \cite when \nonumcitations is set) are unique. OPmac doesn't do this check by default, so it is possible to have the same bibmark connected to more bibliography records in your document without any warning.

The check is done by \bibmarkcheck. The macro definition and the macro call can be inserted after \input opmac at beginning of your document.

\def\bibmarkcheck{\ifx\lastbibnum\undefined \else 
   \bgroup 
      \bibnum=0 
      \loop 
         \advance\bibnum by1 
         \isdefined{bim:\the\bibnum}\iftrue 
            \isdefined{\csname bim:\the\bibnum\endcsname}\iftrue 
               \opwarning{Duplicated bibmark: "\csname bim:\the\bibnum\endcsname"}% 
            \fi 
            \sdef{\csname bim:\the\bibnum\endcsname}{}% 
         \fi 
         \ifnum\bibnum<\lastbibnum \relax \repeat 
   \egroup 
   \fi 
} 
\bibmarkcheck 
Čeština ID: 0098 Author: P. O. Published

Bibliography indentation by maximal cite number

OPmac ignores the item (generated by BibTeX) about the number of digits of the maximal number in the bibliography list. The reason is that OPmac provides to assemble the bibliography list by \bib sequences outside BibTeX and it provides the usage of pre-generated databases in various form and the BibTeX-generated value cannot be exactly true. OPmac introduces the \lastbibnum which includes the maximal number in the bibliography list after REF file is read. By default this value isn't used but you can use this when you design the format of bibliography list. For example:

\def\printbib{% 
   \ifx\lastbibnum\undefined \tmpdim=\iindent 
   \else \setbox0=\hbox{[\lastbibnum] }% 
      \ifdim \parindent=0pt \tmpdim=\wd0 
      \else \tmpdim=0pt \loop \advance\tmpdim by\parindent 
                              \ifdim\tmpdim<\wd0 \repeat 
   \fi\fi 
   \hangindent=\tmpdim \noindent \hskip\tmpdim \llap{[\the\bibnum] }% 
} 

The format-making macro \printbib is redefined here. It measures the box with the [\lastbibnum]~. If \parindent is zero then \tmpdim is set to the width of this box else \tmpdim is set to the multiply of the \parindent so, that the box fits into the generated space. The bibliography list is indented by \tmpdim.

Čeština ID: 0040 Author: P. O. Published

Bibliography indentation by maximal mark

The bibliography list needn't to be numbered; the marks can be used instead numbers. The last mark cannot be the mark with the maximal width (as opposite to the numbers). We need to indent the bibliography list by the maximal width of the marks.

The \halign primitive is one choice as to do it but this is not most practical here. We show another solution using REF file. The solution is usable for another similar situations, no only bibliography lists.

We ask user to add the sequence \setbibindent at the end of the bibliography list. This macro writes the value of the maximal width of used marks into REF file and this value is read in the next TeX run when REF file is read. The \printbib macro uses it. But \printbib measures the width of the marks and sent the value to \setbibitem macro in the \bibindent control sequence. The code is here:

\nonumcitations 
\def\printbib{% 
   \setbox0=\hbox{[\the\bibmark]\quad}% 
   \ifx\bibindent\undefined \def\bibindent{0pt}\fi 
   \ifdim\wd0>\bibindent \edef\bibindent{\the\wd0}\fi 
   \ifx \Xbibindent\undefined 
      \hangindent=\wd0 \noindent [\the\bibmark]\quad 
   \else 
      \hangindent=\Xbibindent \noindent \hskip\Xbibindent \llap{[\the\bibmark]\quad}% 
   \fi 
} 
\def\setbibindent{\ifx\bibindent\undefined \else 
   \openref\immediate\write\reffile{\def\noexpand\Xbibindent{\bibindent}}\fi} 
Čeština ID: 0041 Author: P. O. Published

More independent bibliography lists

Suppose we are creating a Proceedings of a conference. Each article have its own bibliography list. The bibliography items can be stretch in more articles with various numbers. Each bibliography list is numbered from one. Labels from various articles can interfere too.

For example, we have an article where TBN is cited under the number 3 but another article where TBN is cited under the number 21. When the \cite[tbn] occurs in the first article then the [3] have to be printed and the hyperlink have to be created with right aim. When the \cite[tbn] occurs in the second article then [21] have to be printed and the hyperlink points to the second bibliography list.

We need to set \bibnum to zero an set an unambiguous identifier of each article at the start of reading each article:

\bibnum=0 \def\citelist{} \def\bibpart{A} %%% A is identifier of first article 
... first article 
... 
\bibnum=0 \def\citelist{} \def\bibpart{B} %%% B is identifier of second article 
... second article 
... 

The following code is sufficient:

\def\wbib#1#2#3{\dest[cite:\bibpart-\the\bibnum]% 
   \ifx\wref\wrefrelax\else \immediate\wref\Xbib{{\bibpart-#1}{\bibpart-#2}{#3}}\fi} 
 
\let\citeAA=\citeA 
\def\citeA #1#2,{\if#1,\def\citeAA##1,##2,{}\fi\citeAA \bibpart-#1#2,} 
 
\def\printcite#1{\citesep \prepcite#1\relax 
   \citelink{#1}{\tmpa}\def\citesep{,\hskip.2em\relax}} 
\def\prepcite #1-#2{\def\tmpa{\citelinkA{#2}}} 
\let\writeXcite=\addcitelist 
 
\def\nonumcitations{\lastcitenum=0 \def\sortcitesA{}\def\etalchar##1{$^{##1}$}% 
   \def\citelinkA##1{%  \citelinkA needs the \bibpart info: 
      \isdefined{bim:\bibpart-##1}\iftrue \csname bim:\bibpart-##1\endcsname 
      \else ##1% 
      \opwarning{\noexpand\nonumcitations + empty bibmark. Maybe bad BibTeX style}\fi} 
} 

The \bibpart- is added before each label and the same prefix is added before each number. We have labels and numbers prefixed by the appropriate prefix. The \cite macro removes the prefix when printing numbers and adds it to the labels.

Čeština ID: 0042 Author: P. O. Published

OPmac-bib: no more BibTeX problems

BibTeX (1995) is able to work only in ASCII encoding, the accents have to be added by \TeX (or more exactly BibTeX) syntax. But today, we need to write all characters “natural”. Such characters can bring problems with normal BibTeX. It is unable to sort by these characters. This is partially solved by bibtex8 variant of BibTeX which uses 8bit encoding and sorting rules are expressed in external files .csf. But today, we are using UTF-8 encoding (this is more than 8bit encoding). The BibTeX is unable to work with this encoding. Id doesn't sort right and breaks the encoding when converts to the uppercase. Somebody converts the bib databases to 8bit encoding, uses BibTeX and the result is converted back to UTF-8. This is not so optimal.

There exists a patch of bibtex8 called bibtexu. The documentation declares that bibtexu is able to work with UTF-8 input/output and works internally in Unicode using ICU library. Unfortunately this project isn't active and the program doesn't work (sometimes it deads in the infinitive loop).

There exist the new and active project Biber which is *absolutely unusable* for the plain TeX users because the main principle “power is simplicity” is totally lost here. It expected the configuration files in XML (huh!) which is read by external program biber. The result of biber is almost human unreadable .bbl file which is understandable only by very complicated biblatex macros. This is not the way for OPmac.

OPmac is able to read .bib file directly in UTF-8 encoding. BibTeX nor another external program isn't needed. Use \usebib command:

... \cite[cosi] a \cite[jiny]. 
 
List: 
\usebib/s (simple) mybase 
\end 

The format of the reference list is declared in a style file opmac-bib-simple.tex. Features are documented in the opmac-bib.tex and in the second style file opmac-bib-iso690.tex.

Čeština ID: 0047 Author: P. O. Published

Glossary

Glossary at the end of the document

The abbreviations or some else can be occurred in the document and we need to write some explanations of such items at the end of the document. We write \glos{abbreviation}{explanation}. Nothing occurs in this place of the document. For example:

\input opmac 
... 
I am working at CTU\glos{CTU}{Czech Technical University in Prague} in Prague. 

The macro \glos saves the information into memory and uses them at the place where \makeglos is used. You can implement \glos and \makeglos by:

\def\gloslist{} 
\def\glos #1#2{% 
   \expandafter\isinlist\expandafter\gloslist\csname;#1\endcsname 
   \iftrue \opwarning{Duplicated glossary item `#1'}% 
   \else 
      \global\sdef{;#1}{{#1}{#2}}% 
      \global\expandafter\addto\expandafter\gloslist\csname;#1\endcsname 
   \fi 
} 
\def\makeglos{% 
   \ifx\gloslist\empty \opwarning{Glossary data unavailable}% 
   \else 
      \bgroup 
        \let\iilist=\gloslist 
        \dosorting 
        \def\act##1{\ifx##1\relax \else \expandafter\printglos##1\expandafter\act\fi} 
        \expandafter\act\iilist\relax 
      \egroup 
   \fi 
} 
\newdimen\glosindent  \glosindent=2\parindent 
\def\printglos #1#2{\noindent \hangindent=\glosindent \hbox to\glosindent{#1\hss-- }#2\par} 

The glossary is automatically sorted by the alphabet. If you needn't such sorting and the order by the occurrence is sufficient then you can comment out the \dosorting sequence in the \makeglos definition.

Of course, you can program the \printglos by your wish, by your typography design. The \printglos macro has two parameters: {abbreviation}{explanation} and it prints one glossary item in the list. The \printglos defined above sets fixed indentation 2\parindent for all items. You can use another indentation, for example the indentation is calculated fro the maximal length of the abbreviation, see OPmac trick 0041.

Another more simple example of the \printglos:

\def\printglos #1#2{\noindent #1 -- #2\par} 

Explanation: The \glos macro saves \;abbrev1 \;abbrev2 etc. into \gloslist and defines \;abbrev1 as {abbrev1}{explanation}, \;abbrev2 as {abbrev2}{explanation} etc. The macro \makeglos converts \gloslist to \iilist locally and does the alphabetically sorting by the macro \dosorting from OPmac. Finally, the \act macro prints the items.

Čeština ID: 0051 Author: P. O. Published

Glossary at the begin of the document

If you need to place the \makeglos (from previous trick) at the beginning of the document then you have two variants: put all \glos data before \makeglos at beginning of the document or use REF file. The second variant is described here more precisely.

The data is saved to REF file during the first TeX run (and during each next TeX run) and the data is used in second TeX run (and in each next TeX run).

\def\gloslist{} 
\def\Xglos #1#2{% 
   \expandafter\isinlist\expandafter\gloslist\csname;#1\endcsname 
   \iftrue \opwarning{Duplicated glossary item `#1'}% 
   \else 
      \sdef{;#1}{{#1}{#2}}% 
      \expandafter\addto\expandafter\gloslist\csname;#1\endcsname 
   \fi 
} 
 
\input opmac 
 
\def\glos #1#2{\openref\toks0={#2}\immediate\wref\Xglos{{#1}{\the\toks0}}} 

Note that the auxiliary macro \Xglos and the resetting of \gloslist have to be inserted before \input opmac because OPmac reads the REF file from previous TeX during \input opmac and it needs to know all macros used in REF file.

The macro \makeglos is kept unchanged from previous OPmac trick.

Čeština ID: 0052 Author: P. O. Published

Glossary sorted by Czech sorting rules

The glossary from OPmac trick 0051 is sorted alphabetically by ASCII values of letters used in abbreviation. Sometimes this is not sufficient, we need to sort by Czech sorting rules, for example. The same feature is implemented when index is sorted by OPmac. You can add the \preparespecialsorting before \dosorting sequence into \makeglos macro and the rest is the same as in previous OPmac trick. The \preparespecialsorting can be defined by the code:

\def\makeglos{% 
   ... 
   \preparespecialsorting \dosorting 
   ... 
} 
\def\preparespecialsorting{% 
   \setprimarysorting 
   \def\act##1{\ifx##1\relax\else \preparesorting##1% 
      \expandafter\edef\csname\string##1\endcsname{\tmpb}% 
      \expandafter\act\fi}% 
   \expandafter\act\iilist\relax 
   \def\firstdata##1{\csname\string##1\endcsname&}% 
} 

If \chyph is activated then the sorting will be by Czech rules.

Explanation: OPmac sorts \iilist where are control sequences \?fooa \?foob \?fooc and where ? is arbitrary character. When Index is sorted then ?=comma, i.e. \,fooa \,foob \,fooc. We use semicolon for glossary in our code: \;fooa \;foob \;fooc. The macros from \iilist have to include the data in the form {first data}{second data}. The sorting is done by {first data}. The macro \preparesorting\?foo saves the csname (foo in this example) into \tmpb converted using \lccode to the state appropriate for Czech sorting. This result is saved into \\?foo and the \firstdata macro is redirected to this new data so the sorting in the first pass is done by the \\?foo. The second pass of sorting works too because the new data for second pass is needn't to be saved.

Čeština ID: 0053 Author: P. O. Published

Glossary with hyperlinks

If you need to create the hyperlinks in the place where the abbreviation is used then you can write:

...text... \glosref{abbrev1}{explanation} ...text... \glosref{abver2}{expl2} 
...text... \glosref{abbrev1}{} 
... 
\makeglos 

The abbreviations will be printed in the text colored and as hyperlinks with the aim in the glossary list created by \makeglos. The explanation is possible to give only once and if you repeat the same abbreviation then all others have to have the empty explanation. If you write explanation twice for the same abbreviation then the macro prints warning and second explanation will be ignored.

The solution could be:

\hyperlinks\Blue\Blue 
 
\def\glosref #1#2{\if^#2^\else \glos{#1}{#2}\fi 
   \expandafter\isinlist\expandafter\gloslist\csname;#1\endcsname 
   \iftrue \makegloslink{#1}\link[glos:\tmp]{\localcolor\Blue}{#1}% 
   \else #1% 
   \fi 
} 
\def\printglos#1#2{\noindent \makegloslink{#1}\dest[glos:\tmp]#1 .. #2\par} 
 
\def\makegloslink#1{\def\tmp{}\expandafter\makegloslinkA#1\relax} 
\def\makegloslinkA#1{\ifx#1\relax\else 
   \edef\tmp{\tmp\number`#1.}\expandafter\makegloslinkA\fi} 

The macros \glos and \makeglos are the same as in above OPmac tricks. The \glosref checks if the second parameter is empty. Else the normal \glos is used. The twice declaration is checked here. The hyperlink is created by \link only if the item is saved in \gloslist. This saving is done by \glos or when REF file is read. The reason: we need to avoid the broken links which is not typically true after first TeX run.

The \printglos macro *must* include the \dest declaration.

The internal link is is created using the abbreviation and the \makegloslink, but this is not exactly the abbreviation because the exact abbreviation can include accents but link with accents in its internal string doesn't work. So, each character is translated to its numeric code and the list of such codes is the internal string used in the link.

You can define the color of the borders around the links by \def\glosborder{R G B}, for example \def\glosborder{1 0 0}.

Note: hyperlinks works from the first occurrence of the \glosref with the nonempty explanation. If the same \glosref with the empty explanation precedes then it is not hyperlinked. What to do? You can put the whole list of \glos{abbrev}{explanation}\glos{abbrev2}{expl2} etc. at the beginning of the document and then you can use \glosref's in the text with always empty explanation.

Čeština ID: 0054 Author: P. O. Published

Acronyms

We'll play with the macro \ac[label] which prints long name (short) at the first place in the document and prints short at next places. We need to declare the acronym first by

\acrodef [label] {short} {long name} 

The direct printing of short is done by \acs[label] and long name by \acl[label]. The list of all acronys (in the same order as they were declared) can be printed by \acrolist macro. You can put this macro somewhere in the document but after a set of all declarations. You can refer the page with the first occurrence of the acronym by \pgref[acro:label].

If you need to print the acronym with the first letter capitalized then you can use \Ac[label]. If you need to print the acronym by special suffix, then you must to declare \acrodefx[label-suffix] similar as \acrodef[label] but with appropriate suffixes. Example

\acrodef  [CTU]    {CTU}   {Czech Technical University in Prague} 
\acrodefx [CTU-s]  {CTU's} {Czech Technical Iniversities in Prague} 
\acrodef  [UK]     {UK}    {Charles University} 
\acrodef  [water]  {$\rm H_2O$} {water} 
 
Here is \ac[CTU] and beside it is \ac[UK]. Second occurrence \ac[CTU] and \ac[UK]. 
\Ac[water] is basic of the life. So, \ac[water] can be used repeatedly. 
 
\acrolist 

The macro set for \ac can look like:

\def\acrolist{} 
\def\acrodef[#1]#2#3{\sdef{as:#1}{#2}\sdef{al:#1}{#3}\addto\acrolist{\acroitem{#1}}} 
\def\acrodefx[#1-#2]#3#4{\sdef{as:#1-#2}{#3}\sdef{al:#1-#2}{#4}} 
\def\acs[#1]{\isdefined{as:#1}\iftrue \acroprint{as:#1}\else\acno{#1}\fi} 
\def\acl[#1]{\isdefined{al:#1}\iftrue \acroprint{al:#1}\else\acno{#1}\fi} 
\def\acno#1{\opwarning{acro [#1] undefined}ac?#1} 
\def\ac[#1]{\acX#1-\end 
   \isdefined{ad:\acA}\iftrue \acs[\acA\acB]\else 
   \label[acro:\acA]\openref\wlabel{}\global\sdef{ad:\acA}{}% 
   \acl[\acA\acB] \let\acrocap=\undefined(\acs[\acA\acB])\fi} 
\def\acX#1-#2\end{\def\acA{#1}\ifx\end#2\end \def\acB{}\else\acY#2\fi} 
\def\acY#1-{\def\acB{-#1}} 
\def\acroprint#1{\expandafter\expandafter\expandafter\acroprintA\csname#1\endcsname\end} 
\def\acroprintA#1#2\end{\ifx\acrocap\undefined\expandafter\acroprintB\else\uppercase\fi{#1}# 
\def\acroprintB#1{#1} 
\def\Ac[#1]{{\let\acrocap=\active\ac[#1]}} 
\def\acroitem#1{\par\noindent{\bf\boldmath\acs[#1]} -- \acl[#1] \dotfill \pgref[acro:#1]\par} 
\addprotect\acs \addprotect\acl 
Čeština ID: 0113 Author: P. O. Published

Index

Using sort from indexes for another purposes

OPmac includes the sorting algorithm connected to creating the Index. It is not so simple to separate this algorithm from Index printing. We do it in this trick. We create the \sort macro which reads its arguments, sorts them alphabetically and saves the result into the auxiliary macro \tmpb. For example:

\sort{uu}{tt}{zz}{aa}\relax 
now, the \tmpb macro includes: {aa}{tt}{uu}{zz} 

The list of parameters have to be terminated by \relax. The unexpanded parts of the parameters cannot be used (this is analogical to the normal \iindex behavior). The implementation would be:

\def\sort{\begingroup\setprimarysorting\def\iilist{}\sortA} 
\def\sortA#1{\ifx\relax#1\sortB\else 
  \expandafter\addto\expandafter\iilist\csname,#1\endcsname 
  \expandafter\preparesorting\csname,#1\endcsname 
  \expandafter\edef\csname,#1\endcsname{{\tmpb}{}}% 
  \expandafter\sortA\fi 
} 
\def\sortB{\def\message##1{}\dosorting 
  \def\act##1{\ifx##1\relax\else \expandafter\sortC\string##1\relax \expandafter\act\fi}% 
  \gdef\tmpb{}\expandafter\act\iilist\relax 
  \endgroup 
} 
\def\sortC#1#2#3\relax{\global\addto\tmpb{{#3}}} 

The macro \sort works in the group \begingroup...\endgroup in order to the outside data (for Index) keep intact. The parameters are prepared and saved locally to \iilist, then the \dosorting macro is executed. The result is saved to \tmpb globally.

Note that the macro defines the {second data} for \,foo sequences as empty (see last but one line of the \sortA macro). This data field can be used for your data and you can use them after sorting by \seconddata macro from OPmac.

Čeština ID: 0080 Author: P. O. Published

Pages in the Index as hyperlinks

When the Index is created by the \makeindex macro then the pages alongside the Index items are printed normally without hyperlinks. The pages are hyperlinked only in table of contents (after \hyperlinks declaration).

There are two reasons why OPmac doesn't implement page hyperlinks in the Index by default. The credo “power is simplicity” is preferred and the macro-space of the TeX memory is spared. When we have thousands of Index items and average three pages per item then we need approximately 9 thousands of tokens more in the TeX memory. This memory wasting is not supported by OPmac.

If you explicitly need to have the page numbers in the Index hyperlinked then you can use the code:

\def\printiipages#1&{\usepglinks#1\relax\par} 
\def\usepglinks{\afterassignment\usepglinksA \tmpnum=} 
\def\usepglinksA{\pglink{\the\tmpnum}\futurelet\next\usepglinksB} 
\def\usepglinksB{\ifx\next\relax \def\next{}\else 
   \ifx\next,\def\next,{, \afterassignment\usepglinksA \tmpnum=}\else 
   \ifx\next-\def\next--{--\afterassignment\usepglinksA\tmpnum=}% 
   \fi\fi\fi\next} 

The macro \usepglinks has the parameter (for example) 5, 15--18, 24 terminated by \relax. The macro scans the numbers in its parameter and expands each number to the \pglink{number}.

Čeština ID: 0006 Author: P. O. Published

Alternative page-lists in the index

Sometimes we need alongside the Index items more than one page list. Fox example one page list is basic (in roman font), second page list in italics or bold with important occurrences of the Index item. You can be inspired in the Index of the TeXbook. The italic or underlined page numbers denote something more important.

The macro \Xindexg{prefix}{word}{page} is provided by OPmac since the version Jun. 2014. It can be used in the REF files similarly like \Xindex{word}{page}. This macro creates alternative pagelists in the macros \prefixword and the lists of such sequences are saved in \iilist:prefix. The pagelist is processed analogically as standard \,word is used, i.e. the data are in two parts. First part includes the attribute of the processing and the second part included the condensed page list (for example 3,4,4,4,5 is condensed to 3--5).

Just for example, we create the macro \iindexb{word}, which saves the word occurrence into the separated page list prefixed by b:. If the word will have this page list, it will be printed in the Index before common page list in red and bold.

\def\iindexb#1{\openref\wref\Xindexg{{b:}{#1}{\the\pageno}}} 
\def\printiipages#1&{ % second space between word and pagelist 
   \expandafter \isinlist \csname iilist:b:\expandafter\endcsname \csname b:\currii\endcsname 
   \iftrue 
      \expandafter\seconddata \csname b:\currii\endcsname \XindexB 
      {\localcolor\Red \bf \tmp}, \fi 
   #1\par 
} 

The \iindexb is defined at the first line. The word occurrence is sent to alternative page list prefixed by b:. The \printiipages is redefined in order it get the common pagelist in #1 parameter and this to be printed. By the code \isinlist \iilist:b: \b:word \iftrue we do the test if the word has the alternative page list. If it is true then {\localcolor\Red \bf \tmp} is inserted. The \tmp macro includes the second data from \b:word.

The example above will work only in the case that the word have its normal occurrence because the \makeindex processes only \iilist with normal words. Next, we suppose that the alternative page list is closed or it includes only isolated pages. If this isn't true then we need to close the alternative page list. Both these problems are solved by the code:

\def\iindexb#1{\openref\wref\Xindexg{{b:}{#1}{\the\pageno}}\wref\Xindex{{#1}{}}} 
\def\printiipages#1&{ % second space between word and pagelist 
   \expandafter \isinlist \csname iilist:b:\expandafter\endcsname \csname b:\currii\endcsname 
   \iftrue 
      \expandafter\firstdata  \csname b:\currii\endcsname \XindexA 
      \expandafter\seconddata \csname b:\currii\endcsname \XindexB 
      {\localcolor\Red \bf \tmp\ifx\tmpb-\pgfolioA{\tmpa}\fi}% 
      \if^#1^\else, \fi % comma only if the next list isn't empty 
   \fi 
   #1\par 
} 
Čeština ID: 0072 Author: P. O. Published

Index entry valid in page range

It is usable to say that the word (for Index) occurs at all pages of given chapter or at all pages between this occurrence and following occurrence. This cannot be always exactly true but this is not out problem now. The singular occurrences cannot be set (by \iindex{}) inside the declared page range. We create the macro pair \iindexbeg{word} ... \iindexend{word}, which declares the page range. This page range will be added to the page list and merged wit another pages.

\def\Xindexgend#1#2#3{\bgroup \def~{ }% #1=prefix, #2=index-item, #3=pageno 
   \expandafter\firstdata \csname#1#2\endcsname \XindexA 
   \expandafter\seconddata \csname#1#2\endcsname \XindexB 
   \ifnum#3=\tmpa \else 
      \if\tmpb+% 
         \sxdef{#1#2}{{#3/-}{\tmp\iiendash}} 
      \else 
         \sxdef{#1#2}{{#3/-}{\tmp}} 
   \fi\fi \egroup 
} 
\input opmac 
 
\def\iindexbeg#1{\iindex{#1}\expandafter\iimute\csname,#1\endcsname} 
\def\iindexend#1{\expandafter\isinlist\expandafter\iimutelist\csname,#1\endcsname\iftrue 
   \wref\Xindexgend{,{#1}{\the\pageno}}\expandafter\iiunmute\csname,#1\endcsname \fi 
} 
\def\iindex#1{\expandafter\isinlist\expandafter\iimutelist\csname,#1\endcsname\iftrue 
   \else \openref\wref\Xindex{{#1}{\the\pageno}}\fi 
} 
\def\iimute#1{\global\addto\iimutelist#1} 
\def\iiunmute#1{\def\tmp##1#1##2\end{\gdef\iimutelist{##1##2}}\expandafter\tmp\iimutelist\end} 
\def\iimutelist{} 

The auxiliary macro \Xindexgend is used in REF file. This is a reason why we need to define it before \input opmac. The \iindexbeg macro only saves the occurrence of the word by \iindex and it deactivates the \iindex{word} by \iimute. The \iindex{word} will be “mute” in the page range because the continuous page range can would be broken by it. The macro \iindexend{word} inserts the \Xindexgend,{word}{page} into REF file. During REF processing, this macro opens the actual page list from previous page number to actual page or prolongs the opened page list to the current page.

The \iindex is redefined so that only the words not included in \iimutelist are saved to the REF file. The macros \iimute and \iiunmute save and remove the word to/from the \iimutelist

Čeština ID: 0073 Author: P. O. Published

The sorting experiment

PdfTeX implements the \pdfstrcmp{string1}{string2} primitive which returns zero if the strings are the same, returns -1 if string1 is less then string2 else returns +1. OPmac don't use this primitive when it is sorting the Index because only classical TeX us used. This is a reason why OPmac implements this test by four recursive macros, reads token per token and does the test. I have performed the experiment to replace these recursive macros to mentioned primitive and to measure the time. The testing code redefines \isAleB form OPmac:

\def\isAleB #1#2{% 
   \edef\tmp{\noexpand\pdfstrcmp{\firstdata#1\empty}{\firstdata#2\empty}} 
   \ifnum\tmp<0 \AleBtrue 
   \else \ifnum\tmp>0 \AleBfalse 
   \else \bgroup \setsecondarysorting 
            \preparesorting#1\let\tmpa=\tmpb \preparesorting#2% 
            \edef\tmp{\noexpand\pdfstrcmp{\tmpa}{\tmpb}}% 
            \ifnum\tmp<0 \global\AleBtrue \else \global\AleBfalse \fi 
         \egroup 
   \fi\fi 
} 

The result was surprising. The time is not saved. The sorting of the example kuk8.tex from my lecture from December 2012 (where are 6 thousands of the index words) takes 4.13 sec by classical OPmac macros and 4.04 sec when \pdfstrcmp is used. It means that the macro expansion is implemented in TeX very effectively and build-in function \pdfstrcmp doesn't add new real power.

Čeština ID: 0018 Author: P. O. Published

Sections inside the index by first letter

We need to divide the items in the index to sections by their first letter. Each section must be titled by the large and boldface letter significant for this section.

The solution is based on the \everyii macro which is empty by default and OPmac inserts this macro before printing of each index item.

\def\lastchar{} 
\def\everyii{\expandafter\makecurrchar\currii\end 
   \ifx\currchar\lastchar \else 
      \bigskip{\typosize[20/24]\bf\currchar}\par\nobreak\medskip\noindent 
      \let\lastchar=\currchar 
   \fi 
} 
\def\makecurrchar#1#2\end{\uppercase{\def\currchar{#1}}} 

First, the \lastchar is empty. The \currchar (first letter of processed item) is scanned before the item is printed. The \currchar is modified by \uppercase primitive. If \currchar differs from \lastchar, the heading of new “section” is printed and the \latchar is set to \currchar.

Čeština ID: 0140 Author: P. O. Published

Format

OPmac macros as part of a format

A user don't need to write \input opmac at beginning of the document if the appropriate format is generated. For example csplain + OPmac with PDF output can be generate by the following .ini file:

\input csfonts    % CSfonts as default fonts 
\input plain      % plain.tex by DEK 
\restorefont      % restoring of \font primitive 
\input csfontsm   % basic macros for font managing 
\input il2code    % default encoding IL2 (of CSfonts) 
\input etex-mac   % eTeX extensions for registers allocation 
\input hyphen.lan % hyphenatinon patterns of various languages 
\input plaina4    % A4 paper as default 
\input csenc-u    % UTF-8 encoding at input (using encTeX) 
\pdfoutput=1      % output to PDF 
\input opmac      % OPmac macros 
\everyjob=\expandafter{\the\everyjob 
   \message{The format: csplain + OPmac, PDF output}% 
   \inputref} 
\dump 
generate by:  pdftex -ini -etex -enc thisfile.ini 

The reading of \jobname.ref file must be realized by \inputref macro added in \everyjob.

If you want to combine OPmac with etex.src format then the .ini file can look more simple:

\pdfoutput=1 
\input etex.src 
\input opmac 
\everyjob=\expandafter{\the\everyjob 
   \message{The format: etex.src + OPmac, PDF output}% 
   \inputref} 
\dump 
generate by:  pdftex -ini -etex thisfile.ini 
Čeština ID: 0139 Author: P. O. Published

Sorted names of these tricks on your terminal

Maybe you can find useful to show all names of these tricks sorted on your terminal, i.e. sorted (relatively) by time form oldest to newest. You can do it by the command:

  curl http://petr.olsak.net/opmac-tricks-e.html | tac \ 
   | sed -n '/CLASS.*datum/{:a;N;/<h2><a/!ba;s/\n.*\n//; s/<a[^>]*>/ : /;s/<[^>]*>//g;p}' | sort 

The author published this trick at his site in the article Opmac-triky -- sort.

Čeština ID: 0143 Author: Radek Matoušek Published