OpTeX - tips, tricks, howto
This page includes solutions of various tasks when OpTeX is used. Each solution would be ``small'', it means you can see whole solution at once in your www browser. The constellation of each solution is similar: user description followed by macro code followed by explanation of the macro code. User can copy and paste the macro code to his/her document simply by the mouse.
If there exists any tip from you, OpTeX user, don't hesitate please and send me it. I'll welcome it and save it here (with the author of the solution mentioned).
Selected OpTeX tricks can be used directly from OpTeX document without need to copy the code, see section 1.7.8 of OpTeX documentation. The directly usable macros are marked here by the blue word "autoload:" in the right margin.
OPmac tricks can be used too but re-implementation of the code is probably needed because OPmac uses different internal macros than OpTeX. The important OPmac tricks will be re-implemented here soon.
Note that several OPmac tricks are implemented directly into OpTeX:
- \colordef does colors mixing.
- \morecolors reads color names from xcolor package.
- \transformbox applies linear transformations.
- \oval, \circle create colored oval or circle around text.
- \clipinoval, \clipincircle declare clipping path for images.
- \hisyntax performs syntax highlighting for C, Python, TeX, html and XML languages.
- \draft and \showlabels can be used for printing labels in draft mode.
- Absolute positions on the page.
- Options in key=value dictionaries.
- \lipsum prints the text Lorem ipsum dolor sit.
- \mathbox creates a \hbox in math list with size-context.
- \numberedpar helps with creating numbered Theorems, Definitions etc.
- \inspic syntax allows alternative \inspic{filename.ext} without space separator.
- \inkinspic inludes pictures with labels generated by Inkscape.
- \crlp is implemented for tables.
- Tables to given width.
- Variations of paragraphs with p declarator.
- Vertical centered text in more rows in tables.
- Eqbox: equal width of boxes across whole document.
- \slides style allows to create presentations.
- \usebib reads directly .bib databases without any external program.
- Index allows hyperlinked pages and alternative page lists.
Contents
- Fonts
- Micro-typography: font expanding, hanging punctuation
- Text size changed to the desired width
- More than 1300 icons from Awesome5 fonts
- Emoji characters used directly in text
- Fons with non-Unicode encoding
- Marking parts of text
- Font effects using attributes
- Using variable fonts
- Small caps if font doesn't provide it
- Modification kerning data in fonts
- Lists
- Verbatim
- Graphics
- Color gradients
- Curved arrows
- Canceled text
- Text around a circle
- Ignoring pictures when \inspic is processed
- Keystrokes using special images
- Frames with shadows
- Frames with rounded corners
- Adding ornaments to the background
- Moving OpTeX's colors to TikZ environment
- Shadowed and colored QR codes
- Using pstricks
- Tikz pictures created outside OpTeX
- Math
- \bbchar from AMS fonts when Unicode math font is used
- Original \cal from Computer Modern fonts
- More comfortable writing of matrices
- Bigger outer parentheses automatically set
- Text fonts in math for variables, digits
- Equation marks in atypical cases
- Equation marks for sub-equations
- Loading additional Unicode math fonts
- Intelligent \dots like in AMSTeX
- Vertical bars and more math shortcuts
- Controlled sizes of parentheses
- More spaces in script style around rel, bin
- Tables
- Colored cells in the table
- Colored lines in the table
- Tables like in booktabs package
- Decimal digits aligned by the decimal point
- Long table across multiple pages
- Vertically centered paragraphs in table
- The decimal point aligned in the table
- Table notes
- Positioning in the table
- Format valid for each columns in given row
- Text blocks
- Different formatting
- Indented footnotes
- Line numbers in the left side of the formatted text
- First line of the paragraph with a different font
- Numbered paragraph with a different font
- Extra \vsize space for solving widows
- Two-column mode allowing for footnotes
- Two-column mode with full size top inserts
- Material added to the foreground of each page
- Macro tricks
- Structured conditionals
- \fi in \if problem
- Drawing to given nodes
- Tabbing macros
- Macro with variable number of arguments in braces
- The import package
- Numbers printed in three-digits groups
- Expandable token-per-token scanner
- Parameter separated by space or end-group
- Nested brackets of another type than {}
- Breaking URL at any point
- What page-number is current?
- PerPage package features
- Filecontents package features
- Sorting phrases
- Declaring macro parameters with more separators
- Scanning nested LaTeX environments
- Macro parameters selectively expanded
- Adding "and" before the last item in lists
- Testing if currentpage is odd
- Not duplicating the hash characters
- Key-value lists in a key-value list
- Putting separators between list items
- Preparing macros for a simple token-per-token scanner
- Setting \vsize to fit lines exactly to pages
- Random items from a given set of items
- Only define a macro if it is not already defined
- Show dimension values in given unit
- Simple templates
- Lua matters
- Processing lua code with normal characters
- Printing time, date
- Listings of all nodes in selected pages
- Listing all nodes in the box
- Lines modification inside \vbox
- Running system commands during document processing
- Using lua-visual-debug package
- Non-overlapping margin notes
- Printig a character regardless font ligature setting
- Selective suppression of ligatures
- Measuring elapsed time of OpTeX processing
- Sections
- References
- Bibliography
- Slides
- Languages
- Features of PDF viewers
- Others
Fonts
Micro-typography: font expanding, hanging punctuation
LuaTeX supports "microtypography features": slight font expanding when the paragraph line is stretched and hanging punctuation. You can enable this using primitives \pdffontexpand+\adjustspacing and \rpcode,\lpcode+\protrudechars. Example:
\pdffontexpand\_tenrm 30 20 5   % font expanding configured for \_tenrm
\adjustspacing=2                % font expandnig activated

\chardef\hyph=\hyphenchar\_tenrm
\rpcode\_tenrm\hyph=310  \rpcode\_tenrm`\.=200 \rpcode\_tenrm`\,=200
\lpcode\_tenrm`\“=400 \rpcode\_tenrm`\”=400  % hanging punctuation configured for \_tenrm
\protrudechars=2                             % hanging puctuation activated
See TeX in a Nutshell, page 23 for more information about parameters of used primitives.
You can start from this example and modify it for your needs.
Note that the example above has its limitations, see this comment.
You can use mte.opm package where the data for microtypographic extensions are already prepared and ready for use.
(0058) -- P. O. 2020-04-16
Text size changed to the desired width
autoload:
\scaleto
\scaletof
We prepare the macro \scaleto size {text} which prints “text” in the current font, but rescaled so that the width of “text” is the given size.
\def\scaleto#1#{\def\tmp{#1}\scaletoA}
\def\scaletoA#1{\setbox0=\hbox{{#1}}%
   \edef\tmp{\expr{\bp{\tmp}/\bp{\wd0}}}%
   \transformbox{\pdfscale{\tmp}{\tmp}}{#1}}

\scaleto 7cm {text} % the "text" has 7cm width
The desired dimension is saved to the \tmp macro and \scaletoA does the real work. It saves the text to \hbox 0 and calculate the coefficient of scaling as \tmp/\wd0. This coefficient is saved to \tmp again and used in the \transformbox{\pdfscale}{} macro.
You can compare the solution of similar task in OPmac trick 027. You can see that we have more powerful tools for calculation than in OPmac: \bp converts the dimension to Adobe points and \expr calculates the ratio.
If you are using a font family with optical sizes, then we need to scale to right optical size. Then we can use \scaletof size {text}.
\def\scaletof#1#{\def\tmp{#1}\scaletofA}
\def\scaletofA#1{\setbox0=\hbox{{#1}}%
   \edef\tmpa{\expr{\bp{\tmp}/\bp{\wd0}}}%
   \scaletoA{\setfontsize{mag\tmpa}\currvar#1}}
The \setfontsize{mag factor} is calculated, where the factor is the scale ratio calculated and saved in the \tmpa. When the font is changed then the result is not exactly the desired width, because new font have a little different proportions. So previous \scaletoA is called again to reach the exact accuracy.
(0011) -- P. O. 2020-05-06
More than 1300 icons from Awesome5 fonts
The TeX distribitions include OTF fonts FontAwesome5Free-Solid-900, FontAwesome5Brands-Regular-400 and FontAwesome5Free-Regular-400 with icons (dingbats) like keyboard, house, faces etc. See the documentation from fontawesome5 LaTeX package where all these dingbats are listed. We want to use them. The following macro code does it:
\initunifonts  % we need to load OTF fonts
\font\tenfafree      =[FontAwesome5Free-Solid-900]
\font\tenfabran      =[FontAwesome5Brands-Regular-400]
\font\tenfafreeregul =[FontAwesome5Free-Regular-400]
\protected\def\faregul#1{{\let\tenfafree=\tenfafreeregul #1}}
\protected\def\fafree{\tenfafree\resizethefont}
\protected\def\fabran{\tenfabran\resizethefont}
\def\__fontawesome_def_icon:nnnnn#1#2#3#4#5{%
   \ifx^#1^\else
      \getfourtokens\tmp#3\relax
      \protected\edef#1{{\csname fa\tmp\endcsname \char#5}}%
   \fi
}
\def\getfourtokens#1#2#3#4#5#6\relax{\def#1{#2#3#4#5}}
\input fontawesome5-mapping.def
\__fontawesome_def_icon:nnnnn{\faWifi}{wifi}{free3}{213}{"F1EB}
Now, you can use all control sequences listed in the fontawesome5 documentation. For example \faHouseUser, \faAngry, \faApple, etc. The alternative syntax like \faIcon{Angry} is not supported. A few icons are in its "regular" variants. They are listed as \faAngry[regular] in the fontawesone5 documentation. These icons are available by the \faregul prefix in uour macro, i.e. \faregul\faAngry.
Notice to the implementation. The three fonts with dingbats are loaded as \tenfafree, \tenfabran and \tenfafreeregul. The third one includes the "regular" variants. The macros \fafree amd \fabran select these fonts at current size used by Font Selection System from OpTeX.
We need to read the mapping from names to the font codes. It is saved in the fontawesome5-mapping.def. The set of \__fontawesome_def macros are used here. We define such macro in order to read this mapping and then we do \input fontawesome5-mapping.def.
Of course, if Marcel Krüger make changes in the fontawesome5-mapping.def file syntax, we must to redeclare our macros. I hope that this syntax is more or less stable.
You can compare the complexity of macros in the LaTeX implemenation with these 16 lines of plain TeX macros. Only TeX primitives are used here (and two OpTeX macros \initunifonts and \resizethefont). This is one of reasons why I like plain TeX.
(0012) -- P. O. 2020-05-08
Emoji characters used directly in text
We want to write:
\fontfam[lm]

Is it OK? 👍 Yes.
and the current font is used for the text, but emoji font is used for the emoticon. The following code implements this.
\initunifonts
\addto\_fontfeatures{fallback=emoji;}
\directlua{luaotfload.add_fallback ("emoji", {"TwemojiMozilla:+colr;"} )}
\rm
The "fallback" font feature is used and set globally for all fonts. This feature loads and uses fonts from given font list (declared by the luaotfload.add_fallback Lua function) if the character is missing in the current font. The falback font is loaded at the same size as the current font.
Note: we need not to load emoji package.
(0062) -- P. O. 2021-04-25
Fonts with non-Unicode encoding
OpTeX does not prefer such fonts but sometimes there are a reason to use them. For example the font slabikar (with hand written letters continuously binded one with other) was created in 1997 in pre-Unicode epoch. We can use such font if the following file is prepared:
\def\charenc #1 #2 {\catcode`#1=13 \bgroup \lccode`\~=`#1 \lowercase{\egroup \chardef~=#2}}

\def\csfenc{%
   \charenc á 225 % a-acute
   \charenc Á 193 % A-acute
   \charenc ä 228 % a-diaeresis
   \charenc Ä 196 % A-diaeresis
   \charenc č 232 % c-caron
   \charenc Č 200 % C-caron
   ...
   etc.
}
See csf-enc.tex for full version of such file. Then you can use it:
\input csf-enc
\pdfmapline{=slabikar slabikar ≤slabikar.pfb}
\font\s=slabikar at20pt

{\s\csfenc Tady píšu fontem slabikář česky.}
\bye
The letters are set as active but they can be used in \edef or \write without expanding them because their meanig is not macro but chardef constant.
We don't want to fall to the encodings hell. So, such encoding file is here only as an example. It can be a part of an old non-Unicode encoded fonts, but such files will be never the part of OpTeX package. The hyphenation patterns cannot work properly when such fonts are used.
(0018) -- P. O. 2020-05-25
Marking parts of text
We can use standard marking by {\it italic}, {\bf bold}, {\bi bold italic} or {\em emphasized text}. If you want to do something more special, then the following OPmac macros work without any change in OpTeX:
- \ul{text} for underlining text (splittable to more lines) like in the soul LaTeX package, see OPmac trick 0063
- Overlining can be done by the same macro when \uline macro is redefined.
- Leterspacing referred in OPmac trick 0063 need not be done by this macro because we have more robust letterspacing implemented as font feature, se section 2.13.10 in the OpTeX documentation.
- \hyphenprocess from OPmac trick 0065 can be used to implement hyphenation feature to the \ul macro.
- Background colored (splitabble to more lines) text by OPmac trick 0085 can be printed. Use \coltext\ColorA\ColorB{text}.
- See also the following trick (OpTeX trick 0064) for information about achieving font effects with LuaTeX attributes.
(0044) -- P. O. 2021-02-08
Font effects using attributes
You can set printing outlines of characters directly and simply by
\pdfliteral{1 Tr .3 w}TEXT\pdfliteral{0 Tr 0 w}
but it cannot span more pages and it does not respect TeX grouping. There is another possibility shown in this trick.
Setting of color is based on attributes in OpTeX v1.04+. We can use similar mechanism to achieve other font/rule effects, with different PDF graphics operators. For example we can achieve font outlines this way:
Normal, {\outlinefont{.15}outlined}, {\outlinefont{.3}more outlined}.
which produces:

To achieve these effects we must first introduce a Lua mechanism:
\directlua{
local node_id  = node.id
local glyph_id = node_id("glyph")
local rule_id  = node_id("rule")
local glue_id  = node_id("glue")
local hlist_id = node_id("hlist")
local vlist_id = node_id("vlist")
local disc_id  = node_id("disc")

local direct       = node.direct
local todirect     = direct.todirect
local tonode       = direct.tonode
local getfield     = direct.getfield
local setfield     = direct.setfield
local getlist      = direct.getlist
local setlist      = direct.setlist
local getleader    = direct.getleader
local getattribute = direct.get_attribute
local insertbefore = direct.insert_before
local copy         = direct.copy
local traverse     = direct.traverse

local token_getmacro = token.get_macro

local pdfliteral = optex.directpdfliteral

function register_pre_shipout_injector(name, attribute_name, namespace, default)
    local current
    local default = default or 0
    local attribute = assert(registernumber(attribute_name))
    local function injector(head)
        for n, id, subtype in traverse(head) do
            if id == hlist_id or id == vlist_id then
                % nested list, just recurse
                setlist(n, injector(getlist(n)))
            elseif id == disc_id then
                % only replace part is interesting at this point
                local replace = getfield(n, "replace")
                if replace then
                    setfield(n, "replace", injector(replace))
                end
            elseif id == glyph_id or id == rule_id
                    or (id == glue_id and getleader(n)) then
                local new = getattribute(n, attribute) or 0
                if new ~= current then
                    local literal = token_getmacro(namespace..new)
                    head = insertbefore(head, n, pdfliteral(literal))
                    current = new
                end
            end
        end
        return head
    end

    callback.add_to_callback("pre_shipout_filter", function(list)
        current = default
        return tonode(injector(todirect(list)))
    end, name)
end
}
Then we can define the font effects as we please:
\newattribute \fntoutattr
\newcount \fntoutcnt \fntoutcnt=1 % allocations start at 1
\def\outlinefont#1{\fntoutattr=
   \ifcsname fntout::#1\endcsname \lastnamedcs\relax \else
      \fntoutcnt
      \sxdef{fntout::#1}{\the\fntoutcnt}%
      \sxdef{fntout:\the\fntoutcnt}{#1 w 1 Tr}%
      \incr \fntoutcnt
   \fi
}
\addto\_resetattrs{\fntoutattr=\_noattr}
\sdef{fntout:0}{0 w 0 Tr}
\directlua{
register_pre_shipout_injector("fntout", "fntoutattr", "fntout:")
}
The core idea is the same as with colors (see the OpTeX documentation) – we use attributes to mark typesetting material and just before shipout we postprocess, injecting PDF literals where necessary. But unlike with colors, which are specialized (e.g. stroke vs non-stroke), we define a generic Lua function generator that can inject any PDF literals we want.
Each distinct font outline width maps to a single number that is used as the attribute value. Similarly, the inverse mapping maps the attribute values to PDF literals. Special attribute value of “0” designates the default effect – this is e.g. what returns the graphics state to normal after TeX group ends. Other effects are allocated starting at number 1.
The TeX user interface consists of \outlinefont,
they essentially just set the attribute to the right
attribute value (allocating new one if necessary).
We also add to \_resetcolor which is what the default OpTeX
output routine uses to achieve clean slate for headers / footers.
Name of the effect, the attribute name and the macro prefix for PDF literals are passed to the Lua side in order to generate the associated PDF literal injector.
The literals for font outlines activate
the outline style (“1 Tr”) and set the outline width with
“⟨number⟩ w”.
If you want to use other default value of an effect, you need to change the
mapping of attribute value 0 and also need to force inject a PDF
literal on the start of each page (this is normally not done, because it would
be wasteful). The first can be easily done by using a couple of
\sdefs. The second can be achieved by passing an invalid attribute
value (e.g. -1) as the initial (which forces the initial injection
no matter what).
Sadly outline fonts don't work with colors.
(0064) -- M. Vlasák 2021-07-14
Using variable fonts
The OpenType standard allows to create a "variable" font. It generates its glyphs depending on a numeric values of "axes", which is a special font feature with a parameter. For example axis={wght=800} sets the weight of the font glyphs to 800 units (it is typically a bold font). More axes can be provided: wdth (width), slnt (slant), opsz (optical size), ital (italics). They can be set as comma separated list of key=value in the axis parameter. Only few fonts support this feature. If the feature is supported then you can have a single font file for all weights, etc. parameters. See the Wiki page or the introduction page for more information.
An example of font-file with a variable font is f-fraunces.opm. Another example follows.
Suppose, we have download the CrimsonPro-VariableFont_wght.ttf and CrimsonPro-Italic-VariableFont_wght.ttf font files from the internet. This font supports the weight axis. User can set \wght=500 \rm text and the given weight is used. Moreover, we implement the font modifiers \bolder, which increases all weights of \rm, \bf, \it, \bi by 100 and the \lighter modifier decreases all weight by 100. User can try:
\fontfam[CrimsonVar]

\rm Roman, \bf Bold, \it Italic, \bi Bold-Italic \par
\bolder  \rm Roman, \bf Bold, \it Italic, \bi Bold-Italic
In order to provide this, we create f-crimsonvar.opm font file:
\_famdecl [Crimson Var Font] \Crimsonvar
   {CrimsonPro, the robust Garamond-like font, Variable font}
   {\lighter \bolder} {\rm \mf \bf \it \mi \bi}
   {Garamond-Math} {[CrimsonPro-VariableFont_wght]}
   {\_def\_fontnamegen {%
      [CrimsonPro\_currV-VariableFont_wght]:axis={wght=\_the\_numexpr\_wghtV};\_fontfeatures}}

\_wlog{\_detokenize{%
Modifiers:^^J
 \lighter ... All \rm \mf \bf \it \mi \bi are lighter by 1/4 of weight step^^J
 \bolder .... All \rm \mf \bf \it \mi \bi are bolder by 1/4 of weight step^^J
}}

\_newcount\__vf_wght \__vf_wght=400   % default weight for \rm
\_newpublic \_let \wght=\__vf_wght    % user can write: \wght=500 \rm ...

\_sdef{fv:Crimsonvar:rm}{\_fsetV wght={\__vf_wght} }
\_sdef{fv:Crimsonvar:bf}{\_fsetV wght={\__vf_wght+400} }
\_sdef{fv:Crimsonvar:it}{\_fsetV wght={\__vf_wght} }
\_sdef{fv:Crimsonvar:bi}{\_fsetV wght={\__vf_wght+400} }

\_addto\_fmodrm {\_cs{fv:\_currfamily:rm}}
\_addto\_fmodbf {\_cs{fv:\_currfamily:bf}}
\_addto\_fmodit {\_cs{fv:\_currfamily:it}}
\_addto\_fmodbi {\_cs{fv:\_currfamily:bi}}

% Modes
\_moddef \resetmod {\_fsetV wght={\__vf_wght} \_fvars {} {} -Italic -Italic }
\_moddef \lighter  {\_advance\__vf_wght by-100 }
\_moddef \bolder   {\_advance\__vf_wght by100 }

% Medium variants
\_famvardef \mf {\bolder\bolder\_rm}
\_famvardef \mi {\bolder\bolder\_it}

\_initfontfamily % new font family must be initialized
\_loadmath{[Garamond-Math]}
\_endcode
The \_fontnamegen uses \the\numexpr\_wghtV as the axis parameter. The \_wghtV macro is set by \rm, \bf, \it and \bi due to their internal macros \_fmodrm, \_fmodbf etc. It is \wght for normal or \wght+400 for bold variants. The \_fvars sets only two variants (Roman and Italic).
(0102) -- P. O. 2023-01-27
Small caps if font doesn't provide it
Sometimes the font doesn't provide Caps and small caps font feature (cmsp) but we need this feature. For example DejaVu font doesn't have small capitals. We can do alternative small capitals using following trick with the macro \fakecaps{Here is a Text}. Note that real small capitals created by font designer individually for each character are much better.
\def\fakecaps#1{\def\tmp{#1}\replstring\tmp{ }{{ }}%
   {\ea\let \ea\fupper \the\font \uccode`'=`'
    \setfontsize{mag.8}\setff{+upper;embolden=1.1}\setwordspace{1.25}\fontsel
    \ea\foreach\tmp\do{\ifnum\uccode`##1=`##1{\fupper##1}\else ##1\fi}}}
The macro works only with a font registered in Font selection system (i.e. implemented by font family files). The current font is set to \fupper and then it is scaled by the magnification factor 0.8, the font features +upper and embolden=1.1 are added and the word space of the scaled font is scaled back to the value of the original font. The macro parameter is processed token by token using \foreach (spaces are prepared before by \replstring) and if \uccode of the character is equal to the character code the \fupper is used. The character ' (for example in the word don't) must be printed with original font, so its \uccode is changed.
Compare solutions at tex.stacexchange.
(0107) -- P. O. 2023-04-23
Modification kerning data in fonts
Sometimes, you can decide that the kerning of a pair of characters should be better that the font designer suggested. If you are using Opentype fonts then you can re-define kerning data or add more information using Lua code:
\fontfam[lm]
\directlua
  {fonts.handlers.otf.addfeature
    {
    name = "kern-hyph-v",    % name of a new font feature
    type = "kern",
    data = {
    ["-"] = { ["V"] = -150}, % kern between - and V reduced
    }
  }
}
Test: \setff{kern-hyph-v}\rm Finite-Valued.
This example introduces a new font feature "kern-hyph-v" with kerning data of hyphen-character followed by V. Note, the name of the font feature must be in lowercase. Then, all fonts loaded with this new font feature have their kerning data modified as declared.
If you use the name of the font feature "kern" then all fonts loaded after such a declaration have modified kerning data. It means that you have to declare \initunifonts first, then \directlua with kerning data modification and then \fontfam.
(0109) -- P. O. 2023-05-07
Lists
List items multi-numbered at arbitrary level
autoload:
\style m
\keepstyle
We declare the \style m (multi-numbered) of the list. The items are numbered similarly as sections, i.e. 1., 2. 2.1, 2.2, 2.2.1, 2.2.2, 2.2.3 etc. We create macro \keepstyle which propagates the current style to all sub-levels. So:
\begitems \style m \keepstyle  % prints:
* First                        % 1. First
* Second                       % 2. Second
  \begitems
  * Second-A                   %   2.1 Second-A
  * Second-B                   %   2.2 Second-B
  \enditems
* Third                        % 3. Third
\enditems
The implementation:
\def\iprefix#1{}
\addto\_setlistskip{\ifnum\ilevel>1 \edef\iprefix{\iprefix.\the\itemnum}\fi}
\sdef{_item:m}{\iprefix.\the\itemnum. }
\def\keepstyle{\_defaultitem=\_printitem}
The \iprefix is saved at the start of \begitems (in the \_setlistskip macro) and it is used in deeper levels of lists. There can be arbitrary nesting levels.
(0047) -- P. O. 2021-02-17
Depth of the list given by number of *
autoload:
\easylist
We declare the macro \easylist which enables to give the list level simply by the number of * used as a prefix. We need not to specify nesting \begitems...\enditems. So, if we use the \style m and \keepstyle from previous OpTeX trick 0047, then the following input:
\begitems \easylist \style m \keepstyle
* First proposition.
** Interesting comment.
*** A note on the comment.
*** Another note.
**** By the way...
***** This is a subsub...-proposition.
* Let’s start something new...
\enditems
gives exactly the same output as documented at the page 2 of the LaTeX package easylist (see texdoc easylist).
The implementation:
\def\easylist{\adef*{\countlist}\def\enditems{\fornum 1..\ilevel \do{\_enditems}}}
\def\aast{\countlist}
\def\countlist{\tmpnum=1 \countlistA}
\def\countlistA{\futurelet\next\countlistB}
\def\countlistB{\ifx\next\aast \ea\countlistC\else \ea\countlistD \fi}
\def\countlistC#1{\incr\tmpnum \countlistA}
\def\countlistD{%
   \ifnum\tmpnum>\ilevel \fornum \ilevel..\tmpnum-1 \do{\_begitems\easylist}\else
   \ifnum\tmpnum<\ilevel \fornum \tmpnum..\ilevel-1 \do{\_enditems}\fi\fi
   \_startitem}
% + macros from OpTeX trick 0047
Another application. We set given style for each used level:
\everylist={\ifcase\ilevel\or \style X \or \style x \else \style - \fi}
\begitems \easylist
* Main one
* Main two
** sub-item
*** sub-sub-item
\enditems
(0048) -- P. O. 2021-02-17
Definition lists
We create a "\style d" for OpTeX lists which prints definition lists by the following syntax:
\begitems \style d
* {word} description of the word.
* {other} another description.
\enditems
It creates
-
word description of the word.
other another description.
The implementation should be:
\sdef{_item:d}{\aftergroup\dword}
\def\dword#1#2{{\bf#2 }\ignorespaces}
You can declare another format in these macros. For examle various color selection, another font selection, another kerning etc. The basic implementation (shown here) is included in the format.
(0108) -- P. O. 2023-04-27
Verbatim
Code blocks like in Markdown
Code blocks are frequently used in Markdown. They are displayed as an auto-sized, shaded, rounded-corner box around a word. We can redefine the \_printinverbatim macro in order to do it:
\def\_printinverbatim#1{%
   \ovalparams{\lwidth=0pt \lcolor=\LightGrey \fcolor=\LightGrey}%
   \inoval{\setbox0=\hbox{#1}\ht0=1.35ex \dp0=.15ex \box0}}
\verbchar`

This `text` is printed as a `code& {block}`.

The \inoval macro is used for shaded rounded-corner box. The \vphantom{ly} gives a strut inside the text. The height and depth of the text is set to the constant values in order all ovals have the same height plus depth.
(0009) -- P. O. 2020-05-02
Inline verbatim in macro parameters
We know that inline verbatim in maro parameters does not work:
\def\p#1{print: "#1"}
\verbchar`

\p{test: `\relax x~&` fin.} % error (misplaced align tab)
The reason of this error: the parameter text is tokenized when the parameter is read. The first ` is run after this parameter is completely read. It changes catcodes but nothing is read directly from file at this time, so such catcode setting is ineffective.
We know that the usage of \code{...} is 100% working, but we must escape each TeX sensitive character: \p{test: \code{\\relax x\~\&} fin.}.
There is a method for "protecting" the macro parameter without escaping the TeX sensitive characters. Use \verbi as a prefix before usage of the macro:
\def\verbi#1{\def\tmp{#1}\begingroup \verbC \verbG}
\def\verbii#1#2#{\def\tmp{#1#2}\verbiiA}
\def\verbiiA#1{\addto\tmp{{#1}}\begingroup \verbC \verbG}
\def\verbC{\catcode`\\=12 \catcode`\#=12 \catcode`\%=12 }
\def\verbG#1{\endgroup \tmp{\scantextokens{#1}}}

\verbchar`
\def\p#1{print: "#1"}

\verbi\p{aha `\relax!@#$%^& uff~` mluff}

\verbii\table{cc}{ a & `\table` \cr b & `&` }
The \verbii can be used before \table macro or similar macros where the second parameter is important.
Implementaton note: We read the parameter first with category codes set by \verbC. The \endgroup in the \verbG restores the original category codes and the macro parameter is represented by \scantextokens{#1}. When this parameter is processed then the current category codes are used again. The \verbii macro read parameters like \verbii\table pxto10cm{cc}{...}. This is the reason of the existence of the \verbiiA auxiliary macro.
This solution doesn't work in special cases when there are unpaired braces {} in the verbatim parameter and with macros where the scanned parameter is pre-processed. Only \code{...} is 100% working.
Compare the complexity of the cprotect.sty LaTeX package with this 5-line solution.
(0017) -- P. O. 2020-05-22
Algorithms printed as pseudo-codes
autoload:
\algol
declared also:
\var
The LaTeX package bundle algorithms enables to create algorithms formatted by controlled way (pseudo-codes). We create here something similar, but writing the sources is much more confortable than in LaTeX because the source is more similar to the printed result and without useless control sequences. Our pseudo-code is written between \begtt\algol and \endtt as usual verbatim text. The key-words mentioned at pages 1--8 in the algorithms LaTeX documentation are written directly in our source code and they are printed in bold font automatically. If you want to print another word in bold use a pair of !...!, i.e. write !word!. Two !! prints one normal exclamation mark. Texts between dollars $...$ are interpreted in math mode. All input characters between $...$ are non-verbatim, i.e. the math mode is interpreted as usual. Other text (outside math mode) is printed verbatim but in Roman font. The example shown at pages 9--10 of algorithms documentation can be prepared by:
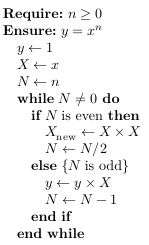
\begtt \algol
Require: $n ≥ 0$
Ensure: $y = x^n$
   $y ← 1$
   $X ← x$
   $N ← n$
   while $N ≠ 0$ do
      if $N$ is even then
         $X_{\rm new} ← X × X$
         $N ← N/2$
      else {$N$ is odd}
         $y ← y × X$
         $N ← N − 1$
      end if
   end while
\endtt
Note that the brackets {...} in our example are interpreted in normal TeX way in math mode: $X_{\rm new}$ but they are printed verbatim outside math mode: else {$N$ is odd}.
You can use symbols like ←, they makes your source code more readable. Or you can use common math control sequences in math mode, \leftarrow in this case.
The implementation of the \algol macro is based on hi-syntax macros of OpTeX:
\newtoks \_hisyntaxalg
\_hisyntaxalg = {
   \_hicolor K \bf  % Keywords
   \foreach {Require:}{Ensure:}{Input:}
      {while}{do}{if}{then}{else}{end}{function}{return}{print}
      {for}{all}{range}{continue}{repeat}{until}{loop}
      {not}{and}{or}{xor}{true}{false}
      \do {\replthis{\n#1\n}{\z K{#1}}}
}
\def\algolmath#1${\catcodetable\_optexcatcodes \scantextokens{#1}$}
\def\algol{\catcode`$=3
   \everymath={\algolmath}%
   \def\_ttfont{\rm}%
   \catcode`\!=13
   \bgroup \lccode`\~=`\! \lowercase{\egroup \def~##1~{\ifx^##1^!\else{\_bf##1}\fi}}%
   \hisyntax{ALG}%
}
\def\var#1{{\it\adef_{\vrule height.4pt width4pt\relax}#1}}
You can use \var{variable_name} inside the math mode. The variable_name is printed in italics.
You can add \replthis{:=}{\leftarrow} to the \_hisyntaxalg declaration if you want to write more legible $y := 1$ instead of $y \leftarrow 1$ in your source code. (We assume that you don't write the character ← directly due to a limitation of your keyboard or your text editor.) Or you can try to colorize your pseudo-code...
Another tip: You can change the indentation of printed result by adding
\def\_indent{\_quitvmode \def\_dsp{ }\_spacefactor=2000\xspaceskip=.7em }
to the \_hisyntax declaration. Each indentation space in the source will have given \xspaceskip width in the output.
(0078) -- P. O. 2022-04-24
Verbatim lines referenced in text
autoload:
\ttlineref
We implement possibility to refer lines printed by \begtt...\endtt if these lines are numbered by \ttline>=0. User needs to select a character unused in the verbatim text (the § in the following example) and use \ttlineref this-character in the header after \begtt and the same character can be used in the verbatim text followed by [label]. Of course, you can use more such labels in single verbatim block. When the verbatim environment is closed then the \lref[label] expands to the the corresponding line number where the [label] was used. For example:
\ttline=0
\begtt \ttlineref §
first line
   second special line §[spec]
   third line
\endtt

Note that the line \lref[spec] is very interesting.
The string §[spec] in this example is not printed in the verbatim environment, it saves only the label [spec] for later use. The \lref[spec] expands to 2 in our example.
The following code implements this feature but only backward references (for sake of simplicity).
\def\ttlineref#1{\adef#1[##1]{\setlref{##1}}}
\protected\def\setlref#1{\sxdef{ttlin:#1}{\the\ttline}}
\def\lref[#1]{\trycs{ttlin:#1}{??}}
You can use the same labels in following verbatim blocks. They are silently rewritten by new line numbers. We suppose that the \lref[label] are used immediately after printed verbatim block and only with labels really declared in previous verbatim block.
You can use this trick with combination of previous OpTeX trick 0078
(0079) -- P. O. 2022-04-25
Graphics
Color gradients
We can use \input tikz and color gradients support from this package. But there is another approach: create a color gradient in an interactive vector editor (Inkscape, for example) and use it. You can create arbitrary rectangle with color gradient in it and save such image to (say) my-gradient.pdf.
Then you can draw a rule with 1pt thickness of this gradient by
\hbox{\picwidth=\hsize \picheight=1pt \inspic{my-gradient.pdf}}
If you want to use gradients to another graphic objects, then it may be more complicated. For example gradiented oval boundary with text in it:
\newdimen\ovalw  \newdimen\ovalh
\ovalw=8cm \ovalh=15cm

\def\gradientoval{\clipinoval \dimexpr\ovalw/2 \dimexpr\ovalh/2 \ovalw \ovalh
   {\rlap{\picwidth=\ovalw \picheight=\ovalh \inspic{my-gradient.pdf}}%
   \raise5mm\hbox{\kern1mm
   \inoval[\roundness=4mm \fcolor=\White \lcolor=\White]
   {\raise\dimexpr\ovalh-1cm\hbox to\dimexpr\ovalw-1cm{}}}}}

\def\textingradientoval#1{\hbox{\rlap{\gradientoval}\kern5mm
   \raise\dimexpr\ovalh-1cm\vtop{\hsize=\dimexpr\ovalw-1cm\noindent #1}}}

\textingradientoval{\lorem[1]}
The \clipinoval is used first with my-gradient.pdf. Then a slightly smaller white oval is drawn over it. Only the boundary remains visible. Finally, the text is printed in it.
(0024) -- P. O. 2020-06-05
Curved arrows
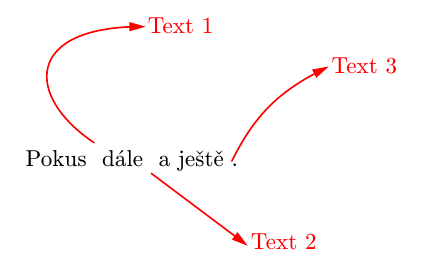
We prepare the macro
\arrowcc x0 y0 {cx0 cy0 cx1 cy1} x1 y1 (dx1 dy1) {Text}
which draws the curve from x0 y0 to x1 y1 ended by arrow spike. The part {cx0 cy0 cx1 cy1} can be empty, i. e. {}. The line is drawn in such case. The numbers {cx0 cy0 cx1 cy1} give the control points of a Bézier curve. At the end of the arrow is printed the "Text" shifted by dx1 dy1. The numbers cx0 cy0 cx1 cy1 x1 y1 are relative to the origin x0 y0. This origin is relative to the current typesetting point. All numbers are in bp units by default. The macro \arrowccparams can include the additional settings (color, line width, etc.). The macro \arrowccspike includes the drawing of the arrow spike and you can redefine it.
\vglue5cm
\def\arrowccparams{1 0 0 rg 1 0 0 RG}  % red color is initialized

Pokus \arrowcc 0 10 {-30 20 -30 50} 20 50 (3 -3) {Text 1}
dále \arrowcc 0 -3 {} 40 -30 (3 -3) {Text 2}
a ještě \arrowcc 0 2 {10 20 20 30} 40 40 (3 -2) {Text 3}.
creates:
The implementation is exacltly the same as in OPmac trick 0062 but the calculation of direction of the spikes is re-implemented using more simple and straightforward lua code.
\def\arrowccspike{2 0 m -5 2 l -5 -2 l h f}
\def\arrowcc #1 #2 #3 #4 #5 (#6)#7{%
   \if^#3^\preparerotdata(0 0) (#4 #5)\else \preparedirection #3 (#4 #5)\fi
   % x0 y0 {cx1 cy1 cx2 cy2} x1 y1 (dx1 dy1) {Text}
   \pdfsave\rlap{\pdfliteral{%
   .7 w \arrowccparams\space 1 0 0 1 #1 #2 cm 0 0 m
   \if ^#3^#4 #5 l \else #3 #4 #5 c \fi S
   1 0 0 1 #4 #5 cm  q \rotdata\space 0 0 cm \arrowccspike\space Q}%
   \if^#7^\else\pdfliteral{1 0 0 1 #6 cm}\hbox{#7}\fi}\pdfrestore
}
\def\preparedirection #1 #2 #3 #4 {\preparerotdata(#3 #4) }
\def\arrowccparams{}

\def\preparerotdata (#1 #2) (#3 #4){\edef\rotdata{\rotcm (#1 #2) (#3 #4)}}
\def\rotcm (#1 #2) (#3 #4){\directlua{%
   local x=(#3)-(#1)
   local y=(#4)-(#2)
   local norm = math.sqrt(x*x+y*y)
   if norm==0 then tex.print('1 0 0 1')
   else tex.print(string.format('\_pcent.3f \_pcent.3f \_pcent.3f \_pcent.3f',%
                                 x/norm, y/norm, -y/norm, x/norm))
   end
}}
The macro \rotcm takes vector (#3,#4)-(#1,#2) and prepares cm matrix data for rotation in the direction of given vector. The data is stored in \rotdata macro using \preparerotdata (for lines) or \preparedirection (for Bézier curves). Then \rotdata is used inside \pdfliteral parameter.
(0037) -- P. O. 2021-02-05
Canceled text
autoload:
\cancel
declared also:
\cancelparams
(if undeclared)
The macro \cancel type {text} prints text and the line over the text. If the type is empty or / then the line is slanted from bottom left to top right. If the type is \\ then the line is drawn from top left to bottom right. If the type is X or x then both lines are drawn. If the type is - then the horizontal line is drawn. The math style inside math formulae is kept. For example
Test: \cancel\\{hello}, ${\cancel X{a}\over \cancel{b}} + \cancel-{\int_a^b f(x){\rm d}x}$
The \cancel macro is implemented by the code:
\def\cancel#1#{\isempty{#1}\iftrue \afterfi{\cancel/}
   \else
      \lowercase{\casesof #1}
        /  {\let\cancline=\drawFslash}
        \\ {\let\cancline=\drawBslash}
        x  {\def\cancline{\drawBslash\drawFslash}}
        -  {\let\cancline=\drawHline}
        \_finc {}%
      \ea\cancelA
   \fi
}
\def\cancelA{\ifmmode \ea\cancelM \else \ea\cancelT \fi}
\def\cancelT#1{\setbox0=\hbox{#1}\cancelF} % text mode
\def\cancelM#1{\mathstyles{\setbox0=\hbox{$\currstyle#1$}\cancelF}} % math mode
\def\cancelF{\edef\tmp{\cancline}\quitvmode\box0 \pdfliteral{q \useit{\cancelparams} \tmp S Q}}
\def\drawFslash{\bp{-\wd0} \bp{-\dp0} m 0 \bp{\ht0} l } % forward slash
\def\drawBslash{\bp{-\wd0} \bp{\ht0} m 0 \bp{-\dp0} l } % backward slash
\def\drawHline {\bp{-\wd0} \bp{.5ex} m 0 \bp{.5ex} l }  % horizontal line
\def\cancelparams{1 0 0 RG 1 J .6 w} % color RG linetype J linewidth w
(0103) -- P. O. 2023-03-19
Text around a circle
We create a macro \circletext {radius}{angle}{TEXT}{correction} which prints TEXT around a circle with given radius. First letter of the TEXT starts at given angle. The fourth parameter declares a correction between letter pairs because the standard kerning table is deactivated when printing around circle. The TEXT runs clockwise when the radius is positive (the center of the circle is below the letters). When the radius parameter is negative then TEXT runs anticlockwise and the center of the circle is above the letters. The macro creates a typesetting material with zero dimensions, the center of the circle is at the current typesetting point. For example

\hbox{%
\circletext {1.7cm} {212}  {{$\bullet$} UNIVERSITAS CAROLINA PRAGENSIS {$\bullet$}}
                           {\spaceskip=.5em \kpcirc TA{-.1}\kpcirc NA{-.05}}
\circletext {-1.7cm} {237} {Facultas MFF}
                           {\kpcirc Fa{-.1}}
}
The fourth parameter correction can include the declaration of word space (using \spaceskip=...) and the space corrections between declared pairs of letters using \kpcirc AB{num}: \kern num (in em units) is inserted between each pair of letters AB. Note that the example includes a "composed object" – $\bullet$. Such object must be enclosed by braces.
Letterspacing can be set by \def\circletextS{\kern value}. No letterspacing is set by default.
The \circletext macro can be defined by
\def\circletext#1#2#3#4{\hbox\bgroup
    \edef\tmpc{\expr{-57.295779/\bp{#1}}}% -(Pi/180)/R
    \setbox0=\hbox{\ifdim#1<0pt X\fi}% lap letters by X height if R<0
    \def\l{0}\baselineskip=#1 \advance\baselineskip by-\ht0 \lineskiplimit=-\maxdimen
    \edef\tmpa{\expr{\ifdim#1<0pt \else-\fi90+#2}}%
    \def\tmpb{{}#3}\replstring\tmpb{ }{{ }}#4% spaces => {spaces}
    \pdfsave \pdfrotate{\tmpa}%
    \expandafter\circletextA\tmpb\relax
}
\def\circletextA#1{\ifx#1\relax\pdfrestore\egroup\ignorespaces\else
    \ifx^#1^\else \setbox0=\hbox{#1\circletextS}%
       \ismacro\l{0}\iffalse
          \edef\l{\expr{\l+\bp{.5\wd0}}}%
          \pdfrotate{\expr{\tmpc*\l}}%
       \fi
       \edef\l{\bp{.5\wd0}}%
       \vbox to0pt{\vss\hbox to0pt{\hss#1\hss}\null}%
    \fi
    \expandafter\circletextA\fi
}
\def\kpcirc#1#2#3{\replstring\tmpb{#1#2}{#1{\kern#3em}#2}}
\def\circletextS{}
The code from OPmac trick 0109 is re-implemeted here. The calculation is done by \expr and \bp macros. The \l macro means the lenght of typeset text and \tmpc is coefficinet which converts such length to the angular measure in degrees.
(0038) -- P. O. 2021-02-05
Ignoring pictures when \inspic is processed
autoload:
\ignoreinspic
declared if undefined:
\nopicw
\nopicratio
Pictures may take more size in the resulting PDF. We may want to disable their loading when a draft of our document is created. Or we may want to sent the source code to a colleague for experimenting, but without picture files. Both cases can be solve by \ignoreinspic macro. When it is used at the beginning of the document then all pictures loaded by \inspic have following features:
- If the given picture file exists then \inspic loads it only in order to get its natural sizes (height and width) but the picture is not printed. The gray rectangle with the same sizes (calculated from \picwidth, \picheight values and from the natural sizes) is printed instead and the name of the picture file is appended. The real picture is not embedded to the PDF file, so the file keeps its small size.
- If the given picture file does not exist then the virtual natural sizes of a non-existent image are taken from \nopicw and \nopicratio macros. The \nopicw gives the natural width and the \nopicratio gives the ratio width/height. The real sizes are calculated from \picwidth, \picheight and the virtual natural sizes (as \inspic normally does it) and a gray rectangle is printed. The text "NONE: file-name" is appended, where the file-name is the non existent picture file name given by the argument of \inspic.
Implementation:
\def\nopicw{5cm}
\def\nopicratio{1.7}

\let\inspicBori=\_inspicB
\def\inspicBnew#1{%
   \isfile{\the\picdir#1}\iftrue
      \edef\filename{\the\picdir#1}%
      \setbox0=\hbox\bgroup\inspicBori{#1}% \egroup is in \inspicBori
   \else
      \edef\filename{NONE: \the\picdir#1}%
      \ifdim\picheight=0pt \picheight=\expr{1/\nopicratio}\picwidth \fi
      \ifdim\picwidth=0pt \picwidth=\nopicratio\picheight \fi
      \ifdim\picwidth=0pt \picwidth=\nopicw\relax \picheight=\expr{1/\nopicratio}\picwidth \fi
      \setbox0=\hbox to\picwidth{\vbox to\picheight{}\hss}%
   \fi
   {\LightGrey \vrule height\ht0 width\wd0\Black\raise1ex\llap{\filename\ }}\egroup
}
\def\ignoreinspic{\let\_inspicB=\inspicBnew}
The internal \_inspicB macro is re-defined when \ingnoreinspic is used. It loads the image to box0 (using the orginal \inspic macro) and uses only its dimensions. The contents of box0 is thrown away when the group is left. Note, that \inspic starts with \hbox\bgroup, so the final \egroup leaves its group. When the file does not exists then more calculatons are done and box0 is constructed with calculated dimensions.
(0053) -- P. O. 2021-04-04
Keystrokes using special images
autoload:
\keystroke
declared if undefined:
\keysize
\keystrokefont
We create a macro \keystroke{text}. Similar macro is provided by keystroke.sty LaTeX package. For example
\keystroke{Q} \keystroke{E} \keystroke{R} \keystroke{T} \keystroke{Y}\par
\keystroke{PgUp} \keystroke{Enter}
gives following result:
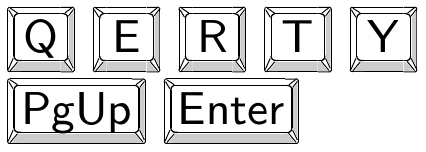
The implementation:
\newdimen\keysize \keysize=1.3em
\def\keystrokefont{\setfontsize{mag.77}\sans\rm}

\newbox\keylbox  \newbox\keymbox  \newbox\keyrbox
\setbox\keylbox=\hbox{\picheight=\keysize \inspic{keystroke_left.pdf}}
\setbox\keymbox=\hbox{\picheight=\keysize \inspic{keystroke_middle.pdf}}
\setbox\keyrbox=\hbox{\picheight=\keysize \inspic{keystroke_right.pdf}}

\def\keystroke#1{\setbox0=\hbox{\keystrokefont#1}%
   \leavevmode \lower.2\keysize \hbox{\copy\keylbox
      \tmpdim=\wd\keymbox
      \ifdim\wd0>\tmpdim \tmpdim=\wd0 \fi
      \ifdim\tmpdim>\wd\keymbox
         \pdfsave \pdfscale{\expr{\bp{\tmpdim}/\bp{\wd\keymbox}}}{1}%
            \rlap{\copy\keymbox}\pdfrestore
      \else \rlap{\copy\keymbox}\fi
      \raise.33\keysize \hbox to\tmpdim{\hss\box0\hss}\copy\keyrbox}%
}
There are three images: left side, middle and right side. These images are part of the keystroke.sty LaTeX package. We print the middle image in its natural width W if the text used on keystroke has its width less than W. The text is centered to the W size. If the text width is greater than W then we print the middle image with \pdfscale{tw/W}{1} where tw is the width of the text. It means that the middle image is deformed to its new width in order to include whole text. The left and right images are not deformed.
(0070) -- P. O. 2022-02-24
Frames with shadows
autoload:
\shadedframe
(second version)
\shadedframe {
  {\bf Title}:
  rweyu fiw wi ewyur uwr rwu wruwr rwu rwur uw qu fiw wi ewyur uwr rwu
  wruwr rwu rwur uw q fiw wi ewyur uwr rwu wruwr rwu rwur uw qwr.
}
outputs to
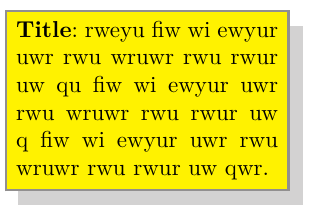
The implementation is based on the macro \frame and measuring boxes and adding boxes with given dimensions.
\newdimen\shadewidth
\def\shadedframe#1{{%
   \vvkern=4pt \hhkern=4pt \shadewidth=4pt \rulewidth=1pt \hsize=4cm % default values
   \Grey % frame color
   \setbox0=\hbox{\frame{\vbox{\Black \noindent\ignorespaces#1}}}%
   \edef\htzo{\the\ht0}\edef\wdzo{\the\wd0}%
   \LightGrey % shadow color
   \hbox{\vbox{\hbox{\rlap{\Yellow\vrule height\ht0 width\wd0 depth\dp0}\box0}%
               \nointerlineskip \moveright\shadewidth
                  \hbox{\vrule height\shadewidth width\wdzo}\kern-\shadewidth}%
         \kern-\shadewidth \vrule height\htzo width\shadewidth}%
}}
This problem is a good material for example how to create the macro with optional key/value paraeters, see section 2.10 in OpTeX manual.
\def\shadedframedefaults{% defaults:
   frame-color=\Grey,       % color of frame rules
   text-color=\Black,       % color ot text inside the frame
   shadow-color=\LightGrey, % color of shadow
   bg-color=\Yellow,        % background color inside the frame
   rule-width=1pt,          % width of rules used in the frame
   v-margins=4pt,           % vertical space between text and frame
   h-margins=4pt,           % horizontal space between text and frame
   shade-width=4pt,         % the width of the shadow
   text-width=4cm,          % width of the text inside the frame
}
\optdef\shadedframe [] #1{\bgroup
      \readkv\shadedframedefaults \readkv{\the\opt}%
      \vvkern=\kv{v-margins}\hhkern=\kv{h-margins}%
      \rulewidth=\kv{rule-width}\hsize=\kv{text-width}\relax
      \kv{frame-color}%
      \setbox0=\hbox{\frame{\vbox{\kv{text-color}\noindent\ignorespaces#1}}}%
      \edef\htzo{\the\ht0}\edef\wdzo{\the\wd0}%
      \kv{shadow-color}%
      \hbox{\vbox{\hbox{\rlap{\kv{bg-color}\vrule height\ht0 width\wd0 depth\dp0}\box0}%
                  \nointerlineskip \moveright\kv{shade-width}
                     \hbox{\vrule height\kv{shade-width}width\wdzo}\kern-\kv{shade-width}}%
            \kern-\kv{shade-width}\vrule height\htzo width\kv{shade-width}}%
   \egroup
}
For example,
\shadedframe [bg-color=\Blue, text-color=\White, text-width=6cm] {text}
is now possible.
(0071) -- P. O. 2022-02-28
Frames with rounded corners
autoload:
\roundframe
We create the macro \roundframe {Title}{Text} for making colored frames with rounded corners. For example
\roundframe {Title here}
            {Text dgd adhkd had dsglj dagjadg fsj csgsd
             gs sgls fsglfs gfsl fglf gfs rtyr rire wrurey.}
creates:

The implementation introduces 16 parameters and uses the \clipinoval macro:
\def \roundframedefaults   {% default parameters:
   round-corner=3mm,        % diameter of corners
   title-bgcolor=\Blue,     % background color of the title area
   title-color=\White,      % color of title text
   title-font=\bf,          % font of title text
   title-above=2pt,         % space above the first line of title
   title-below=1pt,         % space below the last line of title
   midrule-color=\Yellow,   % color of the rule between title and text area
   midrule-width=2pt,       % thickness of the rule between title and text area
   text-bgcolor=\LightGrey, % background color of the text area
   text-color=\Black,       % color of normal text
   text-font=\rm,           % font of normal text
   text-width=6cm,          % text paragraph width; frame width = text width + margins
   text-margins=3mm,        % left and right margins
   text-above=3pt,          % space above the first line of text
   text-below=1pt,          % space below the last line of text
   shadow-width=2pt,        % shadow thickness (if 0pt then no shadow printed)
}
\optdef \roundframe [] #1#2{\bgroup
   \kvdict{roundframe}% dictionary of used key-value parameters
   \readkv\roundframedefaults \readkv{\the\opt}%
   \roundness=\kv{round-corner}\relax
   \hsize=\kv{text-width}\relax
   \leftskip=\kv{text-margins}\relax \rightskip=\leftskip
   \setbox0=\vbox{%
      \bgbox{\kv{title-bgcolor}}{\kern\kv{title-above}%
         \noindent\strut\kv{title-color}\kv{title-font}#1\parstrut\kern\kv{title-below}}
      \kv{midrule-color}\hrule height\kv{midrule-width}%
      \bgbox{\kv{text-bgcolor}}{\kern\kv{text-above}%
         \noindent\strut\kv{text-color}\kv{text-font}#2\parstrut\kern\kv{text-below}}}
   \setbox1=\vbox to\dimexpr\ht0-2\roundness{}\wd1=\dimexpr\wd0-2\roundness\relax
   \hbox{\unless\ifdim\kv{shadow-width}=0pt \roundframeshadow \fi
      \clipinoval .5\wd0 .5\ht0 \wd0 \ht0 {\box0}}%
   \egroup
}
\def\bgbox#1#2{\setbox0=\vbox{#2}\hbox{\rlap{#1\vrule height\ht0 depth\dp0 width\wd0}\box0}}
\def\parstrut{\par\kern-\prevdepth\kern\dp\strutbox}
\def\roundframeshadow{\raise\roundness\rlap{\edef\_shadowb{\bp{\kv{shadow-width}}}%
   \inoval[\fcolor=\Grey \roundness=\kv{round-corner} \shadow=Y \lwidth=0pt]{\box1}}}
{\kvdict{roundframe} \ea\foreach\roundframedefaults \do #1#2=#3,{\global\kvx{#1#2}{}}
 \global\nokvx{\opwarning{\string\roundframe: Unknown option "#1"}}}
The \optdef macro is used, so a user can set parameters in optional brackets [...], for example:
\roundframe [text-width=8cm, midrule-color=\Red, midrule-width=3pt]
            {Title here}
            {More text}
Note that we need not tikz:). Only OpTeX macros \clipinoval and \inoval are used. The \bgbox{bgcolor}{text} creates a \vbox{text} and puts given background color under it. The \box0 is created and \box1 has the same sizes without margins given by \roundness. \box1 is used for generating the shadow using \inoval.
The last two lines of the code implement warnings if a user gives unknown keys (i.e. keys outside the default parameters). All keys from default parameters are "registered" by \kvx{key}{} and warning is set for other keys using \nokvx.
(0073) -- P. O. 2022-03-03
Adding ornaments to the background
We create pages decorated by ornaments like shown here. There is a LaTeX package pgfornament which makes an interface between pgf library (which provides huge amount of ornaments) and user. This package is designed only for LaTeX, so we choose appropriate ornament from pages 15--23 from pfgornament documentation and print it via LaTeX. For example:
\documentclass{article}
\usepackage{pgfornament}
\begin{document}
  \pagestyle{empty}
  \begin{tikzpicture}
     \pgfornament[width=2cm]{61} % ornament 61 is choosen
  \end{tikzpicture}
\end{document}
Apply pdfcrop output.pdf ornam.pdf in order to create cropped PDF image. This image will be used in our OpTeX document. The advantage is that we need not load whole tikz into our document, only single pdf file. For example, the background with four ornaments in the corners of the page can be declared as follows:
\newbox\ornament
\setbox\ornament=\hbox{\inspic{ornam.pdf}} % ornament is loaded

\newdimen\pgdist \pgdist=1mm
\pgbackground={
   \setbox0=\hbox to\dimexpr \pdfpagewidth-2\pgdist
      {\copy\ornament \hfil \rotbox{-90}{\copy\ornament}}
   \moveright\pgdist \vbox to\pdfpageheight{
      \kern\pgdist
      \vbox to0pt{\copy0 \vss}
      \vss
      \vbox to0pt{\vss \rotbox{180}{\box0}}
      \kern\pgdist
   }
}
\footlinedist=50pt
The \pgdist is the distance between ornament border and page border. It is set to 1mm here but warning: common laser printers are not able to print images so close to the edge of the paper.
(0080) -- P. O. 2022-05-05
Moving OpTeX's colors to TikZ environment
The macros for colors have different concept in OpTeX and in Tikz. In OpTeX, you can define a color macro for example by
\def\myColor{\setcmykcolor 1 0 .5 0}
or you can do color mixing by \colordef. On the other hand, Tikz uses the LaTeX concept where colors are defined as words (no control sequences) by \definecolor{myColor}{rgb}{data} and only rgb is supported by \definecolor.
Suppose, we have all colors prepared by OpTeX's macros and now we want to use them in a TikzPicture. For example:
\load [tikz]

\cmykcolordef\myColor{.5\Red + .7\Yellow}  % preparing colors in OpTeX

\tikzcolorlet {myColor} \myColor  % propagating the same color to TikZ

\tikzpicture [fill=myColor]
\fill (0,0) -- (1,0) -- (1,1) -- cycle;
\endtikzpicture
The example above does color mixing in cmyk by OpTeX macros, create \myColor as cmyk color and then puts this color to TikZ by \tikzcolorlet. No conversions are done, the same color in the same color space is used in TikZ. The color spaces cmyk, rgb and grey are supported.
The \tikzcolorlet macro is implemented here:
\def\tikzcolorlet #1#2{\ea\tikzcolorletA #2{#1}}
\def\tikzcolorletA #1#2{%
   \def\next {\tikzcolorletgrey}%
   \ifx#1\setcmykcolor \def\next{\tikzcolorletcmyk}\fi
   \ifx#1\setrgbcolor  \def\next{\tikzcolorletrgb}\fi
   \next #2
}
\def\tikzcolorletcmyk #1 #2 #3 #4 {\tikzcolorletB{cmyk}{#1,#2,#3,#4}}
\def\tikzcolorletrgb  #1 #2 #3    {\tikzcolorletB{rgb}{#1,#2,#3}}
\def\tikzcolorletgrey #1          {\tikzcolorletB{gray}{#1}}
\catcode`\@=11
\def\tikzcolorletB #1#2#3{\sdef{\string\color@#3}{\xcolor@{}{}{#1}{#2}}}
\catcode`\@=12
TikZ needs to define a macro \\color@colorName as
\xcolor@{}{}{color-space}{comma-separated-data}
and the code above does this job.
(0083) -- P. O. 2022-05-18
Shadowed and colored QR codes
OpTeX provides printing QR codes after \load[qrcode]. The following example shows how to set colors and shadows of these QR codes using TikZ. I am not sure that such result is extremely useful but it shows possibility of combination TikZ macros together with QRcode.
\load[qrcode,tikz]
\usetikzlibrary{fadings, shadings}

\newcount\fadcnt
\def\fadingtext#1#2{%
   \incr\fadcnt
   \setbox0=\hbox{#2}%
   \tikzfadingfrompicture [name=fading letter\the\fadcnt]
      \node[text=transparent!0,inner xsep=0pt,outer xsep=0pt] {\copy0};
   \endtikzfadingfrompicture
   \tikzpicture [baseline=(textnode.base)]
      \node[inner sep=0pt,outer sep=0pt](textnode){\phantom{\box0}};
      \shade[path fading=fading letter\the\fadcnt,#1,fit fading=false]
      (textnode.south west) rectangle (textnode.north east);%
   \endtikzpicture
}
\newbox\shbox
\tikzset{%
   path picture shading/.style={%
      path picture={%
         \pgfpointdiff{\pgfpointanchor{path picture bounding box}{south west}}%
         {\pgfpointanchor{path picture bounding box}{north east}}%
         \pgfgetlastxy\pathwidth\pathheight
         \pgfinterruptpicture
            \global\setbox\shbox=\hbox{\pgfuseshading{#1}}%
         \endpgfinterruptpicture
         \pgftransformshift{\pgfpointanchor{path picture bounding box}{center}}%
         \pgftransformxscale{\pathwidth/(\wd\shbox)}%
         \pgftransformyscale{\pathheight/(\ht\shbox)}%
         \pgftext{\box\shbox}%
   } } }
\pgfdeclarehorizontalshading{rainbow}{10bp}{%
   color(0bp)=(violet);
   color(1.6667bp)=(blue);
   color(3.3333bp)=(cyan);
   color(5bp)=(green);
   color(6.6667bp)=(yellow);
   color(8.3333bp)=(orange);
   color(10bp)=(red)
}

\tikzpicture
    \fadingtext {path picture shading=rainbow}
    {\qrcode[height=3cm]{this is QR code message}}
\endtikzpicture
(0093) -- P. O. 2022-10-14
Using pstricks
First of all: pstricks is an obsolete method for programming pictures. Nowadays, TikZ has mostly replaced it. You can use TikZ in OpTeX simply with \load[tikz]. The following way of using pstricks with OpTeX is only experimental.
Problems:
Pstricks in LuaTeX needs to load a special Lua code which substitutes the old PostScript programming used in original pstricks. It is done automatically if you do \input pstrick in LuaTeX. But this Lua code needs luatexbase from LaTeX which is not supported in OpTeX in full range (only part of luatexbase needed for luaotfload is included in the optex.lua basic code). This problem can be solved using \directlua which defines luatexbase.new_luafunction.
The \initunifonts or \fontfam[..] must be loaded because pstricks for LuaTeX needs some code from luaotfload.
Pstricks uses different concept of colors than OpTeX. It defines a few basic colors, new colors can be defined with \newrgbcolor, \newcmykcolor or \definecolor. Since the last one doesn't work directly, we need patch it.
pstricks.tex loads pgffor.tex which additionally loads about 80 % of TikZ macros. By looking at loaded files in the log file you cannot be sure whether you are using TikZ or pstricks:). pgffor includes yet another concept of colors and this mostly breaks pure pstricks color settings. Fortunately, we can suppress loading of pgffor.tex by using \let\pgfkeysloaded=\relax before we \input pstricks.
The optional pst-3dplot extension uses direct color setting in \setIIIDplotDefaults, but it is broken. pstSegmentColor must be defined before \input pst-3dplot is used.
\fontfam[lm]
%% luatexbase.new_luafunction is needed by LuaTeX's pstricks:
\directlua{
   function luatexbase.new_luafunction(name)
      return \string#lua.get_functions_table() + 1
   end }
%% we want to suppress loading of pgffor from TikZ:
\let\pgfkeysloaded=\relax
\input pstricks
%% a patch for \definecolor is needed:
\def\definecolor #1#2#3{\cs{new#2colorA}{#1}#3,}
\def\newrgbcolorA #1#2,#3,#4,{\newrgbcolor{#1}{#2 #3 #4}}
\def\newcmykcolorA #1#2,#3,#4,#5,{\newcmykcolor{#1}{#2 #3 #4 #5}}
\def\newgraycolorA #1#2,{\newrgbcolor{#1}{#2 #2 #2}}
%% pstSegmentColor must be declared before \input pst-3dplot:
\definecolor {pstSegmentColor}{cmyk}{0.2,0.6,1,0}
\sdef{\string\color@ [cmyk]{0.2,0.6,1,0}}{pstSegmentColor}

%% Test:
\definecolor{LightOrange} {cmyk}{0,0.2,0.4,0}%

\pspicture(-1, 0)(3.5, 4.5)
\psframe[linewidth=2pt,framearc=.3,fillstyle=solid,fillcolor=LightOrange](4,2)
\psframe*[linecolor=white](1,.5)(2,1.5)
\endpspicture
\bye
(0099) -- P. O. 2022-12-06
Tikz pictures created outside OpTeX
OpTeX enables creating Tikz pictures directly after \load[tikz] because the Tikz macros are designed for plain TeX too. But there are several additional LaTeX packages providing more features, but they are working only with LaTeX, unfortunately. If you want to use such features then LaTeX have to be used. You can create a set set of Tikz pictures by LaTeX using standalone class:
\documentclass[tikz,multi=true]{standalone}
\begin{document}
  \begin{tikzpicture}   % picture 1
    ... code of first picture
  \end{tikzpicture}

  \begin{tikzpicture}   % picture 2
    ... code of second picture
  \end{tikzpicture}
    ... etc
\end{document}
Create the a PDF file from this source by pdflatex, for example. For example, the pdf file is named pictures.pdf.
The generated pictures can be loaded by \etikz{number} macro in the OpTeX document. The number is the the page number where desired picture is in the external LaTeX-generated PDF file. The name of this PDF file have to be defined as \tikpdf. The macro \etikz enables optional parameter which gives the width of the picture, i.e. \etikz[width]{number} (default is \hsize).
\def\tikzpdf{pictures.pdf}

Here is the first picture: \etikz[5cm]{1}

The second picture has hsize width:

\etikz{2}

\bye
The macro \etikz should be defined:
\optdef\etikz[\hsize]#1{\hbox{%
   \picwidth=\the\opt \picparams={page#1}\inspic{\tikzpdf}%
}}
There are advantages of this approach: you needn't to generate large Tikz pictures repeatedly during debuging and tuning your OpTeX document and a huge amount of Tikz macros need not be loaded. You can create Tikz pictures with LaTeX specific additional packages.
Analogical approach can be used for any pictures, graphs etc. in various format, no only Tikz. You have to convert them to a PDF file and then simply use them.
(0122) -- P. O. 2023-11-19
Math
\bbchar from AMS fonts when Unicode math font is used
When \fontfam[] is used and \noloadmath is not declared then a relevant math font from Unicode math fonts is loaded too. The single font includes more math alphabets together: math italics, roman, calligraphic, fractur, greek letters, bbchars etc.
Maybe, your opinion about ideal black board letters (\bbchar's) is influneced by the traditional AMS fonts and it is different than the opinion of font designer of the used Unicode math font (Latin Modern math font is typical example of this case). Then you can return to the AMS \bbchars using the following code after the first \fontfam[] command loads the Unicode math font. Try it by $\oribb B$.
\fontfam[lm]
\newfam\bbfam
\addto\_normalmath {\_loadmathfamily \bbfam msbm }
\addto\_boldmath   {\_loadmathfamily \bbfam msbm }
\_normalmath
\def\oribb {\fam\bbfam \_rmvariables}
We need to add \_loadmathfamily\bbfam to \_normalmath in order to load 8 bit version of math fonts at the family \bbfam. Unfortunately, there is no bold variants of bbchars, thus we use the same for \_boldmath. Then we define \oribb macro as family selector and mathcodes of letters must be "normal" (not Unicoded) when this 8bit font is used. This is done by the \_rmvariables macro.
(0001) -- P. O. 2020-04-09
Original \cal from Computer Modern fonts
When \fontfam[lm] is used then LatinModern-Math Unicode font is used for math. The different calligraphic shapes are here than Knuth designed for his Computer Modern fonts. If you want to use his original calligraphic glyphs after \fontfam[lm], then you can use \orical instead \cal and the macro \orical is defined here:
\fontfam[lm]
\newfam\calfam
\addto\_normalmath {\_loadmathfamily \calfam cmsy }
\addto\_boldmath   {\_loadmathfamily \calfam cmsy }
\_normalmath
\def\orical {\fam\calfam \_rmvariables}

% For example:
\def\P{{\orical P}} % powerset
The concept is the same as in the previous OpTeX trick.
(0077) -- P. O. 2022-04-19
More comfortable writing of matrices
It is quite strenuous to put the characters & between every item of a matrix. In particular, when we are writing a huge amount of matrices. But we can simplify our writing (and reading of the source text too) using the \replstring macro. We create the \x macro which can be used as a prefix before macros such as \matrix and \pmatrix. If it is used then user can write spaces instead of ampersands.
\def\x#1#2{\def\tmpb{#2}\replstring\tmpb{ }{&}\_ea#1\_ea{\tmpb}}

$$
  \x\pmatrix{x_1 x_2 x_3\cr 12 11 10} = \left[\x\matrix{12 11 10\cr y_1 y_2 y_3}\right]
$$
(0010) -- P. O. 2020-04-09
Bigger outer parentheses automatically set
Sometimes we need to typeset something like f(b+((c+d)(e+f))\cdot g) and we want to set outer parentheses bigger than the inner ones because this is a traditional typographical rule. We can write $f\Bigl(b+\bigl((c+d)(e+f)\bigr)\cdot g\Bigl)$ in our TeX source, but this makes the source less clear. The macro \biglr defined here is able to do such a task automatically. You can write:
$\biglr f(b+((c+d)(e+f))\cdot g) \biglr$
All material between the \biglr pair is scanned by TeX and the appropriate \bigl, \bigr, \Bigl etc. are added before parentheses () automatically.
\def\biglr#1\biglr{%
   \def\biglrL{}\tmpnum=0 \def\biglrM{0}%
   \def\tmpb{#1}\replstring\tmpb{(}{\biglrC(}\replstring\tmpb{)}{\biglrC)}%
   \ea\biglrA\tmpb\biglrC.%
}
\def\biglrA#1\biglrC#2{\addto\biglrL{#1}%
   \ifx.#2\tmpnum=\biglrM\relax \biglrL
   \else \addto\biglrL{\biglrC#2}%
         \ifx(#2\advance\tmpnum by1 \ifnum\biglrM<\tmpnum \edef\biglrM{\the\tmpnum}\fi\fi
         \ifx)#2\advance\tmpnum by-1 \fi
         \ea \biglrA\fi}
\def\biglrC#1{\ifx(#1\advance\tmpnum by-1 \biglrD(\fi
              \ifx)#1\biglrE)\advance\tmpnum by1 \fi}
\def\biglrD{\ifcase\tmpnum \or\ea\bigl\or \ea\Bigl\or \ea\biggl \else \ea\Biggl\fi}
\def\biglrE{\ifcase\tmpnum \or\ea\bigr\or \ea\Bigr\or \ea\biggr \else \ea\Biggr\fi}
Note that the \biglr scanner is active only at outer level of braces {}. And it is not usable when you are using fractions or other big objects inside parentheses in display style. Use \left, \right primitives in such situations.
(0026) -- P. O. 2020-06-30
Text fonts in math for variables, digits
When you write 13 or $13$ then the digits are (typically) rendered from different fonts: from text font in first case and from math font in second one. Sometimes you want to use only text fonts in both cases. Suppose that you have a text font without visually compatible math font. Then you may want to use a-z, A-Z, 0-9 and some other characters from text font in math mode instead from math font. The following trick does this (compare this with the mathastext.sty package used in LaTeX).
We assume that the Unicode math font is loaded already and now, we want to typeset characters mentioned above from text font in math mode. Try this:
Note: slihtly better implementation is in math.opm package, use \load[math].
\loadmath{[texgyretermes-math]} % Math font is loaded: texgyretermes-math, just for testing
\fontfam[Heros]                 % Text font is loaded: texgyreheros, just for testing

% Test:
Heros in text, 13, but $Termes-math, 13$. It is visually incompatible.

% \rm, \it, \bf, \bi from current family will be used in math:
\fontdef\mathrm{\rm}  \fontdef\mathit{\it}
\fontdef\mathbf{\bf}  \fontdef\mathbi{\bi}

\_addto\_normalmath{% This must be declared after Unicode math font is loaded
    \_setmathfamily    5 \mathrm
    \_setmathfamily    6 \mathit
}%
\_addto\_boldmath{%
    \_setmathfamily    5 \mathbf
    \_setmathfamily    6 \mathbi
}
\def\_rmdigits    {\_umathrange{0-9}75\_digitrmO}
\def\_rmvariables {\_umathrange{A-Z}75\_ncharrmA \_umathrange{a-z}75\_ncharrma}
\def\_itdigits    {\_umathrange{0-9}76\_digitrmO}
\def\_itvariables {\_umathrange{A-Z}76\_ncharrmA \_umathrange{a-z}76\_ncharrma}

% Default settings:
\_normalmath              % reloads math fonts incuding families 5, 6.
\_rmdigits \_itvariables  % Upright digits, slanted variables

\_def\textcharsinmath #1#2 {\_ifx\_end#2\_else
   \_Umathcode `#1=#2 5 `#1\_relax \_ea\textcharsinmath\_fi}

% Characters !?*,.:;+-=()[]/<>| are printed from math family 5, i.e. normal text font
\textcharsinmath !5 ?5 *2 ,6 .0 :6 ;6 +2 −2 =3 (4 )5 [4 ]5 /0 <3 >3 |0 .\end
\Umathcode `- = 2 5 "2212   % Minus in math mode created by the hyphen character
\Umathcode `\{ = 4 5 `\{    % \{ and \} must have mathcode from fam 5
\Umathcode `\} = 5 5 `\}
\Udelcode  `\{ = 1 `\{      % and delcode from fam 1 (math font)
\Udelcode  `\} = 1 `\}
\edef\{{\csstring\{}  \edef\}{\csstring\}}

% Test:
Heros in text and in math: $Heros-math: 13, M = -(3!) + y_5$.
The code above reloads the same Unicode math font but moreover, it loads the currently used \rm and \it text fonts as math family 5 and 6. The digits are rendered from family 5 and variables from family 6 instead of from the math font. The characters specified by \textcharsinmath, i.e. ! ? * , . : + - = ( ) [ ] < > | \{ and \}, are printed from family 5 too. Other math symbols are printed from original Unicode math font.
If you have loaded a special text font by \font primitive, i.e. \font\foo=something, then you can set this font as family 5 by
\_addto\_normalmath{%
    \_setmathfamily    5 \foo
}
(0027) -- P. O. 2020-07-09
Equation marks in atypical cases
We want to put equation marks \eqmark in more lines in display mode when we are using macros not designed for such case. For example in the lines of \case macro:
$$ f(x) = \cases{0 & for $x<0$\toright\eqmark \cr
                 1 & otherwise\toright\eqmark } $$
This puts the equation marks to the right margin in each line generated by the \case macro. The \toright\eqmark is used here. Analogically, \toleft\eqmark puts the equation mark to the left margin. The \toright, \toleft macrs are based on the \setpos, \posx, \posy macros from OpTeX.
Note: the same implementation is in math.opm package, use \load[math].
\newcount\tomarginno
\def\toright#1{\_incr\tomarginno {\setpos[tr:\the\tomarginno]%
   \rlap{\kern-\posx[tr:\the\tomarginno]\kern\hoffset\kern\hsize\llap{#1}}}}
\def\toleft#1{\_incr\tomarginno {\setpos[tr:\the\tomarginno]%
   \rlap{\kern-\posx[tr:\the\tomarginno]\kern\hoffset\rlap{#1}}}}
The parameter #1 is shifted to the right/left margin in the second run of TeX because we need to know the absolute position of the current point and we shift it to the right margin.
(0028) -- P. O. 2020-07-10
Equation marks for sub-equations
Sometime we want to declare a bunch of equations with the same numeric
equation marks but with different suffixes, for example (1.1a), (1.1b).
We create a macro \subeqmark suffix.
The \subeqmark a starts
the bunch of equations with a new number. Following \subeqmark b,
\subeqmark c etc. use the same equation number, they differ only by
given suffixes. For example
$$ \eqalignno{
    x + 2y + 3z &= 600 & \subeqmark a \cr
   12x + y - 3z &= 7   & \subeqmark b[label] \cr
    4x - y + 5z &= -5  & \subeqmark c \cr
}
$$
See equation~\ref[label].
$$
  a^2 + b^2 = c^2 \eqmark
$$
prints the system of equations with numbers (1a), (1b), (1c) and the (1b) is referenced in the text. The next Pythagorean theorem has number (2).
The implementation is simple:
\def \_thednum    {(\the\_dnum\dnumpost)}
\def\dnumpost{}
\def\subeqmark#1{\def\dnumpost{#1}\ifx a#1\else \decr\_dnum\fi \eqmark}
Note: the same implementation is in math.opm package, use \load[math].
(0074) -- P. O. 2022-03-08
Loading additional Unicode math fonts
Unicode math font should include all math characters needed in the document. But it is not generally true. Try to load a Unicode math font using \loadmath{[math-font]} followed by \input print-unimath.opm and you can see empty slots. They are unsupported by loaded math font.
Maybe, another Unicode math font supports another slots. You can combine more than one math font in single document. For example, you have loaded Garamond-Math font and you have found that \triangleq isn't supported. Then you can load additional Unicode math font by \addUmathfont and you can re-declare \triangleq in order this additional font is used for such character. Example:
\fontfam [EBGaramond]  % Garamond family including Garamond-Math is loaded
\addUmathfont \stix {[STIXMath-Regular]}{} {}{} {} % additional font STIX loaded
\mathchars \stix {\stareq \triangleq} % \stareq and \triangleq will use STIX

Test: $a \triangleq b$. % All is in Garamond only \triangleq in STIX.
If you want to set whole math alphabet to be used from additional font, you can modify \cal, \frak, \bbchar etc. macros:
\addto\cal{\fam\stix} % calligraphic will be used from STIX
The \addUmathfont macro is implemented in OpTeX itself since June 2022. See OpTeX documentation for more information.
This trick was inspired by a question at StackExchange, but I recommend to use my answer (wipet's answer) in this case becuase combination of basic equal sign from Garamond with other equal signs from STIX doesn't look good in single formula.
If you want to replace all missing slots of used main math font by characters of another font, use the macro \replacemissingchars, which is defined in math.opm package. Use \load[math].
(0030) -- P. O. 2020-12-02
Intelligent \dots like in AMSTeX
AMSTeX provides \dots macro which works by the context. If it is surrounded by symbols like + - = then it works like \cdots, if it is surrounded by comma or similar symbols then it works like \ldots. The math.opm package implements this issue. Use \load[math].
(0045) -- P. O. 2021-02-12
Vertical bars and more math shortcuts
Writing $|x|$ in the source code works but $|-1|$ or $|\sin x|$ gives bad spaces, because | is Ord and it should be Open at the left and Close at the right side. But typing something more complicated in the math source is annoying. We define | as math active character which gives right spacing. Moreover, we can type $||x||$ for norm with righ spacing.
\mathcode`|="8000
\def\autovert{\isnextchar|{\autoVertA}{\autovertA}}
\def\autoVertA|#1||{\mathopen{}\mathclose{\left\Vert #1\right\Vert}}
\def\autovertA#1|{\mathopen{}\mathclose{\left\vert #1\right\vert}}
{\catcode`|=13 \global\let|=\autovert}
You can try to write $|-1|$ or $||x-y||$. Moreover, the vertical bars are resizable because the |#1| is defined as
\mathopen{}\mathclose{\left\vert#1\right\vert}.
Do you want more shortcuts? For example, if you write <= then it should be automatically transformed to Unicode character ≤ in your text editor. Then OpTeX is able to read it and your math source keeps clear. But, if such a feature is not available in your text editor then you can implement this intelligence at macro level. You write
$$ a <= b <= c ==> a <= c $$
and you get:

You can use macos from OPmac trick 0149, they are working in OpTeX too.
(0061) -- P. O. 2021-04-19
Controlled sizes of parentheses
If you write $f(x(y+z))$ then the outer parentheses should be bigger. Classical Plain TeX provides macros \bigl, \bigr, etc., they can be used by $f\bigl(x(y+z)\bigr)$. But the source file looks bad with this markup. Better is to say that parentheses have to be bigger using a single prefix before functional symbol, i.e. $\bigp f(x(y+z))$. This should be print the same as previous example with \bigl, \bigr.
We implement prefixes \bigp, \Bigp, \biggp and \Biggp, they can be used before a functional symbol. The scaled parentheses surrounding the functional parameter can be (...) or [...] or {...} or \{...\}. I.e. \Bigp\Gamma [x] is the same as \Gamma \Bigl[x\bigr]. Moreover, the functional parameter gets its own TeX group, so \Bigp G(a\over2) results to G\Bigl({a\over2}\bigr). We add two more prefixes \autop and \normalp. First one applies \left, \right to the parentheses of the parameter, second one keeps the parentheses unscaled. The implementation follows.
Note: slihtly better implementation is in math.opm package, use \load[math].
\def\bigp#1{#1\fparam\bigl\bigr}
\def\Bigp#1{#1\fparam\Bigl\Bigr}
\def\biggp#1{#1\fparam\biggl\biggr}
\def\Biggp#1{#1\fparam\Biggl\Biggr}
\def\autop#1{#1\fparam\left\right}    % for auto-sized parentheses
\def\normalp#1{#1\fparam\relax\relax} % for no-scaled parentheses
\def\fparam#1#2{\let\bigleft=#1\let\bigright=#2\futureletns\next\fparamA}
\def\fparamA{%
   \ifx\next(\afterrelax{\fparamB()}\fi
   \ifx\next[\afterrelax{\fparamB[]}\fi
   \ifx\next\{\afterrelax{\fparamB\{\}}\fi
   \ifx\next\bgroup \def\lparen{\{}\def\rparen{\}}\afterrelax{\fparamC}\fi
   \relax
}
\def\fparamB#1#2{%
   \def\lparen{#1}\def\rparen{#2}%
   \def\next#1##1#2{\ensurebalanced#1#2\fparamC{##1}}%
   \next
}
\def\fparamC#1{%
   \ifx\bigleft\left \mathopen{}\fi
   \bigleft\lparen{#1}\bigright\rparen
   \ifx\bigright\right \mathclose{}\fi
}
\def\afterrelax#1#2\relax{\fi#1}
\def\futureletns#1#2{\ea\futurelet\ea#1\ea#2\romannumeral-`\.\noexpand}
We need to load macros \ensurebalanced from OpTeX trick 0043 because the functional parameter must be scanned as balanced text with respect to the given parentheses. For example \Bigp f(1+\bigp f(1+f(x))) works as we expect.
(0094) -- P. O. 2022-11-02
More spaces in script style around rel, bin
Classical TeX puts automatically \medmuskip around binary operators and \thickmuskip around relations, but only in text and display styles. These spaces are missing in script style. Maybe, someone want to add (smaller) spaces in these cases too. This can be done by following settings:
\Umathordbinspacing\scriptstyle=1mu
\Umathbinordspacing\scriptstyle=1mu
\Umathordbinspacing\crampedscriptstyle=1mu
\Umathbinordspacing\crampedscriptstyle=1mu

\Umathordrelspacing\scriptstyle=1.5mu
\Umathrelordspacing\scriptstyle=1.5mu
\Umathordrelspacing\crampedscriptstyle=1.5mu
\Umathrelordspacing\crampedscriptstyle=1.5mu
The LuaTeX primitive registers are used here, see section 7.5.2 in LuaTeX manual.
Note: slihtly better implementation is in math.opm package, use \load[math].
(0095) -- P. O. 2022-11-12
Tables
Colored cells in the table
autoload:
\colortab
declared also:
\multispanc
We create the macro \colortab which can be used in \thistable declaration. When this macro is applied then tha background of each cell can be cloered by chosen color. If the first item in the cell data is color switcher then this color is used for the background of the cell. For example:
   ... & \Blue Text &        ... % blue background and black text
   ... & \Green \Red  Text & ... % green background and red text
   ... & \relax \Blue Text & ... % blue text and default background
The color of the background will stretch as spaces in the common cells in normal table, i.e. C declarator means that colored space will stretch from both sides, L declarator means right stretching and R declarator means left stretching. The spaces from \tabiteml and \tabitemr are colored too.
If \cellcolor sequence is set by \let to the color (example \let\cellcolor=\Yellow) then this color is used as default background. If the \cellcolor is undefined then default background is transparent.
You can insert the white space between columns by nonzero \tabskip and you can insert the white space between lines by \noalign{\kern...}. Example:
\thistable={\colortab              % colored cells activated
            \tabstrut={\lower4pt\vbox to15pt{}}        % lines dimensions
            \tabskip=2pt \everycr={\noalign{\kern2pt}} % spaces between cells
            \let\cellcolor=\Yellow % default background color
           }
\table{clr}{first item      & second & \Blue \White third item \cr
            next long item  & \Red X & \Green       YES }
creates the table:
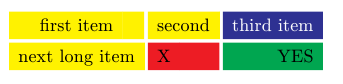
Implementation:
\def\tabdC{\futurelet\next\setcellcolor##\end\hfil\hfil}
\def\tabdL{\futurelet\next\setcellcolor##\end\relax\hfil}
\def\tabdR{\futurelet\next\setcellcolor##\end\hfil\relax}
\def\tabdP#1{\futurelet\next\setcellcolor##\end\vtop
    {\hsize=#1\relax \baselineskip=\normalbaselineskip
     \lineskiplimit=0pt \noindent\tmp\_unsskip\lower\dp\_tstrutbox\hbox{}}}
\def\colortab{\tablinespace=0pt \let\_paramtabdeclarep=\tabdP
   \let\_tabdeclarec=\tabdC \let\_tabdeclarel=\tabdL \_let\_tabdeclarer=\tabdR}
\def\setcellcolor{%
   \ifx\next\_setcolor \expandafter\setcellcolorC\else \expandafter\setcellcolorD\fi}
\def\setcellcolorC\_setcolor#1#2#3#4\end#5#6{%
   \ifx#5\vtop \def\tmp{#4}%
      \setbox0=\hbox{\the\tabiteml\vtop{\localcolor#6}\the\tabitemr}%
      \the\tabstrut {\localcolor\_setcolor{#1}{#2}{#3}\vrule width\wd0}\kern-\wd0 \box0
   \else
      \setbox0=\hbox{\the\tabiteml\localcolor#4\_unsskip\the\tabitemr}%
      {\localcolor\_setcolor{#1}{#2}{#3}%
       \the\tabstrut\leaders\vrule\hskip\wd0 \ifx#5\hfil plus1fil\fi}%
      \kern-\wd0 \box0
      \ifx#6\hfil
      {\kern-.3bp \localcolor\_setcolor{#1}{#2}{#3}\leaders\vrule\hskip.3bp plus1fil}\fi
   \fi
}
\def\setcellcolorD{\ifx\cellcolor\undefined \let\next=\setcellcolorN
   \else \def\next{\_ea\_ea\_ea\setcellcolorC\cellcolor}%
   \fi \next
}
\def\setcellcolorN#1\end#2#3{#2\the\tabiteml{\localcolor#1\unskip}\the\tabitemr#3}

\def\multispanc#1#2#3{\multispan{#1}%
   \_ea\_ea\_ea\cellcolexp#2#3\end\hfil\hfil\ignorespaces}
\def\cellcolexp{\futurelet\next\setcellcolor}
The \setcellcolor macro scans the first token from the cell data. The macro works in declaration part of the \halign, so the first token is scanned as the first unexpandable token after expansion. This token is \_setcolor when color macro is presented here. If this is true then the \setcellcolorC macro is executed, #1, #2 and #3 are the \_setcolor parameters #4 is the text of the item, #5 and #6 decide the align style. This macro measures the cell text in the box0 and does the colored background using \leaders. If the first token isn't \_setcolor then the macro \setcellcolorD decides if \cellcolor is defined. If it is true then \setcellcolorC is execuded (with partially expanded \cellcolor as parameter). Else \setcellcolorN is executed. This macro doesn't print any background.
The \multispanc Num \Color {text} can be used for multispan cells, see OPmac trick 103.
(0004) -- P. O. 2020-04-10
Colored lines in the table
autoload:
\crx
We can see the trend to use colored tables like this:

The table above can be created by the \table macro from OpTeX:
\thistable={\tabiteml={\quad}\tabitemr={\quad}}
\frame{\table{llllll}{\crx
  aa & bb & cc & dd & ee & ff \crx
  gg & hh & ii & jj & kk & ll \crx
  mm & nn & oo & pp & qq & rr \crx
  ss & tt & uu & vv & ww & xx \crx
  ab & cd & ef & gh & ij & kl \crx
  mn & op & qr & st & uv & wx}}
We need to define the \crx macro which inserts the grey rule before each odd line into the vertical list:
\newcount\tabline  \tabline=1
\def\crx{\crcr \ifodd\tabline \colortabline \else\noalign{\hrule height0pt}\fi
         \global\advance\tabline by1 }
\def\colortabline{\noalign{\localcolor\LightGrey
   \hrule height\ht\strutbox depth\dimexpr\dp\strutbox +2\tablinespace\relax
   \kern-\dimexpr\ht\strutbox+\dp\strutbox +2\tablinespace}}
The \tabline counter counts the lines in the table and inserts the grey backgroud for each odd \tabline. The last line must not be terminated by \crx macro.
(0005) -- P. O. 2020-04-10
Tables like in booktabs package
autoload:
\crtop
\crmid
\crbot
The orthodox advocates of LaTeX booktabs package don't like the table formats from the example above and they point out that I am loser because I don't know that the vertical rules in the table are out. Only horizontal rules are allowed but not double rules. And less rules is better than more. They have the following example in the documentation:
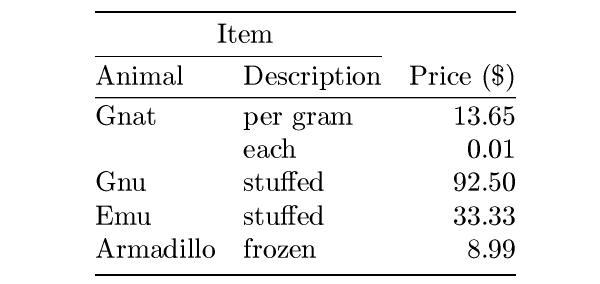
we can create such table by OpTeX and without booktabs package:
\thistable={\tabiteml={}\tabitemr={}\rulewidth=.2pt}
\table{l(\quad)lr}{                           \crtop
  \mspan2[c]{Item}         &                  \crlp{1-2}
   Animal    & Description & \quad Price (\$) \crmid
   Gnat      & per gram    &      13.65       \cr
             & each        &       0.01       \cr
   Gnu       & stuffed     &      92.50       \cr
   Emu       & stuffed     &      33.33       \cr
   Armadillo & frozen      &       8.99       \crbot}
We only need to define \crtop, \crmid, \crbot macros:
\def\crtop{\crcr \noalign{\hrule height.6pt \kern2.5pt}}
\def\crbot{\crcr \noalign{\kern2.5pt\hrule height.6pt}}
\def\crmid{\crcr \noalign{\kern1pt\hrule height.4pt\kern1pt}}
We need to set default rulewidth for this table to .2pt (it is generated by \crlp{1-2}). Other rules have explicitly declared thickness. We have to remove the spaces left in the first cell and right in the last cell because the rules have to be aligned with the text. This is a reason why the \tabitemr and \tabiteml are empty. The space between first and second column is created by (\quad) in the declaration. The same space before third column is caused by \quad before "Price".
(0007) -- P. O. 2020-04-10
Decimal digits aligned by the decimal point
We declare new column letter N with numeric parameter: it gives the maximal number of the digits used after the decimal point in the column. Table items can be in the form "xxx.xx" or ".xxx" or "xxx.". All these variants are aligned by the decimal point. The deciaml point itself is printed by the \decimalpoint macro, which can be defined as period or as comma (comma is used in Czech traditional typography for decimal numbers). The latest form "xxx." is aligned too but the decimal point is not printed. If the table item does not have any decimal point (for example it is the title of the column) then the text is centered.
\def\decimalpoint{.}
\def\_paramtabdeclareN#1{\the\tabiteml\hfil\adigit{#1}##.\relax\the\tabitemr}
\def\adigit#1#2.#3{\ifx\relax#3\hfil#2\_unsskip\hfil \else
    \tmpdim=.5em \tmpdim=#1\tmpdim $#2$%
    \_ea \ifx.#3\relax\phantom\decimalpoint \else \decimalpoint \fi
    \_ea \adigitA\fi #3%
}
\def\adigitA#1.\relax{\hbox to\tmpdim{$#1$\hss}}

% test:

\table{r N3 l}{
       & results & \crl
   aha &   1.24  & uff \cr
   uha &    .123 & mm  \cr
    nn &  24.42  & rr  \cr
     p &   2.    & r   \cr
     q &    .24  & s   }
The N declararor runs \adigit macro. This macro reads the item data until decimal point is found. The hidden decimal point is in the right part of declaration, so we are sure that the scanning of the parameter finishes. If this compensatory decimal point is scanned (i.e. no decimal point is in the item data, #3 is \relax) then we write the text centered. Else we write left part of the number, \decimalpoint (or \phantom\decimalpoint if no digits follows) and the rest is printed in the box with fixed width given by the number of digits declared in N parameter.
If you don't want to specify the maximal number of digits, you can declare D column declarator (without parameter) and use the \eqbox macro from OpTeX, see section 2.30.4. You have to run TeX two times.
\def\decimalpoint{.}
\def\_tabdeclareD{\the\tabiteml\hfil\adigitD##.\relax\the\tabitemr}
\def\adigitD#1.#2{\ifx\relax#2\hfil#1\_unsskip\hfil \else
    $#1$%
    \_ea \ifx.#2\relax\phantom\decimalpoint \else \decimalpoint \fi
    \adigitAD\fi #2%
}
\def\adigitAD#1.\relax{\eqbox l[D:\the\tabnum/\the\colnum]{$#1$}}

\newcount\tabnum
\everytable{\global\advance\tabnum by1}
We must to specify the label for \eqbox uniquely in whole document. So we have to set numbers to each table and use the label in the form D:tablenum/colnum. Note that the column number \colnum is calculated by the \table macro and it is available for each column used in this macro.
(0015) -- P. O. 2020-05-20
Long table across multiple pages
autoload:
\longtable
The \table macro runs \halign primitive inside \vbox. This is reason why it is unbreakable to multiple pages. But you can deactivate this \vbox. Suppose that you have a lot of lines like this:
\def\ltable{\bgroup \let\_tablebox=\egroup \table} % the \vbox is deactivated

\ltable{|c|c|}{data & data \cr
               data & data \cr
      ... much more & data ... \cr}
Now, the \halign can work in main vertical mode and its lines are breakable to more pages. But you can see more problems. If the \table is in main vertical mode, then all lines are at the left margin of the page box. Maybe, you want to see them in the center. This can be done by:
\thistable{\tabskipl=0pt plus1fil \tabskipr=\tabskipl}
\ltable to\hsize {|c|c|}{data & data \cr
                         data & data \cr
                ... much more & data ... \cr}
OK, the table is in the center. But \crl does not do what we want. We can use \crli instead it. If there is \crli at each line, then we see next problem. The horizontal rule is at the bottom of the page but not at the top of next page. You can re-define \crli like this:
\thistable{\tabskipl=0pt plus1fil \tabskipr=\tabskipl
           \def\crli{\_crli \noalign{\penalty0\kern-.4pt}\_crli\noalign{\nobreak}}}
\ltable to\hsize{|c|c|}{\crli
                  data & data \crli
                  data & data \crli
         ... much more & data ... \crli}
The trick is based on the fact, that there are two horizontal rules (one over another) between each lines. If a page break occurs (at \penalty0) then one horizontal rule is at the bottom and second one at the top of next page.
The tricks above are only very simple examples of long tables. If you need something more smart then you can use fixed witdh of table items and each line is one \hbox. You need not to use \halign. Or you can use \eqbox from OpTeX. Or you can resample the boxes created by \halign. This last approach allows to repeat a table header at the top of each page again:
\def\longtable#1#2{\goodbreak \bgroup \tablinespace=0pt \let\_zerotabrule=\empty
   \setbox0=\table{#1}{\strutT\relax #2}
   \setbox1=\vbox{\unvbox0 \setbox2=\vbox{}\revertbox}
   \setbox2=\vbox{\unvbox2 \global\setbox4=\lastbox\unskip \global\setbox5=\lastbox\unskip}
   \whatfree4 \advance\tmpdim by-.8pt \ifdim\tmpdim<\baselineskip \vfil\break \fi
   \offinterlineskip \crule\center4\crule\center5 \printboxes
   \center5\crule \egroup \goodbreak
}
\def\whatfree#1{\tmpdim=\vsize \advance\tmpdim by-\pagetotal
   \advance\tmpdim by-\prevdepth \advance\tmpdim by-.4pt
   \advance\tmpdim by-\ht#1 \advance\tmpdim by-\dp#1 \advance\tmpdim by-\ht5 }
\def\revertbox {\setbox0=\lastbox\unskip
   \ifvoid0 \else \global\setbox2=\vbox{\unvbox2\box0} \ea\revertbox\fi }
\def\printboxes{\setbox2=\vbox{\unvbox2 \global\setbox0=\lastbox\unskip}
   \ifvoid0 \else \whatfree0
      \ifdim\tmpdim<0pt \center5\crule\vfil\break \crule\center4\crule\center5 \fi
      \center0 \nobreak \printboxes \fi }
\def\crule{\centerline{\hbox to\wd4{\hrulefill}}\nobreak}
\def\center#1{\centerline{\copy#1}\nobreak}

\def\strutT {\vrule height1.8em depth.8em width0pt} % strut for the title

\longtable {|c|c|c|}{ head1 & head2 & head22 \cr % title
                                             \tskip5pt
                      data2 & data2 & data2 \cr
                      data3 & data3 & data3 \cr
                      data4 & data4 & data4 \cr
                       data & data  & data \cr
              ... much more & data  & data ...}
The head1 , head2 and head22 is repeated with rules above and below this head at the top of each page. The \tskip is mandatory here and it separates the bottom rule of the head from the data. This solution is copied from OPmac trick 0024.
(0016) -- P. O. 2020-05-20
Vertically centered paragraphs in table
autoload:
\vcent, \vbot
The p declarator in the \table macro creates paragraphs in \vtop. It means that first line of all paragraphs in one table row is vertically aligned. Maybe, you want to set vertically alignment to center or to the last line. The following testing code shows one approach:
\def\vbot{\let\_tableparbox=\_vbox}
\def\vcent{\toksapp\tabiteml{$}\tokspre\tabitemr{$}\let\_tableparbox=\_vcenter}

\table{|p{1.5cm}|p{4cm}|}{ % top alignment (default)
 \crl
 d f g fd s f h d d s r df g h jj f d sd f d f g g t f di ejb  &
 ff h hjs hjs chjds js sjd fgh fshs gf sfhs fh ss shfs fs
 \crl
}

\table{|p{1.5cm\vcent}|p{4cm\vcent}|}{ % vertically centered paragraphs
 \crl
 d f g fd s f h d d s r df g h jj f d sd f d f g g t f di ejb  &
 ff h hjs hjs chjds js sjd fgh fshs gf sfhs fh ss shfs fs
 \crl
}
You can combine \fL, \fR, \fC and \fX with \vbot and \vcent. For example, p{7cm\fC\vcent} creates horizontaly and verticaly centered paragraph.
Internals: the macros \vbot and \vcent redefine the OpTeX sequence \_tableparbox, which is used in "p" table items and is declared as \vtop by default.
The alternative is:
\thistable{\vcent} \table{|p{1.5cm}|p{4cm}|}{...}
(0023) -- P. O. 2020-06-01
The decimal point aligned in the table
We create table column declarator Nn which can be used for decimal numbers aligned by decimal point.
\table{|c|Nn|}{\crl
   first:   & 23433.1       \cr
   second:  &    55.131415  \crl
}
In fact, there are two clumns N and n with following declarations:
\def\_tabdeclareN{\the\tabiteml \hfil \scannum ##\_unsskip}
\def\_tabdeclaren{##\_unsskip \hfil \the\tabitemr}

\def\scannum#1 {\isinlist{#1}.\iftrue \ea\scannumA \else \ea\scannumB\fi #1\relax}
\def\scannumA#1.#2\relax{#1&\decimaldot#2}
\def\scannumB#1\relax{#1&}
\def\decimaldot{.}
First column N is right aligned and second colum n is left aligned. The first column runs the scanner \scannum which reads the number separated by space. It means that we must write space after numbers and before & or \cr.
There exists more powerfull macro \num which can be used in tables too, see OpTeX trick 0040.
(0039) -- P. O. 2021-02-06
Table notes
autoload:
\tnote
declared also:
\tnoteprint
We create the macro \tnote{text} which can be used in tables. Each occurrence prints only a mark in the form ^a, ^b, etc. and saves {text} into the memory. When the table is printed then user write \tnoteprint and the marks are repeated again with the appropriate texts. This is similar as footnotes, but works locally for each table.
\newcount\tnotenum
\def\tnotelist{}
\def\tnoteformat{$\Red^{\rm\_athe\tnotenum}$}
\def\tnote#1{\incr\tnotenum \tnoteformat\global\addto\tnotelist{{#1}}}
\def\tnoteprint{\par\noindent \tnotenum=0
   \ea\foreach\tnotelist \do{\advance\tnotenum by1 \tnoteformat##1 }\par
   \global\tnotenum=0 \gdef\tnotelist{}%
}

%test:
\table{|c|c|}{\crl
  m\tnote{meters}      & s\tnote{seconds} \crl
  kg\tnote{kilograms}  & A\tnote{ampers} \crl
}
\tnoteprint
The format of \tnoteprint is single paragraph with \noindent and with note marks in \Red. You can create a different \tnoteprint macro with different formating, of course.
(0046) -- P. O. 2021-02-14
Positioning in the table
autoload:
\tabnodes,
\tablebefore
declared also:
\tableafter,
\itl, \icl, \ibl,
\itc, \icc, \ibc,
\itr, \icr, \ibr
We craete macro \tabnodes which creates nodes in the table when \thistable{\tabnodes} is declared. You can put graphics or text at these nodes before or after the table using \tablebefore or \tableafter macros. Example:
\tablebefore
   \pdfliteral{q 1 0 0 RG \icc[1,1] m \icc[2,3] l S \icc[2,1] m \icc[1,3] l S Q}%

\thistable{\tabnodes \tablinespace=0pt}
\table{ccc}{
   first & second & third \cr
   A     & B      & C
}
This example connects the center of "first" with the center of "C" and the center of "third" with the center of "A" by red line. The macro is based on absolute positions on the page given by \setpos, \posx and \posy, so the material from \tablebefore and \tableafter is placed at given positions after second run of TeX.
The \tablebefore or \tableafter set the position of the current point as origin of coodinate system and following \pdfliteral's can use the macro \icc (and others). They give the positions of table items in bp unit and in the current coordinate system. The \tablebefore must be used before \table (the graphics act as background of the real table) and \tableafter should be used after \table with the same meaning, but the graphics owerwrite the table. You can use both of them or only one of them at the same page where the \table is.
When \tabnodes is used then \tablinespace=0pt is recommended in order to correct vertical positioning of the nodes.
There are macros \itl, \icl, \ibl, \itc, \icc, \ibc, \itr, \icr, \ibr. Their syntax is \itl[row,column] and they expand to the coordinates (separated by space) of the table item given by [row,column]. These macros expand to top-left, center-left, bottom-left, top-center, center, bottom-center, top-right, center-right, bottom-right coordinates of the item respectively. Moreover the macros \iht[row,column] or \iwd[row,column] expand to the total height or width of the item respectively.
\ishift\itl[row,col][right,up] expands to the \itl coordinates of the point shifted by given amount right and up, for example \ishift\itl[2,3][1pt,1pt]. The same can be applied to other macros \icl, \ibl, \itc, \icc, \ibc, \itr, \icr, \ibr.
You can use \puttext or \putpic after \tablebefore or \tableafter like \pdfliteral, and you can use \ibl etc. macros as coordinates given to \puttext ot \putpic. But the se macros have to be prefixed by \tabpos in this case. Example:
\tablebefore
   \tabpos\puttext\ibl[2,2]{HELLO}
   ... or ...
   \tabpos\puttext\ishift\ibl[2,2][3pt,7pt]{HELLO}
The implementation follows.
\def\tablebefore{\ifvmode \nointerlineskip\null \fi
   \incr\tndnum \setpos[t\the\tndnum:ori:b]\ea\tbpxpy\ea{\the\tndnum}{b}\decr\tndnum
}
\def\tableafter {\setpos[t\the\tndnum:ori:e]\ea\tbpxpy\ea{\the\tndnum}{e}}
\def\tbpxpy#1#2{%
   \def\tbpx[##1]{\expr{\bp{\posx[t#1:##1]}-\bp{\posx[t#1:ori:#2]}}}%
   \def\tbpy[##1]{\expr{\bp{\posy[t#1:##1]}-\bp{\posy[t#1:ori:#2]}}}%
}
\newcount\tndnum \newcount\tablerownum
\def\putnodeh#1{\omit\relax
   \setpos[t\the\tndnum:l#1]\hskip0pt plus1fill\relax \setpos[t\the\tndnum:r#1]}
\def\putnodelr{\fornum 1..\colnum-1\do{\putnodeh{##1}&}\putnodeh{\the\colnum}%
   \gdef\putnode{\noalign{\putnodev}}\cr}
\def\putnodev{\setpos[t\the\tndnum:v\the\tablerownum]\incr\tablerownum}
\def\tabnodes{\incr\tndnum \tablerownum=0
   \def\_tablepxpreset{\everycr{}}\let\putnode=\putnodelr \everycr={\putnode}}

\def\itl[#1,#2]{\expr{\tbpx[l\enum{#2}]} \expr{\tbpy[v\enum{#1-1}]}}
\def\icl[#1,#2]{\expr{\tbpx[l\enum{#2}]}
                \expr{(\tbpy[v\enum{#1-1}]+(\tbpy[v\enum{#1}]))/2}}
\def\ibl[#1,#2]{\expr{\tbpx[l\enum{#2}]} \expr{\tbpy[v\enum{#1}]}}
\def\itc[#1,#2]{\expr{(\tbpx[l\enum{#2}]+(\tbpx[r\enum{#2}]))/2}
                \expr{\tbpy[v\enum{#1-1}]}}
\def\icc[#1,#2]{\expr{(\tbpx[l\enum{#2}]+(\tbpx[r\enum{#2}]))/2}
                \expr{(\tbpy[v\enum{#1-1}]+(\tbpy[v\enum{#1}]))/2}}
\def\ibc[#1,#2]{\expr{(\tbpx[l\enum{#2}]+(\tbpx[r\enum{#2}]))/2}
                \expr{\tbpy[v\enum{#1}]}}
\def\itr[#1,#2]{\expr{\tbpx[r\enum{#2}]} \expr{\tbpy[v\enum{#1-1}]}}
\def\icr[#1,#2]{\expr{\tbpx[r\enum{#2}]}
                \expr{(\tbpy[v\enum{#1-1}]+(\tbpy[v\enum{#1}]))/2}}
\def\ibr[#1,#2]{\expr{\tbpx[r\enum{#2}]} \expr{\tbpy[v\enum{#1}]}}
\def\iwd[#1,#2]{\expr{\tbpx[r\enum{#2}]-(\tbpx[l\enum{#2}])}}
\def\iht[#1,#2]{\expr{\tbpy[v\enum{#1-1}]-(\tbpy[v\enum{#1}])}}

\def\enum#1{\number\numexpr#1\relax}
\def\ishift #1{\ea\ishifta#1}  %  \ishift[2,3][1pt,2.5pt]
\def\ishifta \expr#1 \expr#2#3#4,#5]{\expr{#1+(\bp{#4})} \expr{#2+(\bp{#5})}}
\def\tabpos#1#2{#1\ifx\ishift#2\afterfi{\ea\ea\ea\ea\ea\ea}\fi\ea\tabposA#2}
\def\tabposA\expr#1 \expr#2{\expr{#1}bp \expr{#2}bp}
The nodes t(tab-num):v(row-num) are created for vertical positioning, t(tab-num):l(con-num) and t(tab-num):r(col-num) are created for horizontal positioning (left side and right side of given column). The t(tab-num):ori:b and t(tab-num):ori:e are nodes for origins at \tablebefore and \taleafter respectively. See .ref file for real example. Note that t(tab-num):l(col-num) can differ from t(tab-num):r(col-num -1) if \tabskip is non-zero.
(0050) -- P. O. 2021-03-09
Format valid for each columns in given row
We create the macro \rowformat{selectors} which can be given before first item in a table row and the selectors are applied for each items in this row. For example \rowformat{\Red\bf} causes that all items in the given row are bold and red.
\def\itemfmt{\ifnum\colnum=1 \gdef\itemfmtA{}\else \itemfmtA\fi}
\def\rowformat#1{\gdef\itemfmtA{#1}#1\ignorespaces}

\tabiteml={\enspace\itemfmt}

\table {ccc}{
  \rowformat{\bf}
  bold & text & here \cr
  n & m & p \cr
  1 & 2 & 3
}
The \rowformat macro works ony if \tabiteml includes the \itemfmt macro as shown in the example above.
(0110) -- P. O. 2021-05-12
Text blocks
Text blocks with grey background splittable to more pages
autoload:
\framedblock
re-defined:
\beglock, \endblock
declared also:
\printframe,
(if undeclared)
used and declared also:
\frameslist
We implement another design of \begblock...\endblock than the default from OpTeX. The text blocks will have a grey background. They can split into more pages. The grey background continues to the next pages in this case. The main issue of the implementation is this splitting problem:
\newcount\blocklevel  % nesting level of blocks
\def\begblock{\par\bgroup
   \advance\blocklevel by1 \advance\leftskip by\iindent \rightskip=\leftskip
   \medskip
   \openref\pdfsavepos \ea\_wref\ea\Xblock\ea{\ea{\the\blocklevel}B{\the\pdflastypos}}
   \nobreak \medskip
}
\def\endblock{\par\nobreak\medskip
   \pdfsavepos \ea\_wref\ea\Xblock\ea{\ea{\the\blocklevel}E{\the\pdflastypos}}
   \medskip \egroup
}
\refdecl{%
   \def\Xblock#1#2#3{\ifnum#1=1 \edef\tmp{frm:\ea\ignoresecond\_currpage}^^J
      \unless\ifcsname \tmp \endcsname \sxdef{\tmp}{}\fi^^J
      \sxdef{\tmp}{\cs{\tmp}#2{#3}}\fi}
}
\newdimen\frtop \newdimen\frbottom % positions of top and bottom text on the pages
\pgbackground={%
   \slet{tmp}{frm:\the\gpageno}
   \ifx\tmp\undefined \def\tmp{}\fi
   \frtop=\dimexpr \pdfpageheight-\voffset+\smallskipamount\relax
   \frbottom=\dimexpr\pdfpageheight-\voffset-\vsize-\medskipamount\relax
   \ifx\frnext y \edef\tmp{B{\number\frtop}\tmp}\global\let\frnext n\fi
   \ea\printframes \tmp B{0}E{\number\frbottom}
   \ifx\frameslist\empty \else
   \pdfliteral{q 1 0 0 1 0 \bp{-\pdfpageheight} cm \frameslist Q}\fi
}
\def\printframes B#1#2E#3{\ifnum#1=0 \else
   \printframe {\hoffset}{#3sp}{\_xhsize}{\ifnum#1=-1 \number\frtop\else#1\fi sp-#3sp}
   \ifx^#2^\else \global\let\frnext=y \let\printframes=\relax \fi
   \ea\printframes\fi
}
\def\frameslist{}
\def\printframe #1#2#3#4{\edef\frameslist{\frameslist
    .8 g \bp{#1} \bp{#2} \bp{#3} \bp{#4} re f }%
}
\def\framedblocks{} % for autoloading only, it redefines standard \begblock, \endblock
The main idea of the implementation. The \begblock writes its vertical position to the .ref file in the format \Xblock{level}B{position} using \pdfsavepos and \pdflastypos. The \endblock writes analogical information in the format \Xblock{level}E{position}. We restore this information (only first nesting level) from the .ref file like
\def\frm:gpageno{B{pos}E{pos}B{pos}E{pos}...B{pos}E{pos}}
for each page number gpageno. The grey rectangles are drawn in the \pgbackground when output routine is processed in the second TeX run. This is done by
\printframes B{pos}E{pos}...B{pos}E{pos}B{0}E{bottom-pos}
This macro reads B{}E{} in pairs in a loop and creates the frame for each pair. When B{0}E{bootom-pos} is read, the loop is finished and the last frame is not created. This is "normal" behavior when all blocks begin and end on the same page. If we have an opened block at a page (but not closed), then the data looks like
\printframes B{pos}E{pos}...B{pos}B{0}E{bottom-pos}
The last pair B{pos}#2E{bottom-pos} is processed now (#2 is ignored) and the status about the continued block is saved as \frnext=y. Then the data of the next page looks like B{top-pos}E{pos}...B{0}E{pos}.
You can test it:
\lipsum[1]
\begblock
  \lipsum[2-3]
\endblock
\lipsum[4-5]
and run OpTeX twice.
(0031) -- P. O. 2021-01-13, added \openref 2023-03-22
Text blocks in ovals
The trick 0031 above (text blocks splitting to more pages) should be modified with respect to various different designs. The example below puts these blocks to yellow ovals with red borders.
We re-define the \printframe macro in order to print the oval with desired sizes. The diameter or rounded corners is set to 10bp.
\def\printframe #1#2#3#4{\edef\frameslist{\frameslist
    q 1 1 0 rg 1 0 0 RG
      1 0 0 1 \bp{\hoffset+10bp} \bp{#2+10bp} cm    % origin shifted to the left-bottom
      \_oval{\bp{\_xhsize-20bp}}{\bp{#4-20bp}}{10} B Q }%
}
(0034) -- P. O. 2021-01-14
Two columns parallel side by side
autoloaded:
\twoblocks
We implement the macro \twoblocks{first column}{second column} which prints two columns side by side, the first lines of both columns are vertically aligned. If there is no space at the current page, the columns are broken to more pages. The macro can be used for bilingual text columns. You can use more \twoblocks one by one. The first line of each \texblocks pair is vertically aligned again. Example:
\twoblocks{
  {\bf The text in English...} \lorem[1-2]
}
{
  {\bf The text in other language...} \lorem[3-4]
}
\twoblocks{
  {\bf Another text in English...} \lorem[5-12]
}
{
  {\bf Another text in other language...} \lorem[15-22]
}
Implementation:
\newdimen\pageblank
\newdimen\columnsht

\def\setcolumn{\advance\hsize by-\colsep \hsize=.5\hsize \penalty0 }
\def\twoblocks{\par
   \begingroup \hbadness=5000 \splittopskip=1em plus1fil \brokenpenalty=0
   \setbox0=\vbox\bgroup \setcolumn
      \aftergroup\twoblocksA
      \let\next=%
}
\def\twoblocksA{%
   \setbox1=\vbox\bgroup \setcolumn
      \aftergroup\twoblocksB
      \let\next=%
}
\def\twoblocksB{\setbox2=\vsplit0 to0pt \setbox2=\vsplit1 to0pt \twoblocksC}
\def\twoblocksC{%
   \penalty0 \vskip\parskip
   \ifdim\pagegoal=\maxdimen \pageblank=\vsize \else \pageblank=\pagegoal \fi
   \advance\pageblank by-\pagetotal
   \ifdim\pageblank<24pt \vfil\break \pageblank=\vsize \fi
   \ifdim\ht0>\ht1 \columnsht=\ht0 \dimen0=\dp0 \else \columnsht=\ht1 \dimen0=\dp1 \fi
   \ifdim\columnsht>\pageblank
      \setbox2=\vsplit0 to\pageblank \setbox3=\vsplit1 to\pageblank
      \line{\xvtop2\hss\xvtop3}
      \kern-\baselineskip \nobreak\vfil\break
      \expandafter\twoblocksC
   \else
      \line{\xvtop0\hss\xvtop1}
      \prevdepth=\dimen0
      \endgroup
   \fi
}
\def\xvtop#1{\vtop{\null\kern-\splittopskip\unvbox#1}}
The left column is accumulated into box0 by the \twoblocks macro. The \twoblocks {text} is transformed to
\setbox0=\vbox\bgroup...\let\next={text}
It means that the opening brace { is ignored because there is \brgoup inside the macro instead it. The right column is saved to box1 similar way by the \twoblocksA macro. The \twoblocksB macro prepares columns to printing: it adds the \splittopskip space at the top of the boxes. The \twobolcksC macro prints columns. If there is sufficient space on the current page (\pageblank) then the boxes are printed using \line with two \xvtop's. The \xvtop macro is the same like \vtop but a correction at the top of the box is added: the \null is exactly at the next line in the document and the baseline of the first line of the column is shifted to the baseline of the \null box. The \dimen0 is the depth of the last line of the larger column and it is set to \prevdepth in order to the next line in the document will be printed to the baseline grid. If there isn't sufficient space on the current page then we get only parts of box0 and box1 of the given height \pageblank using \vsplit primitive, we print these parts as columns by the \line macro and go to the next page and the macro \twoblocksC is recursively repeated.
(0086) -- P. O. 2022-05-30
Different formatting
Indented footnotes
The question on StackExchange includes the need of indented footnotes, like this:
--------------
  1 This is a long footnote
    at more than one line.
We can set this formatting by replacing \_textindent by \textllap in \_fnset:
\def\textllap#1{\noindent\llap{#1\enspace}\ignorespaces}
\addto\_fnset{\leftskip=\parindent \let\_textindent=\textllap}
(0067) -- P. O. 2022-02-02
Line numbers in the left side of the formatted text
autoloaded:
\pstart
declared also:
\pend
The question on the tex.stackexchange asks for the line numbers in the left side of the formatted text. The macro package edmac mentioned here is not usable for OpTeX because it changes the output routine. If you want to change the output routine, you must to do it with recommendation given in the section 2.18 of the OpTeX manual, but old edmac macro package does't respect it.
Use \pstart before and \pend after one or more paragraphs. Set registers \firstlinenum=num or \linenumincrement if they differ from one.
The solution by wipet does not use edmac, but simply does a box manupulation at the post processing state (when \pend is processed):
\newcount\firstlinenum
\newcount\linenumincrement
\newcount\gprevgraf

\def\pstart{\par \setbox0=\vbox\bgroup
   \def\_par{\endgraf\advance\gprevgraf by\prevgraf \prevgraf=0 }%
}
\def\pend{\par \global\tmpnum=\prevgraf \egroup
   \ifnum\firstlinenum=0 \firstlinenum=1 \fi
   \ifnum\linenumincrement=0 \linenumincrement=1 \fi
   \multiply\tmpnum by\linenumincrement \advance\tmpnum by\firstlinenum
   \firstlinenum=\tmpnum \advance\tmpnum by-1
   \setbox0=\vbox{\unvbox0
      \setbox2=\hbox{}
      \loop
         \unskip \unskip\unpenalty \setbox1=\lastbox
         \ifvoid1 \else
            \global\setbox2=\hbox{\llap{\printnum}\box1\penalty0\unhbox2}
            \advance\tmpnum by-\linenumincrement
            \repeat
   }\noindent\unhbox2 \par
}
\def\printnum{\setfontsize{mag.6}\rm\the\tmpnum\kern.8em}
The signle paragraph surrounded by \pstart...\pend is processed first in the \vbox. The lines from this paragraph are moved from the vertical list to a horizontal list in \box2. The line numbers are added here by \llap. The lines are separated by \penalty0 in the created horizontal list. This is a reason why putting this horizontal list to the paragraph processing again (after \noindend) creates desired paragraph. If you want to do this over more than single paragraph then you must to re-define \par (or \_par in the new OpTeX) in order to do this re-boxing at each paragraph-end between \pstart and \pend.
(0069) -- P. O. 2022-02-02
First line of the paragraph with a different font
The following macro \firstline{text of the paragraph} prints the paragraph with different font of its first line. This font is given by the \firstlineshape. For example:
\let\firstlineshape=\bf
\firstline{The text of the paragraph}
or
\def\firstlineshape{\setfontsize{at12pt}\bf \uppercase} % \uppercase must be last
\firstline{The text of the paragraph}
The implementation:
\def\firstline#1{\par
   \begingroup \hfuzz=\maxdimen
   \setbox0=\vbox{
      \parshape 2 0pt\hsize 0pt\maxdimen
      \firstlineshape{#1}\par
      \global\tmpnum=\prevgraf
      \fornum 2..\prevgraf \do{\setbox0=\lastbox \unskip\unpenalty}
      \global\setbox1=\lastbox
   }
   \ifnum\tmpnum=1 \endgroup \box1 \else
      \setbox0=\vbox{
         \parshape 1 0pt0pt
         \unhcopy1 \par
         \setbox0=\lastbox \setbox0=\hbox{\unhbox0}
         \ifdim\wd0=0pt \prevgraf=\numexpr\prevgraf-1\relax \fi
         \parshape \numexpr\prevgraf+1\relax
             \fornum 1..\prevgraf \do{0pt0pt }0pt\maxdimen
         #1\par
         \setbox0=\box2
         \loop
             \setbox0=\lastbox \unskip\unpenalty
             \ifdim\wd0=\maxdimen
                 \global\setbox2=\hbox{\unhbox0 \ifvoid2 \else\space\unhbox2 \fi}
         \repeat
      }
      \endgroup
      \noindent\box1\penalty0\unhbox2 \par
   \fi
}
In the first step, we create the first line and the rest is in the second (or more) lines with \maxdimen width. Using \fornum we remove the rest and save the first line in the \box1. If there is no more lines then the \box1 is printed else we go to the second step. The box1 is divided to the elements (each element is one line with \hsize=0pt) and the number of the elements N is \prevgraf (or \prevgraf-1 if the last element ends with discretionary). Then we create \parshape where there is N lines with 0pt width and next lines are with \maxdimen width. Only the lines with \maxdimen width are taken in the following \loop and saved into \box2. It is the rest of the pragraph text. Finally, the paragraph is created again using \box1 followed by \unhbox2.
(0076) -- P. O. 2022-04-15
Numbered paragraph with a different font
We want to print selected numbered paragraphs with a different font. For example Theorems should be in italics. Then we can define
\def\theorem {\ea\numparit \numberedpar A{Theorem}}
and use
\theorem Let $M$ be a nonempty set ...
followed by empty line, which closes the Theorem text.
The \numparit macro can be defined like this:
\def\numparit#1\_numberedparparam{#1%
   \addto\_tmpb{\aftergroup\numparfmt\aftergroup\it}\_numberedparparam}
\def\numparfmt#1\_par{{#1}\_par}
This code is based on the fact, that the \numberedpar macro defines \_tmpb and it is finalized by \_numberedparparam. The \_tmpb macro is used in \_printnumberedpar in a group.
(0116) -- P. O. 2023-08-04
Extra \vsize space for solving widows
Orphans and widows are single-line paragraph-parts which must not be alone at the beginning or at the end of pages. If we need to have exactly the same number of lines at all pages then we have problem with these orphans and widows. Very interesting solution which automatically adds \looseness is implemented in the package lua-widow-control. But sometimes this solution is not fully successful because \looseness is not applicable for arbitrary paragraph. Then we can decide, that two verso/recto pages should be one-line shorter or larger in order to avoid widows and orphans.
The solution presented here is manual-based. You can decide which pages should be shorter or larger in a parameter of \extravsizes macro. For example:
\parskip=0pt
\hsize=11cm
\vsize=\topskip \advance\vsize by25\baselineskip % 26 lines default
\footlinedist=35pt  % more space above pageno, default is 24pt

\extravsizes{ 2:+ 11:- 13:+ }
This example gives pages 2 and 3 larger, pages 10 and 11 shorter and pages 12 and 13 larger by one \baselineskip. You can specify only one page number from the verso/recto pair in the list of extra pages, as shown in the example. The second page from the pages pair is set to the same value automatically. The implementation follows:
\newdimen\vsizedefault
\def\extravsizes#1{%
   \foreach #1\do ##1:##2{%
      \tmpnum=##1
      \sxdef{vs:\the\tmpnum}{##2}
      \advance\tmpnum by \ifodd\tmpnum -\fi 1
      \sxdef{vs:\the\tmpnum}{##2}
   }
   \global\vsizedefault=\vsize \corrvsize  % for page 1
   \global\pgbottomskip=0pt plus1fil minus\baselineskip
}
\addto\_begoutput{\global\vsize=\vsizedefault}
\addto\_endoutput{\corrvsize}

\def\corrvsize{
   \global\vsize=\vsizedefault
   \ifcsname vs:\the\pageno\endcsname
      \global\advance \vsize by \csname vs:\the\pageno\endcsname \baselineskip
   \fi
}
The \extravsize defines macros \vs:pageno as + or -. It does this for given page in the list and for the second page in the pair too. Then it initializes \vsizedefault and sets the \pgbottomskip used in the output routine in order to allow shorter or larger pages without messages about overfull \vbox. The \corrvsize is called here for the page 1. All other \corrvsize's are called from in output routine from the \_endoutput macro (where the \pageno is increased for next page already). The \corrvsize macro advances \vsize by plus or minus one \baselineskip if the macro \vs:pageno is defined.
(0081) -- P. O. 2022-05-06
Two-column mode allowing for footnotes
OpTeX provides \begmulti ... \endmulti environment which prints more columns, but the columns are implemented using \vsplit primitive, so it doesn't provide \inserts inside the columns, especially footnotes.
The experimental macro pair \twocol ...\endtwocol shown here supports footnotes. We get a similar design as used in TUGboat, i.e. each article begins with its title and abstract at full \hsize and then two columns starts. The last two columns are not balanced at the end of the article. You can try the following code:
\fontfam[lm]
\newcount\numcolumn
\newdimen\xvsize
\def\vsizecorr{} \def\trytopins#1{}  % they are re-defined in OpTeX trick 0112

\def\twocol{\par\penalty0 \setbox0=\vbox\bgroup \hsize=.48\hsize \hbadness=5000 }
\def\endtwocol{\egroup
   \_setxhsize \global\xvsize=\vsize % save the global values of \hsize, \vsize
   \begingroup
      \maxdeadcycles=1000 \vbadness=5000
      \numcolumn=0
      \headline={} \footline={}   % internal \output routine without\head/foot lines
      \output={\incr\numcolumn
         \global\setbox\numexpr10000+\numcolumn=\_completepage      % no \shipout, only save box
         \ifodd\numcolumn\else \global\vsize=\xvsize \vsizecorr \fi % correct \vsize for next page
         \ifnum\outputpenalty>-20000 \else\dosupereject\fi
      }
      \ifdim\pagetotal>0pt % if the current page is non empty , we move it to \box10000
         \numcolumn=-1
         \tmpdim=\dimexpr\pagegoal-\pagetotal-\bigskipamount\relax
         \vsize=\dimexpr\pagetotal+\prevdepth\relax
         \vfil\supereject
         \global\vsize=\tmpdim
      \fi
      \vsizecorr \unvbox0  % now, we break \box0 to columns using internal output routine
      \vfil\supereject
   \endgroup
   \vsize=\xvsize
   \ifvoid10000 \else \unvbox10000 \bigskip \fi  % print the original current page content
   \fornumstep 2: 1..\numcolumn \do {     % print columns
      \line{\box\numexpr10000+##1\hfil \box\numexpr10001+##1}\trytopins{##1}\vfil\break
   }
}

%% TEST:
\lorem[1]  % text printed with full \hsize
\twocol    % two column mode starts
  \lorem[1-20]
  Text\fnote{This is a footnote.}.
  \lorem[21-30]
\endtwocol % two column mode ends
\bye
The material between \twocol ...\endtwocol is saved to the \box0 and then the internal \output routine is configured and \unvbox0 \vfil\supereject is processed with this internal routine. It doesn't do \shipout but saves the completed boxes to \box10001, \box10002, etc. Finally, these boxes are printed using original \output routine in the \fornumstep loop. If there is a full page width material in the current page before \twocol ...\endtwocol starts then it is moved to the \box10000 using internal \output routine and then it is re-used before printing columns. The \vsize is modified for first two columns in such case.
If you want to insert a typesetting material above columns, see the OpTeX trick 0112.
(0111) -- P. O. 2023-05-14
Two-column mode with full size top inserts
We use the previous OpTeX trick 0111. Moreover, we enable to insert a vertical materlial with full page width to top parts of selected pages. Note that \topinsert itself puts the material only to the top of the column.
The macro \toppage{pagenum}{vertical material} is implemented here. It puts the vertical material to the top of given page. Let currpage is the page where \twocol ...\endtwocol starts. Then the vertical material is inserted to the page currpage-1+pagenum page, i.e. if pagenum=1 then it will be at currpage, if pagenum=2 then it will be at the next page etc. A collection of \toppage macros have to be used before \twocol is started. For example:
\toppage1 {\Magenta \hrule\centerline{\vrule height1.5cm width1cm}\hrule}
\toppage3 {\Red \hrule\centerline{\vrule height1cm width1cm}\hrule}
\toppage4 {\Green \hrule height1.5cm width\hsize}
\lorem[1]  % text printed with full \hsize
\twocol    % two column mode starts
  \lorem[1-17]
  \topinsert \Blue \hrule height1cm width\hsize \endinsert % will be on the top of a column
  \lorem[18-20]
  Text\fnote{This is a footnote.}. % footnotes work
  \lorem[21-30]
\endtwocol % two column mode ends
The implementation is based on the previous OpTeX trick 0111. Use its code and define macros \toppage, \vsizecorr and \trytopins:
\def\toppage#1{\setbox\numexpr 11000+#1=\vbox}
\def\vsizecorr{\ifvoid \numexpr11001+\numcolumn/2\relax \else \global\advance\vsize by
   -\dimexpr\ht\numexpr11001+\numcolumn/2\relax+\skip\topins+\bigskipamount \relax \fi
}
\def\trytopins#1{\ifvoid\numexpr11000+#1/2\relax \else
   \topinsert \unvbox\numexpr11000+#1/2\relax \endinsert \fi
}
The macro \toppage just saves the vertical material to the box 11000+pagenum. If the page currently processed by \endtwocol corresponds with non-empty box 11000+pagenum then \vsize of columns is scaled down by the height of this box plus the space between top material and columns below it. Finally, the boxes 11000+pagenum are printed using the \trytopins when default \output routine is active, i.e. inside the \fornumstep loop.
(0112) -- P. O. 2023-05-15
Material added to the foreground of each page
autoload:
\pgforeground
OpTeX output routine provides \pgbackground tokens list which can declare a vertical material added to the background of each page. It means that the normal text overwrites this material.
We implement analogous tokens list \pgforeground which can declare a vertical material added to the foreground of each page. It means that this material overwrites the normal text of the document. You can specify, for example
\pgforeground{\Green \hrule width\pagewidth height3cm}
and the green rectangle is appended at the upper edge of each page. This rectangle overwrites the text of the document, if there is any.
The implementation:
\newtoks\pgforeground

\addto\_makefootline{
   \istoksempty\pgforeground \iffalse
      \vskip-\prevdepth
      \vskip-\vsize
      \vskip-\voffset
      \istoksempty\footline \iffalse \vskip-\footlinedist \fi
      \nointerlineskip
      \moveleft\hoffset \vbox{\the\pgforeground}
   \fi
}
The code is appended to the \_makefootline macro which is called after page body is created in the OpTeX output routine. This code is somewhat tricky, because we have to return the current typesetting point upwards to the upper edge. We have it just under the last box with (probably) nonzero depth. So, we have to return by this depth (\prevdepth) and by the page size (\vsize) and by the upper margin size (\voffset). Moreover, if there is nonempty \footline, we have to return by \footlinedist too.
(0129) -- P. O. 2024-02-12
Macro tricks
Structured conditionals
The usage of \if* conditionals is very uncomfortable if we need to use some structured logical expression in our macros with brackets () and logical AND, OR. This is not implemented at TeX primitive level, unfortunately. But we can use the following trick:
\def\cond[#1:#2]{#1 1\else0\fi}

%%        IF      (           a=a     AND          c=c      ) OR          e=f       then
\ifnum 0<\numexpr ( \cond[\ifx aa:\fi] * \cond[\ifx cc:\fi] ) + \cond[\ifx ef:\fi] \relax
     YES \else NO \fi
The \cond macro has syntax: \cond[primitive conditional:\fi] where primitive conditional is \ifx, \if, \ifnum, \ifvoid, \ifmmode, \ifdim, etc. followed by elementary conditional expression which syntax is dependent on used \if primitive. The \fi prameter is mandatory here because we need to have the whole construction \if-skipable.
If you want to use AND logical conjunction write *. If you want OR write +. Use brackets () as usual. The whole \if construction is fully expandable.
You can add another logical operators if you want:
\def\IMPL#1{\IMPLa#1\relax}
\def\IMPLa#1=>#2\relax{\ifnum #1>#2 0\else 1\fi}

\ifnum 0<\numexpr
%        (         a=a      =>           c=d     ) AND          2=2        then
   \IMPL{ \cond[\if aa:\fi] => \cond[\if cd:\fi] } * \cond[\ifnum2=2:\fi] \relax
   Yes \else No \fi
(0019) -- P. O. 2020-05-27
\fi in \if problem
TeX uses \if primitives in very specific way. If the condition is evaluated as false then TeX skips input stream without expansion of it until a matched \fi is reached. TeX observes only \if* primitives, \else and \fi (or their equivalents declared by \let) during this skipping process. This works relatively good but there may be a problem if we have a parameter (say #1) in the skippable part and this parameter includes unpaired \if or \fi or something similar. For example:
\def\test #1{\ifx #1a\message{the \string#1 has meaning of letter a}\fi}
Suppose that we want to process \test\fi. Then it is expanded to
\ifx \fi a\message{the \string\fi has meaning of letter a}\fi
The condition is evaluated as false, so the following text \message{the \string is skipped and the next \fi matches with starting \ifx. The next text has meaning of letter a}\fi is processed and gives TeX error. Of course, the macro \test works well until its parameter doesn't contain an unpaired \if* or \else or \fi.
If we want to have more robust macro \test, we can create a \splitif macro which has syntax:
\splitif{\if condition}{true text}{false text}
where \if condition is arbitrary \if primitive including its conditional parameters, for example \ifx#1#2 or \ifnum 0<\mycount etc. The true text is processed if the condition gives true, false text is processed if the condition gives false. The core idea is that we moved the skipping process from \if...\fi skipping to the macro prameter skipping. The \splitif macro can be implemented like this:
\long\def \splitif #1{#1\ea\ignoresecond\else\ea\usesecond\fi}
Now, our \test macro can look like:
\def\test #1{\splitif{\ifx #1a}{\message{the \string#1 is the letter a}}{}}
(0098) -- P. O. 2020-05-27
Drawing to given nodes
We show the application of the \setpos, \posx, \posy privided by OpTeX. We can connect two (or more) points at the single page by a line (more lines, curves). These points are declared by the position of the current point. For example the last word of the first paragraph is connected to the last word of the second paragraph by a line:
This is first paragraph.\setorigin\pdfliteral{0 0 m \bpx[end1] \bpy[end1] l S}

This is second paragraph connected by a line.\setpos[end1]
One position must be set by \setorigin. Other positions at the same page can be set by \setpos[label]. Then you can draw something at origin position by \pdfliteral primitive. The coordinates of the origin is 0,0, the coordinates of a point with label [label] (in big points) is given by \bpx[label],\bpy[label].
Use these macros:
\newcount\posorigin
\def\setorigin{\incr\posorigin\xdef\origin{ori:\the\posorigin}\setpos[ori:\the\posorigin]}
\def\bpx[#1]{\expr{\bp{\posx[#1]}-\bp{\posx[\origin]}}}
\def\bpy[#1]{\expr{\bp{\posy[#1]}-\bp{\posy[\origin]}}}
We can add arrows using macro \arrowccspike and \rotcm from OpTeX trick 0037:
This is first paragraph.\setorigin
\pdfliteral{q 0 0 m 1 0 0 RG 1 0 0 rg
   100 40 \expr{\bpx[end1]+50} \expr{\bpy[end1]+30} \bpx[end1] \bpy[end1] c S
   q \rotcm (0 0) (-100 -40) 0 0 cm \arrowccspike\space Q
   q \rotcm (0 0) (-50 -30) \bpx[end1] \bpy[end1] cm \arrowccspike\space Q
   Q}

This is second paragraph connected by a line.\setpos[end1]
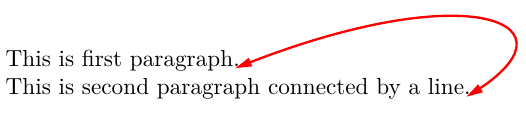
(0041) -- P. O. 2021-02-06
Tabbing macros
autoload:
\settabs
declared also:
\tabs
Plain TeX provides tabbing macros but OpTeX does not, bacuase old typewriter style for alignment is not preferred. Use \table instead this. Or you can set such typewriter TABs by following macros. Moreower, these macros are more intelligent than the Plain TeX equivalent.
You can say, for example, \settabs 4\columns. Then the \hsize is divided to four equal-size parts, each of them begins by a TAB position and the last one ends by a TAB position too. I.e. there are five equi-distant TAB positions. Then you can type
\tabs first text & second text & third text & fourth text & other text \cr
The left boundary of the first text is aligned with first TAB position. The next text is aligned to next TAB position. But it needs not to be exactly the second one: all TAB positions which are left to the actual text position are ignored and the first non-ignored TAB position is used. This means that the text is never overlapped. This is real behavior of old typewriters. Go to a Museum of Technology and try it. This is the significant difference from plain TeX macros.
You can set the TAB positions by invisible sample line too:
\settabs\tabs &textA&textB&textC\cr
Each & or \cr gives one TAB position. If you did not use first & immediately after \tabs then first TAB position is shifted from left boundary of lines.
The implementation looks like:
\def\tabs #1\cr{\setbox0=\hbox\bgroup \tabA #1&\cr&}
\def\tabA #1&{\ifx\cr#1\egroup\box0 \else
   \egroup
      \tmpdim=\maxdimen \ea\tabB \tabsdata {}\relax
      \ifdim \tmpdim=\maxdimen \tmpdim=0pt
      \else \advance\tmpdim by-\wd0 \fi
   \setbox0=\hbox\bgroup \unhbox0 \kern\tmpdim \ignorespaces#1\unskip\kern1sp
   \_ea\tabA \fi
}
\def\tabB #1{\ifx^#1^\else \unless\ifdim \wd0>#1 \tmpdim=#1 \tabC \fi \ea\tabB \fi}
\def\tabC #1\relax {\fi\fi}

\def\settabs #1{\def\tabsdata{}\ifx\tabs#1\_ea\settabstext \else\_ea\settabscols \fi #1}
\def\settabscols #1\columns{\tmpdim=\hsize \divide\tmpdim by#1\relax
   \fornum 0..#1 \do {\edef\tabsdata{\tabsdata{\the\dimexpr##1\tmpdim\relax}}}}

\def\settabstext #1#2\cr{\setbox0=\hbox\bgroup \settabA #2&\cr&}
\def\settabA #1&{\ifx\cr#1\egroup \edef\tabsdata{\tabsdata{\the\wd0}}\else
    #1\egroup \edef\tabsdata{\tabsdata{\the\wd0}}%
    \setbox0=\hbox\bgroup \unhbox0
    \_ea\settabA \fi
}
\def\tabsdata{}  % default: no tabulators set
The \tabsdata macro includes TAB positions in the format {0pt}{100pt}{200pt}. Of course, you can define directly TAB positions by \def\tabsdata{{0cm}{2cm}{4cm}{6cm}{8cm}}, for example.
The \tabs macro opens \setbox0=\hbox\bgroup, sets the appropriate text to it, closes it, measures \wd0, sets appropriate kern, opens \setbox0=\hbox\bgroup \unhbox0 again ad does this in a loop.
(0021) -- P. O. 2020-05-27
Macro with variable number of arguments in braces
You can create a macro by \vardef\mymacro{...} which can be used with arbitrary number of parameters enclosed in braces. For example \mymacro{first}{second} or \mymacro{one}{two}{three}. If the \mymacro is declared by \vardef, then you can use \NARGS in the macro body (this expands to the number of parameters just read) and \ARG{num} which expands to the num-th parameter.
This code is published at Stack exchange too. The discussion and more detail description is there.
\newcount\vardefnum
\newtoks\vardefinition

\def\vardef#1#2{%
\def#1{%
    \vardefnum=0
    \vardefinition{#2}%
    \grab}}

\def\grab{\futurelet\next\grabA}

\def\grabA{\ifx\next\bgroup \expandafter\storearg \else
  \edef\NARGS{\the\vardefnum}%
  \def\ARG##1{\csname vararg:##1\endcsname}%
  \the\vardefinition
  \let\NARGS\undefined \let\ARG=\undefined
  \fi}

\def\storearg#1{\advance\vardefnum by 1
  \ea\def\csname vararg:\the\vardefnum\endcsname{#1}%
  \grab}
The body #2 of a user defined macro is stored in the \vardefinition token string. Then the opening brace { is tested by the \futurelet primitive and possible parameters are read to \vararg:num macro. Next, the \vardefinition is processed.
You can test it by following code:
\vardef\mymacro{%
  The number of arguments passed to {\tt\string\mymacro} is \NARGS.
  \ifnum\NARGS=0\else
     They are:
     \tmpnum=1 \loop \ARG{\the\tmpnum}%
        \ifnum\NARGS>\tmpnum, \advance\tmpnum by 1 \repeat.\fi
}

\mymacro{a}{b}{c}

\mymacro{1}{2}{3}{4}{5}

\mymacro{x}

\mymacro{}{}{}{}

\mymacro123  % You can't omit brackets!
(0025) -- Matteo Caoduro. 2020-06-05
The import package
autoload:
\import
re-defined:
\input
We implement the LaTeX import package (see texdoc import) by three lines of the code.
\def\import#1#2{\def\tmp{\gtoksapp\picdir{#1/}\input{#2}}%
   \ea\tmp\ea\global\ea\picdir\ea{\the\picdir}}
\def\input#1{\_input{\the\picdir#1}}
The \input is redefined as primitive input applied to "\the\picdir filename". The \import macro redeclares \picdir and does the \input. When input is finished, then \picdir returns to its previous value.
Unlike the import LaTeX package, the \import macro can be used recursively in imported files. So, we need not to define \subimport.
(0035) -- P. O. 2021-01-14
Numbers printed in three-digits groups
The long number should be printed with spaces (or another symbol depending on used language) with three-digits groups. For example:
  2 365 121
     10 115.16
         25.145 17
We can write \num 2365121 or \num 10115.1 or \num 25.14517 and the grouping will be calculated by the macro.
\def\num #1 {\isinlist{#1}{.}\iftrue \ea\numG \else \ea\numH \fi #1\end}
\def\numG #1.#2\end {\numH#1\end \decimaldot \numB #2\empty\empty\empty}
\def\numH#1\end{\numA #1\empty\empty\empty #1\empty}
\def\numA #1#2#3{\xcasesof
   {\ifx #1\empty} {\numB}
   {\ifx #2\empty} {\numB{}}
   {\ifx #3\empty} {\ea\numB\ignoreit}
   \_finc          {\numA}
}
\def\numB #1#2#3#4{#1#2#3\ifx#4\empty\else \numsep \ea\numB\ea#4\fi}
\def\numsep{\,}
\def\decimaldot{.}
The macro \num reads the number separated by space. If it incudes period then the front part is processed by \numH and the decimal part by \numB. The front part is processed in two steps. First, the macro counts the number of digits by \numA and then it inserts spaces by \numB.
We can use this macro in tables with Nn declarator (see OpTeX trick 0039), but we must add the & symbol at the end of the \numH macro:
\def\numH#1\end{\numA #1\empty\empty\empty#1\empty &}

\def\_tabdeclareN{\the\tabiteml \hfil \num ##\_unsskip}
\def\_tabdeclaren{##\_unsskip\hfil\the\tabitemr}

\table{|c|Nn|}{\crl
   first:   & 23433.1       \cr
   second:  &    55.131415  \crl
}
(0040) -- P. O. 2021-02-06, used \xcasesof: 2022-11-27
Expandable token-per-token scanner
We define \def\dotoken#1{do something with #1} and we can use \scantokenlist{token list}. The macro \scantokenlist calls \dotoken repeatedly to each token from the given token list. All tokens are prepared "as is" in the #1 parameter (including category code), only { and } are given as tokens with the same ASCI code but category 12.
The implementation follows:
\def\scantokenlist #1{%
   \immediateassignment\edef\tmp{\scantokenlistA #1{\_fin} }%
   \immediateassignment\edef\tmp{\ea\scantokenlistC \tmp\_fin}%
   \ea\scantokenlistD \tmp\_fin
}
\def\scantokenlistA #1#{\unexpanded{#1}\scantokenlistB}
\def\scantokenlistB #1{\ifx\_fin#1\empty\else
   \string{\scantokenlistA#1{\_fin}\string}\ea\scantokenlistA\fi}
\def\scantokenlistC #1 #2{\ifx\_fin#2\empty\unexpanded{#1}\else
   \unexpanded{#1{ }#2}\ea\scantokenlistC\fi}
\def\scantokenlistD #1{\ifx\_fin#1\else \dotoken{#1}\ea\scantokenlistD\fi}

%% Test:
\def\dotoken#1{^^Jtoken: \string#1}
\message{\scantokenlist{a{h}#a {\test u{f}f muf}f.}}
First, \scantokenlistA converts { and } to category 12. It is used in \edef with \immediateassignment which makes \edef expandable. This is LuaTeX feature. Second, \scantokenlistC converts spaces to spaces surrounded in { }. Third, \scantokenlistD applies \dotoken to each token in the preprocessed token list.
If you want to return converted token list to the the original token list ({,} have catcodes 1,2) then you can define
\def\dotoken#1{\ea\ifx\string{#1{\else\ea\ifx\string}#1}\else\noexpand#1\fi\fi}
and run \scantokenlist in \edef, for example
\edef\mylist{\ea\scantokenlist\ea{\mylist}}
(0042) -- P. O. 2021-02-06
Parameter separated by space or end-group
We want to create a macro with a parameter separated by a space. For example \macro text . But sometimes a user may use the macro with bad syntax: {... \macro text} but we want to interpret this syntax correctly too. It should be used for macros with \input-like parameters, but OpTeX doesn't use this for \opinput, \inspic, etc. because the syntax \opinput{parameter} is preffered and we want to keep OpTeX macros to be simple. So, the next code is only an academical example.
You can do
\def\macrox #1{do something with "#1"}
\def\macro {\paramspaced\macrox}
Now \macro text accepts text separated by space
or {\bf \macro text} by end-group.
The \paramspaced macro is implemented here:
\def\paramspaced#1{\ea#1\expanded{{\iffalse}}\fi\paramspacedA}
\def\paramspacedA{\immediateassignment\futurelet\next\paramspacedB}
\def\paramspacedB{\casesof\next
   { }     {\paramspacedC}%
   \egroup {\paramspacedC}%
   \bgroup {\paramspacedD}
   \_finc  {\paramspacedE}%
}
\def\paramspacedC{\nospaceafter{\iffalse{{\fi}}}}
\def\paramspacedD#1{{#1}\paramspacedA}
\def\paramspacedE#1{#1\paramspacedA}
The trick is in the \expanded{{\iffalse}}\fi part of the code. It opens \expanded process which ends at \iffalse{{\fi}}. We read tokens during this process and do particular tasks depending on the following token.
(0097) -- P. O. 2022-11-27
Nested brackets of another type than {}
TeX checks the nested brackets only for one type of brackets: {}. OpTeX uses macros sometimes with the parameters surrounded by [] brackets, but they cannot be simply nested. If you write (for example) \label[a[b]c] then you get the label a[b and the text c] is printed. You can check the pairs and nesting of another type of brackets than {} by the \ensurebalanced macro:
% \ensurebalanced left-bracket right-bracket macro-to-run {first-attempt}
\def\macro[#1]{\ensurebalanced[]\macroA{#1}}
\def\macroA#1{the parameter "#1" has balanced brackets [].}
for example:
\macro[a[b]c] prints: the parameter "a[b]c" has balanced brackets [].
The \label macro can be redefined in order to balanced [] brackets can be nested:
\def\tmp{\def\labelA##1}\ea\tmp\ea{\label[#1]}
\def\label[#1]{\ensurebalanced[]\labelA{#1}}
The \ensurebalanced macro is defined by:
\def\ensurebalanced#1#2#3{\immediateassigned{%
   \def\balopen{#1}\def\balclose{#2}\let\balaction=#3%
   \def\readnextbal##1##2#2{\ensurebalancedA{##1#2##2}}}%
   \ensurebalancedA}
\def\ensurebalancedA#1{\isbalanced#1%
   \iftrue\afterfi{\balaction{#1}}\else\afterfi{\readnextbal{#1}}\fi}
\def\isbalanced#1\iftrue{\immediateassignment\tmpnum=0 \isbalancedA#1{\isbalanced}}
\def\isbalancedA#1#{\countbalanced#1\isbalanced \isbalancedB}
\def\isbalancedB#1{%
   \ifx\isbalanced#1\afterfi{\cs{ifnum}\tmpnum=0 }\else\ea\isbalancedA\fi}
\def\countbalanced#1{\ea\ifx\balopen #1\immediateassignment\incr\tmpnum\fi
                     \ea\ifx\balclose#1\immediateassignment\decr\tmpnum\fi
                     \ifx\isbalanced#1\else\ea\countbalanced\fi}
The macro \ensurebalanced is fully expandable using LuaTeX primitives \immediateassigned and \immediateassignment.
If the parameter includes {...} then balancing is not counted inside this pair. It. means that balancing of {...} has higher priority.
The heart of this macro is \ensurebalancedA and \readnextbal. They say (roughly speaking):
\ensurebalancedA #1 -> \isbalanced #1\iftrue \balaction{#1}\else \readnextbal{#1}
\readnextbal #1#2] -> \ensurebalancedA{#1]#2}
The \readnextbal reads next part of the text until next ] occurs.
(0043) -- P. O. 2021-02-06
Breaking URL at any point
Breaking URLs to more lines can be customized by \_urlxskip (inserted between normal characters), \_urlbskip (inserted after :// / . ? = - &), \_urlskip (inserted before these special characters) and \_urlgskip (inserted by \|). By default, URL is breakable at any point (since OpTeX version May 2021) because \_urlxskip is defined by \penalty9990 and there is a small amount of stretchability.
If we dislike such stretchability between characters, we can declare breaking possibiity with ragged right, when URL is broken:
\def\_urlxskip{\nobreak\hfil\penalty9900 \hfilneg}
\def\_urlbskip{\nobreak\hfil\penalty100 \hfilneg}
Suppose, we want to allow breaking URLs only after / . ? = & and breaking using \|, moreower small stretching between all characters in URL are allowed. Then we can use following settings:
\slet{_ur:-}{undefined} % disallow breaking after -
\_def\_urlxskip{\_penalty10000\_hskip0pt plus0.03em\_relax}
If we want to break long URLs only manually using \| inside URL text then we can define:
\let\_urlxskip=\nobreak
\let\_urlbskip=\nobreak
\let\_urlskip=\nobreak
\def\_urlgskip{\hfil\break}
You can try to show, where glues are added to the URL text by following experiment:
\def\_urlxskip{@}
\def\_urlbskip{*}
\def\_urlskip{§}
\def\_urlgskip{!}
\url{http://petr.olsak.net/op\|tex}
You get: h*t*t*p§:§/§/@p*e*t*r§.@o*l*s*a*k§.@n*e*t§/@o*p!t*e*x but a hyperlink to real http://petr.olsak.net/optex is created (if \hyperlinks is declared).
(0052) -- P. O. 2021-05-12
What page-number is current?
We want to ask sometimes what page-number is current. For example we want to put an image to the outer side of the page (to the left side at left page, to the right side at right page). We want to do somethig like this:
\ifodd ???
   \line{\hss \picw=.7\hsize \inspic{picture.jpg}} % right side
\else
   \line{\picw=.7\hsize \inspic{picture.jpg}\hss}  % left side
\fi
We can declare a special counter \picno for such pictures globally incremented and we save to the .ref file:
\_sxdef {pic::picno-value}{\selectpage}
When the .ref file is read during the next TeX run then the control sequence \pic::picno-value is defined as a macro with the current page number. We have to define the macro \selectpage using \refdecl. The whole example looks like this:
\refdecl{\def\selectpage{\_ea\_usesecond\_currpage}}
\def\setpage#1{\_openref \_ewref\_sxdef{{#1}{\_string\selectpage}}}

\newcount\picno

\incr\picno
\ifodd \trycs{pic::\the\picno}{0}
   \line{\hss \picw=.7\hsize \inspic{picture.jpg}} % right side
\else
   \line{\picw=.7\hsize \inspic{picture.jpg}\hss}  % left side
\fi
\setpage{pic::\the\picno}
You can see that \picno must be incremented in the place where we need to know the current page number. The \setpage must be added immediatelly after the box (or inserted into the box) where we need to know the current page number because its internal \write command (used in \setpage) must not be separated (to different pages) from its box.
(0075) -- P. O. 2022-03-15
PerPage package features
autoload:
\incrpp
declared also:
\thepp
\thepplast
\truepage
We implement the functionality from LaTeX perpage.sty package. User can declare \newcount\mycounter and then the \mycounter can be used by following macros:
- \incrpp\mycounter increments \mycounter by one and resets (or increments) the internal counter counted from initial value (usually from one) per each page.
- \thepp\mycounter prints (expands to) the value of the internal counter prepared by \incrpp.
- \truepage expands to the true page number if it is used immediatelly after \incrpp\mycounter.
- \thepplast\mycounter{pageno} expands to the last value of the internal counter at given page {pageno}. This can be used in the \output routine if you want to count the number of objects at given page.
Typically, the \incrpp\mycounter \thepp\mycounter are used in this couple. Or use: \incrpp\mycounter \truepage/\thepp\mycounter.
You must run TeX twice to get references right.
The internal counter is reset to 1 at begin of each page. If you like other value, use \sdef{resetpp:mycounter}{2} for example. Note that "mycounter" is the name you our counter without backslash.
Example:
\newcount\mycounter
\headline={The number of objects: \thepplast\mycounter{\the\pageno}\hss}

xx: \incrpp\mycounter \thepp\mycounter,
yy: \incrpp\mycounter \thepp\mycounter.
\vfil\break
zz: \incrpp\mycounter \thepp\mycounter,
uu: \incrpp\mycounter \thepp\mycounter,
vv: \incrpp\mycounter \thepp\mycounter.
\bye
Implementation:
\openref
\def\thepp#1{\trycs{pp:\csstring#1}{?\the#1}}
\def\thepplast#1#2{\trycs{lastpp:\csstring#1:#2}{?\the#1}}
\def\truepage{?\the\pageno}
\def\incrpp#1{\incr#1%
   \isdefined{_pgref:pp:\csstring#1:\the#1}\iftrue
      \edef\tmp{\cs{_pgref:pp:\csstring#1:\the#1}}%
      \ea\ifx\csname currpp:\csstring#1\endcsname\tmp
         \sxdef{pp:\csstring#1}{\the\numexpr\cs{pp:\csstring#1}+1\relax}%
      \else \sxdef{pp:\csstring#1}{\trycs{resetpp:\csstring#1}{1}}%
         \sxdef{currpp:\csstring#1}{\tmp}\fi
      \xdef\truepage{\ea\ea\ea\usesecond \csname currpp:\csstring#1\endcsname}%
      \sxdef{lastpp:\csstring#1:\truepage}{\cs{pp:\csstring#1}}%
   \else \incr\_unresolvedrefs \openref \fi
   \_ewref \_Xlabel {{pp:\csstring#1:\the#1}{}}%
}
The \incrpp does whole work. It increments the counter and saves the label in the form "pp:counter-name:counter-value" using \_ewref to the ref file. The effect is the same as when the normal \label[...] is saved to the ref file. The \incrpp knows the actual page (where the labes was saved) in the second TeX run using \cs{_pgref:label}. The effect is the same as when \pgref is used. If the current page is new then \incrpp sets the internal macro \cs{pp:counter-name} to the initial value, else it increments the value of the internal macro. The \cs{currpp:counter-name} includes the page where last \incrpp\countername was used. The \cs{lastpp:counter-name:pageno} includes the last internal number from \cs{pp:counter-name}. The \truepage is defined by \incrpp too as expanded \cs{currpp:counter-name} where the real pageno is extracted, because \cs{currpp:counter-name} has the format {gpageno}{pageno} (see section 2.22, sequence \_Xlabel, in the OpTeX manual).
The \thepp expands to the \cs{pp:counter-name} and \thepplast expands to the \cs{lastpp:counter-name:pageno}.
(0051) -- P. O. 2021-04-01
Filecontents package features
autoload:
\begfile
\createfile
\endfile
We implement something similar to filecontents.sty LaTeX package. A user can write:
\begfile {filename.tex}
% file generated from source
\macros \macros \macros ...
   Text text text.
\endfile
and the filename.tex is written to the current directory with given contents.
Implementation:
\newwrite\outfile
\def\begfile #1 {\immediate\openout\outfile={#1}%
   \begingroup \_setverb \endlinechar=`\^^J \begfileA^^J%
}
\ea\def\ea\begfileA\ea#\ea1\ea^^J\csstring\\endfile#2^^J{\endgroup
   \ifx^#1^\else\immediate\write\outfile{\_ignoreit #1}\_fi
   \immediate\closeout\outfile
}
\let\createfile=\begfile
The \_setverb sets the reading of the argument to verbatim mode. And the \endlinechar is set. Then the parameter is read and written to the given file. Elementary my dear Watson.
We add ^^J at the start of \begfileA because user may want to create an empty file using \endfile immediatelly after \begfile{name}. And then we have to ingore this first ^^J by \ignoreit during \write.
Canceled OpTeX trick 0091 solved the same issue and declared \createfile instead \begfile. We provide both names.
(0057) -- P. O. 2021-04-10
Sorting phrases
We create a macro \sort with the syntax: \sort list of phrases \endsort. The macro sorts the phrases in the given list and prints them. Each phrase is in curly braces in the given list. For example:
\sort {first} {second} {third} {fourth} \endsort
prints: first fourth second third.
This OpTeX trick is meant as an example how to do sorting outside the index macros. The implementation follows:
\def\sort #1\endsort {\def\slist{}%
   \foreach #1\do{\ea\addto\ea\slist\ea{\csname+##1\endcsname}\sdef{+##1}{##1}}
   \_dosorting\slist
   \ea\foreach \slist \do{##1 }%
}
The main key to sorting is the \_dosorting macro from OpTeX. It reads the list of control sequencs in a macro. The list must be in the form \?first \?second etc. The first character od these cs names (? here, + in the given example) are ignored. The control sequences are sorted due to their names and the result is saved to the same macro (\slist in the example). The meanings of the sorted control sequences are irrelevant during sorting.
The macro \sort from our example initializes \slist as the empty macro and adds the control seqences using \foreach to the \slist in the form \+first \+second etc. Each control sequence is defined as the given phrase, for example \+first is defined as first, \+second as second etc. After \slist is sorted by \_dosorting\slist, we print it. We can do this printing simply by expanding \slist, but spaces between phrases are lost in this case. This is a reason why we print the result using the second \foreach.
(0068) -- P. O. 2022-02-11
Declaring macro parameters with more separators
We create \sepdef for declaring macros with a parameter separated by various separators. The syntax is:
\sepdef\macro{list of separators}{#1=parameter #2=separator}
% For example:
\sepdef\firstsentence{{.}{?}{!}}{{\it#1\Red#2}}
The example declares macro \firstsentence which scanns following text until first period or question or exclamation mark occurs. This text is treated as #1 and the actual separator is #2. Our example prints the next sentence in italic and prints the final character of the sentence in red.
The list of separators is in the format {first}{second}... Each separator can include more than single character.
The implementation:
\def\sepdef#1{%
   \def#1{\edef\seqname{\csstring#1}\def\param{}%
      \ea\scantoeol\csname sdAx\csstring#1\endcsname}%
   \sdef{sdAx\csstring#1}##1{\def\tmp{##1}%
      \ea\foreach\seplist\do{\replstring\tmp{####1}{\sep{####1}}}%
      \ea\scantosep\tmp\sep\end}%
   \begingroup \_setscancatcodes \catcode`{=1 \catcode`}=2 \sepdefA #1%
}
\def\sepdefA#1#2{\endgroup\def\seplist{#2}\sdef{sdEx\csstring#1}##1##2}

\def\scantosep#1\sep#2{%
   \addto\param{#1}%
   \ifx\end#2\addto\param{ }\afterfi{\ea\scantoeol\csname sdAx\seqname\endcsname}%
   \else \afterfi{\def\separator{#2}\def\tmp{}\scantosepA}%
   \fi
}
\def\scantosepA#1\sep#2{%
   \addto\tmp{#1}%
   \ifx\end#2\ea\scantosepB
   \else\addto\tmp{#2}\ea\scantosepA
   \fi
}
\def\scantosepB{\edef\tmp{\ea\noexpand\csname sdEx\seqname\endcsname{\param}{\separator}\tmp}%
   \scantextokens\ea{\tmp}%
}
The \sepdef\macro defines \macro which runs \scantoeol\sdAxmacro, i.e. reads single line in verbatim mode. \adAxmacro saves the read line to \tmp and does \replstring{what}{\sep{what}} for each "what" from separator list. Then the \ea\scantosep\tmp\sep\end is run. The \scantosep reads the data separated by \sep. If the next token is \end then we are at the end of line and we must to open next line. The \param macro is accumulated. If the next token is not \end, then we have found first separator and the next separators \sep at the same line are ignored by \scantosepA. Finally, \scantosepB runs \adExmacro{param}{sep} and does new \scatextokens. The macro \adExmacro was defined by \sepdefA.
Because the lines are read in verbatim mode first, the following example with closing brace at the second line works:
{\bf\firstsentence Is it a sentence
  over more lines?  Next idea.} End.
(0072) -- P. O. 2022-02-28
Scanning nested LaTeX environments
LaTeX have somewhat impractical syntax with its environments. For example:
\begin{a}
   preambule
   \begin{b}
       next text
       \begin{c}
          something inside c
       \end{c}
   \end{b}
   \begin{d}
      inside d
   \end{d}
\end{a}
We try to scan such text by our macros. The problem is that the separator \end used by primitive \def isn't sufficient to scan whole environment because there may be nested environments. For example, if we define:
\def\begin#1{\cs{begin:#1}}
\sdef{begin:a}{\scanenvto\text \afterscan{a}}
\def\afterscan#1{environment:#1, body: \meaning\text}
and run the code above, then we want to store whole body of the environment into the macro \text and then the \afterscan{a} macro is processed. This macro is defined here only for testing putrposes: it prints only environment name and the meaning of the absorbed text. Note, that the LaTeX package environ does the similar job.
The \scanenvto is defined here:
\def\scanenvto#1#2#3{%  #1: body macro, #2{#3}: what to do after scanning
   \def\doafterscanenvthis{\let#1=\tmp \envcheck{#3}#2{#3}}%
   \def\tmp{}\def\tmpa{}\scantoend
}
\long\def\scantoend#1\end#2{%
   \addto\tmp{#1}\addto\tmpa{#1}%
   \isinlist\tmpa\begin\iftrue
      \addto\tmp{\end{#2}}%
      \ea\redeftmpa\tmpa\endscanenvtext
      \ea\scantoend
   \else
      \def\envname{#2}\ea\doafterscanenvthis
   \fi
}
\long\def\redeftmpa#1\begin#2#3\endscanenvtext{\def\tmpa{#3}}
\def\envcheck#1{\ismacro\envname{#1}\iffalse \errmessage{unpaired evironments}\fi}
We read the following text to the first \end by \scantoend. If the text includes \begin, then we add the scanned \end{what} to the scanned text, we remove the text to the first \begin in the parallel absorbing macro \tmpa and run \scantoend again. It is recursive algorithm which works. If there is no next \begin in the \tmpa then the whole environment is scanned. We do \envcheck (if the name given by \begin is the same as the name given by end) and we run what a user needs to do after.
(0084) -- P. O. 2022-05-18
Macro parameters selectively expanded
Expl3 language (designed for LaTeX) allows to create macros which get their parameters in various states: full-expanded, no-expanded, once-expanded. We show how to do it. Suppose, we want to create a macro \macro with four unseparated parameters, first is unexpanded, second is fully expanded, third is once expanded and fourth is fully expanded. We create a "prefix-macro" \MPnxex where MP means "macro parameters", n means no-expanded, x means fully expanded, e means once-expanded. The usage is shown in following testing code:
\def\test{\testA aha}
\def\testA{A}

\def\macro #1#2#3#4{\message{\unexpanded{1:#1, 2:#2, 3:#3, 4:#4}}}

\MPnxex\macro \test \test \test \test
The macro above prints message: 1:\test , 2:Aaha, 3:\testA aha, 4:Aaha. It means that the first parameter is unexpanded, second is fully expanded, third is once-expanded and last is fully expanded when the \macro gets its parameters.
The "prefix-macro" \MPnxex is defined by:
\def\MPnxex #1#2#3#4#5{\ea#1\expanded{{\unexpanded{#2}}{#3}{\unexpanded\ea{#4}}{#5}}}
You can define other "prefix-macros" \MP... analogically. The principle is: \MP... designed for n \macro parameters must have n+1 parameters internally, first one is for the \macro itself. Others are parameters preprocessed for the \macro. The simplest \MP... macro prepares all parameters as fully-expanded:
\def\MPxxx #1#2#3#4{\ea#1\expanded{{#2}{#3}{#4}}}
If you want to create unexpanded first parameter, replace #2 by \unexpanded{#2}. If you want to create once-expanded first parameter, replace #2 by \unexpanded\ea{#2}. And replace the symbol x to the symbol n or e in the \MP... macro name, of course.
(0085) -- P. O. 2022-05-25
Adding "and" before the last item in lists
We have a list of comma separated numbers or something else, the comma is appended after the last item too. We want to print this list, but before the last item must be the word "and". The word "and" should be without the comma before it if there are exactly two items but the comma before it should be printed if there are more items. The comma after the last item is removed. The spaces are added after printed commas.
Suppose, that we did \def\list{1,3,5,8,} and then we can use
\ea\addand\list\end. % prints: 1, 3, 5, and 8.
The macro \addand is fully expandable, so you can use it in \edef context. The macro is implemented here:
\let\ia=\immediateassignment
\def\addand #1\end{\ia\tmpnum=0
   \foreach #1\do ##1,{\ia\incr\tmpnum}%
   \ifcase\tmpnum \or \ea\addandA \or \ea\addandB \else \ea\addandC \fi #1\empty
}
\def\addandA #1,\empty{#1}
\def\addandB #1,#2,\empty{#1 and #2}
\def\addandC #1\empty{%
   \foreach #1\do ##1,{\ia\decr\tmpnum \ifcase\tmpnum ##1\or ##1, and \else ##1, \fi}%
}
The first \foreach loop only counts the items and saves the result to the \tmpnum. The \addandA is used if there is a single item, the \addandB is used if there are two items and the \addandC is used if there are more items. The \addandC runs second loop, adds comma followed by space after items but adds the sequence ", and " before the last item when decreased \tmpnum is equal to one.
(0090) -- P. O. 2022-08-11
Testing if current page is odd
autoload:
\ispageodd
TeX creates pages asynchronously, so we are unsure what page will be used for a material which is created by our macro. For example we need a different design of section headers at odd/even pages but we cannot simply say \ifodd\pageno in our macro because we are unsure at what page the created section header will be printed. But we can implement the desired test using .ref file. When the document is processed by TeX again then the .ref file is read and the positions of the pages are known.
We implement the testing macro \ispageodd\iftrue (or \iispageodd\iffalse) which can be used in our macros like this:
The current page is \ispageodd\iftrue odd (right side)\else even (left side)\fi
The impplementation is based on \_mnotenum and \_Xmnote used by OpTeX for margin notes. It doesn't interferre with the \mnote macro because each occurrence of \mnote or \ispageodd has its individual \_mnotenum.
\def\ispageodd#1{%
   \_incr\_mnotenum
   \_ifcsname _mn:\_the\_mnotenum \_endcsname
       \_expanded{\_let \_noexpand\pgtype =\_cs{_mn:\_the\_mnotenum}}\_else
       \_let\pgtype=\_right \_opwarning{pageside is unknown, TeX me again}\_openref
   \_fi
   \_wref\_Xmnote{}%
   #1\_else \_ea\_unless\_fi \_ifx\pgtype\_right
}
Note: the \ispageodd macro isn't expandable and use it in horizontal mode or inside a box.
(0115) -- P. O. 2023-08-01
Not duplicating the hash characters
If you do \toks0={A text with # inside it}, \the\toks0, then the # character (catcode 6) is duplicated. The same is done if you use \detokenize{A text with # inside it}. But we sometimes want to have another \detokenize command which doesn't do this duplication. The luatex manual mentions that the optional argument -2 of tex.print and tex.sprint works like \the\toks. It is not true, it works like \detokenize, moreover, the hash characters (catcode 6 transformed to catcode 12) are not duplicated.
You can define
\def\xdetokenize#1{\directlua{tex.sprint(-2,"\luaescapestring{#1}")}}
Then the \xdetokenize expands to the result like \detokenize but each hash character with catcode 6 is transformed to the single hash character with catcode 12.
(0117) -- P. O. 2023-09-08
Key-value lists in a key-value list
A stack exchage question includes interesting task: how to interpret more key-value lists in a key-value list. An example is here:
\showchapter{%
    title=My chapter,
    authors={
        {name=Peter,affiliation=MIT},
        {name=Mary,affiliation=UCLA},
    },
}
The data have to be interpreted and printed (for example):
My chapter
    Peter, MIT
    Mary, UCLA
We can use \readkv at the outer list and \foreach over the authors value.
\newcount\aunum
\def\showchapter#1{\readkv{#1} % scanning outer list
   \iskv{authors}\iftrue       % scanning inner lists
      \ea\foreach\expanded{\trykv{authors}{}}\do ##1##2,{%
         \incr\aunum
         \readkv{##1}%
         \sxdef{author\the\aunum}{\kv{name}}%
         \sxdef{affiliation\the\aunum}{\kv{affiliation}}%
      }
   \fi
   \kv{title}\par        % using scanned data:
   \fornum 1..\aunum \do{%
      \hskip\parindent \cs{author##1}, \cs{affiliation##1}\par
   }
}
The unseparated parameter ##1 is used in \foreach in order to ignore spaces before {...}. The authors value have to be expanded before \foreach. You can use \expanded (as shown in the code) or 31 \ea before \foreach when using \kv{authors} or only three \ea but explicit \csname...\endcsname:
    \ea\ea\ea \foreach \csname _kv::authors\endcsname \do ##1,##2,{%
       ...
    }
(0118) -- P. O. 2023-10-31
Putting separators between list items
If we are working with lists then we can simply save data into it in the format:
\def\list{{first}{second}{third}{fourth}}
Then we can simply do \ea\foreach\list \do{...} and many other things are easier. Finally, we want to print the list with a separator between items (comma+space, for example). This separator should not be printed after the last item and, moreover, before the last item should be somewhat different separator. We create a macro \putsep \list {separator} {last-separator} which re-defines \list from the format above to the format where given separators are inserted between items. For example with our example above
\putsep\list {, } {, and }
defines \list as
first, second, third, and fourth
The implementation should be:
\def\putsep#1#2#3{\def\sep{#2}\def\sepfin{#3}%
   \unless\ifx#1\empty \edef#1{\ea\putsepA#1\_fin\_empty}\fi
}
\def\putsepA#1#2#3{\unexpanded{#1}%
      \ifx \_fin#2\_else
         \ifx \_fin#3\sepfin \unexpanded{#2}\_else
            \sep \afterfi{\afterfi{\putsepA{#2}{#3}}}%
   \fi\fi
}
Only unempty lists are redefined. The \edef\list{...} is used, but items are not expanded because of \unexpanded.
(0119) -- P. O. 2023-10-31
Preparing macros for a simple token-per-token scanner
Sometimes we want to scan a string saved in a macro by a simple token-per-token scanner, for example:
\def\scantok#1{\ifx#1\_fin \else do something with \string#1. \ea\scantok\fi}

\def\macro{abc def, \test.}
\ea\scantok\macro\_fin
But we have problems with spaces (they are ignored when unseparated #1 is used) and with grouping characters {...} (they disables reading a guaranteed single token to a #1 parameter).
We create a macro \normalbraces which resets the catcodes of { and } to 12 (normal character) in the given macro. Moreover, we can use \replstring\macro{ }{{ }} in order to enable reading spaces by unseparated parameter. For example:
\def\pertoken#1{\ea\pertokenA#1\_fin}
\def\pertokenA#1{\ifx#1\_fin \else \afterfi{token is: "\string#1", \pertokenA}\fi}

\def\macro{abc {def\relax gh}\dosomething ijk}

\normalbraces\macro        % braces will be normal characters, catcode 12
\replstring\macro{ }{{ }}  % spaces are replaced by { }

\pertoken\macro
It prints: token is: "a", token is: "b", token is: "c", token is: " ", token is: "{", token is: "d", token is: "e", token is: "f", token is: "\relax", token is: "g", etc.
The \normalbraces macro can be implemented like this:
\def\normalbraces#1{{\catcode`{=12 \catcode`}=12 \ea}\ea\def\ea#1\ea{\scantextokens\ea{#1}}}
(0120) -- P. O. 2023-10-31
Setting \vsize to fit lines exactly to pages
autoload:
\correctvsize
If you have no stretchable or shrinkable glues in the page (for example you set \parskip=0pt or you have a long paragraph across more pages) and you have not set \raggedbottom, then you may see warnings in the log file "Underfull \vbox while output is active". This warning means that the lines cannot be placed one to above according to \baselineskip so that the resulting page is exactly \vsize height. You must correct the \vsize so that it is a multiple of \baselineskip plus single \topskip. (The \topskip is here because it is the distance from the top edge of the resulting vbox to the baseline of the first line.
Note, that the default value of \vsize (set by the format) isn't a multiple of \baselineskip plus \topskip.
The macro \correctvsize keeps \vsize if it is set correctly as a multiple of \baselineskip plus \topskip. Or it sets \vsize to the nearest smaller value which meets this requirement.
\def\correctvsize{%
   \vsize=\dimexpr
      \expr[0]{\bp{\vsize-\topskip}//\bp{\baselineskip}}\baselineskip
      +\topskip \relax
}
This expression says \vsize = C\baselineskip + \topskip, where C is calculated as (\vsize-\topskip)//\baselineskip, where // is integer division.
(0121) -- P. O. 2023-10-31
Random items from a given set of items
The problem is formulated here. We want to declare a set of items and then print a given number of these items in random order. This macro can be used for generating questions for students, for example.
We can declare a set of questions:
\sxdef{item:A}{Question A}
\sxdef{item:B}{Question B}
\sxdef{item:C}{Question C}
\sxdef{item:D}{Question D}
\sxdef{item:E}{Question E}
\def\items{ABCDE}
and then select a randomly ordered subset of them and print them:
\usetitems{4} % prints four questions in \begitems ... \enditems environment
If you want to have the same result in each TeX run, then you have to initialize random-number generator by \setrandomseed 42 (for example) before the first \useitems.
The relevant macros are here:
\def\strlen#1{\directlua{tex.print(string.len("#1"))}}

\def\choosefrom#1{\chardef\chosednum=\uniformdeviate\strlen{#1}
   \def\outlist{}\tmpnum=-1 \choosefromA#1\_fin
}
\def\choosefromA#1{\incr\tmpnum \ifnum\tmpnum=\chosednum
   \def\outitem{#1}\ea\choosefromB
   \else \addto\outlist{#1}\ea\choosefromA
   \fi
}
\def\choosefromB#1\_fin{\addto\outlist{#1}}

\def\useitems#1{%
   \begitems
      \let\outlist=\items
      \fornum 0..#1\do {\ea\choosefrom\ea{\outlist}%
                        \_startitem \cs{item:\outitem}}%
   \enditems
}
\choosefrom{list-of-tokens} chooses one token from given list randomly and returns it in `\outitem` macro. The list without chosen item is returned in `\outlist` macro.
(0123) -- P. O. 2023-11-21
Only define a macro if it is not already defined
autoload:
\onlyifnew
LaTeX has \providecommand{\NAME}{...} that only defines
\NAME if it was not already defined. We can achieve this in
OpTeX by wrapping \def\NAME{...} inside
\isdefined{\NAME}\iffalse ...\fi. However, this will get
verbose if we need to define many macros in this manner. Therefore, we
implement a similar functionality as a prefix macro
\onlyifnew.
Usage examples:
\onlyifnew\def\mymacro#1{...}
\onlyifnew\let\myfont=\bf  \onlyifnew\let\myfont\bf
\onlyifnew\slet{myfont}{bf}
\onlyifnew\newtoks\mytoks
\onlyifnew{\protected\long\def}\foo#1{...}
In the last case, it could be useful to define a shortcut such as:
\def\mylpdef{\onlyifnew{\protected\long\def}}
\mylpdef\foo#1{...}
The implementation:
\def \onlyifnew#1#2{\begingroup
   \edef\tmpA{\csstring #2}%
   \edef\tmpB{\string #2}%
   \ea\ifcsname\tmpA\endcsname
   \ifx\tmpA\tmpB% #2 has no backslash
   \def\onlyifnewA{#1{onlyifnewB}}\else
   \def\onlyifnewA{#1\onlyifnewB}\fi
   \else
   \ifx\tmpA\tmpB
   \def\onlyifnewA{#1{#2}}\else
   \def\onlyifnewA{#1#2}\fi
   \fi\ea\endgroup\onlyifnewA}
(0130) -- Robert Bachmann 2024-02-13
Show dimension values in given unit
autoload:
\thedimen
The TeX primitive \the shows a dimension only in pt unit. We want to show it in other common TeX units, for example \thedimen\hsize mm will show the \hsize register in millimeters. We can use the \thedimen macro for various diagnostic purposes (in \wterm or \message, for example). It means that it must be expandable.
The implementation can be based on \expr and \qcasesof OpTeX macros:
\def\thedimen #1#2#3{\nnum{\expr[5]{%
   \number\dimexpr#1\relax / 65536 /
      \qcasesof {#2#3}
         {pt} {1}
         {cm} {28.4527559}
         {mm} {2.84527559}
         {in} {72.27}
         {sp} {(1/65536)}
         {pc} {12}
         {bp} {1.00375}
         {dd} {1.070008643}
         {cc} {12.8401037}
         {em} {(\number\fontdimen6\font/65536)}
         {ex} {(\number\fontdimen5\font/65536)}
         \_finc {5000000000}
   }}#2#3%
}
Note that if the given unit is unknown then we divide by a big number to reach zero result (\maxdimen and 5 digits precision returns zero with used constant). For example, \thedimen\hsize xx returns 0xx.
This solution seems elegant but it is not efficient. More efficient is to do \sdef{thedimen:pt}{1} \sdef{thedimen:cm}{28.4527559} etc. and use \trycs{thedimen:#2#3}{5000000000} instead \qcasesof. The reason is that \qcasseof reads given pairs sequentially until the string matches. But \trycs uses internal TeX's hash table.
(0132) -- P O 2024-03-09
Simple templates
Adverts for notice boards with phone numbers
We want to create an advert that we would pin down on some notice board in a mall with phone number repeated on strips. We can use following template:
\fontfam[lm]

\def\width{10cm}
\def\title {Vend Baignoire enfant}
\def\phone {02 99 yy yy yy}
\setbox1=\hbox{\picw=\dimexpr\width/2 \inspic{baignoire.JPG}}
\setbox2=\vbox to\ht1{\hsize=\dimexpr\width/2-5mm \parindent=0pt
   \vss
   Vend baignoire enfant.\par
   Dimensions 80\,cm × 30\,cm\par
   Prix 20 €
   \vss
}
\setbox3=\hbox{\kern1.8mm\rotbox{90}{\ \phone\ }\kern1.7mm}

\directoutput\frame{\vbox{\hsize=\width \lineskip=2mm
  \medskip
  \line{\typosize[14/]\ \dotfill\ \title\ \dotfill\ }
  \medskip
  \line{\kern2mm\box2\hss \box1\kern2mm}
  \line{\dotfill}
  \centerline{\fornum 1..14\do{\copy3\vrule}\box3}
}}
\bye
You can run this example if you have the image baignoire.JPG in the current directory. It is from petiteannonce LaTeX package. Of course, you can change the \title, \phone, text, image file etc. as required.
The result is a single page with the single advert with page dimensions derived from the advert size. We probably want to put this single avert to A4 page and repeat it more times at single A4 page and finally, we want to cut the printed page. This can be done by the OpTeX trick 0126.
Note that we needn't to create an special package for this purpose. We are using TeX primitives, we can modify the template shown here and we can do the task with a few lines of the code.
(0124) -- P. O. 2023-12-03
Pins for conference participants
The following macro creates pins for conference participants:
\fontfam[Roboto]  \cond\typosize[12/19]
\parindent=0pt

\hhkern=0pt \vvkern=0pt
\def\confpin#1#2{%
   \directoutput\vbox to50.8mm{\hsize=70mm % dimensions of the pin is here
      \null \vskip9mm
      \centerline{\setfontsize{at15pt}\bf#1}
      \centerline{\bf#2}
      \rulewidth=2pt \line{\quad \hrulefill\quad}
      \nointerlineskip \vskip4mm
      \line{\quad\vtop{\hsize=50mm \typosize[8/11] \kern0pt\confdata}\hss
            \vtop{\kern0pt\copy\logobox}}
      \vss
   }
}
\def\confdata {Animal annual meeting (AAM)\par
               In the gardens\par
               April 1, 2000}
\newbox\logobox
\setbox\logobox=\vbox{\picw=25mm \kern-2mm\inspic{op-ring.png}}

\confpin{Camelus dromedarius}{North Africa}
\confpin{Urocyon cinereoargenteus}{America}
\confpin{Galago moholi}{South Africa}
\confpin{Dasypus novemcintus}{South America}
\confpin{Rhinocerus sondaicus}{Java}
\confpin{Canis lupus}{Northern sphere}
\confpin{Ramphastus spec.}{South Amerika}
\confpin{Panthera tigris sondaica}{Java}
\confpin{Hippocampus spec.}{the ocean}
\confpin{Anthonomus grandis}{Mexico}
\confpin{Petrogale penicillata}{Australia}
\confpin{Tarsius spec.}{Sumatra}

\bye
The example prints each pin on a single "page" in the pdf output. If we want to print more of them on a single A4 page, then we can use the OpTeX trick 0126.
(0125) -- P. O. 2023-12-03
More tickets from a pdf to individual pages
If we prepare an advert or a set of pins for conference participants or business cards or address labels or something similar in a pdf (so called tickets) with single "ticket" per page in the pdf with its real dimensions, then we can put more tickets per a real page, print them and cut them by scissors. Suppose that we have prepared pins for conference participants using previous OpTeX trick 0125 in a pdf file pins.pdf. Then we can use following code:
\def\tikets{pins.pdf} % pdf file name, one tiket per page is here
\def\repeat{1}        % each ticket is printed \repeat times
\def\dist{10mm 10mm}  % horizontal and vertical distance between tikets

\margins/1 a4 (3,3,5,5)mm  % paper A4, 3mm margins
\nopagenumbers

% corners: \corner0: right up, 1: left up, 2: left down, 3: right down
\def\corner#1{\pdfliteral{q \rot{#1} 0 0 cm .2w 0 10 m 0 3 l 3 0 m 10 0 l S Q}}
\def\rot#1{\ifcase#1 1 0 0 1\or 0 1 -1 0\or -1 0 0 -1\or 0 -1 1 0\fi}
% \let\corner=\ignoreit % use this command if you don't want crop marks
\def\dotiket{%
   \vbox{\offinterlineskip \halign{##\hfil&##\cr
      \corner1&\corner0\cr
      \corner2\inspic{\tikets}\corner3\cr
   }}%
}
% printing all tikets in a single paragraph:
\afterassignment\lineskip \dimen0=\dist
\rightskip=0pt plus1fil \parindent=0pt \raggedbottom
\setbox0=\dotiket % page 1, we get \pdflastximagepages
\noindent
\fornum 1..\pdflastximagepages \do
   {\picparams={page#1}\ifnum#1>1 \setbox0=\dotiket \fi
   \fornum 1..\repeat \do {\copy0\hskip\dimen0}}

\bye
If you have prepared an advert using OpTeX trick 0124 then you can use the same code, only the first three lines differ:
\def\tikets{baignoire.pdf} % pdf file name, one tiket per page is here
\def\repeat{6}             % each ticket is printed \repeat times
\def\dist{0mm 0mm}         % horizontal and vertical distance
If you don't need the cropmarks then use \let\corner=\ignoreit.
The tickets are printed as words to a single paragraph. The number of tickets per line and per page depends on the size of the tickets, on the distance between them and on the output page size declared by \margins.
(0126) -- P. O. 2023-12-03
Lua matters
Processing lua code with normal characters
autoload:
\beglua
\endlua
\begLUA
\endLUA
\logginglua
The \directlua primitive processes its argument with current category codes of characters. It means that you probably cannot directly use characters \, %, and you cannot use -- as prefix of lua comments because the whole parameter of \directlua is interpreted as only single line.
Of course, you can create a *.lua file and use it by "loadfile" or "require" functions. But sometimes, it can be practical to have a native lua code in a TeX macro file. We implement the pair \beglua ...\endlua. The lua code between them can include % and \ as normal characters, more consecutive spaces are really more spaces and the lines are interpreted by lua interpreter, so lua comments prefixed by -- are possible.
The \beglua...\endlua pair is equivalent to \begin{luacode*}...\end{luacode*} from the LaTeX package luacode. The \begLUA...\endLUA pair is equivalent to \begin{luacode}...\end{luacode}, i.e. the macros \foo can be inside the lua code and they are fully expanded before lua interpreter reads the code.
Moreover, you can use \logginglua at the begining of your document to see the processed lua codes in the log file.
The \beglua...\endlua, \begLUA...\endLUA are based on changing category codes. They cannot be used in macro bodies. Typical usage is:
\beglua
function myfunction (...) -- lua comments are possible
  ...
  tex.print(string.format("%04X", num)) -- normal % can be used here
  ...                                   -- TeX comments by % are not allowed here
  end
\endlua

\def\mymacro{...\directlua{myfunction(parameters)}...}
Implementation:
\newtoks\luamacros
\luamacros={\let\\=\nbb \edef\%{\csstring\%}\edef\#{\csstring\#}\let\n=\relax}
\def\beglua{\savelineno\bgroup \_setverb \endlinechar=`\^^J \begluaA}
\ea\def\ea\begluaA\ea#\ea1\csstring\\endlua^^J{\egroup\debuglua{#1}\directlua{#1}}
\def\begLUA{\savelineno\bgroup \_setverb \endlinechar=`\^^J \catcode`\\=0 \begLUAA}
\def\begLUAA#1\endLUA^^J{\the\luamacros\debuglua{#1}\directlua{#1}\egroup}
\def\savelineno{\edef\tmp{\the\numexpr\inputlineno+1}}
\let\debuglua=\ignoreit
\def\printloglua#1{\wlog{lua code processed (l.\tmp):^^J#1-------------}}
\def\logginglua{\let\debuglua=\printloglua}
The parameter separated by \endlua is read in verbatim mode (initialized by \_setverb) and when \endlinechar=`\^^J. Then this parameter is processed by the \directlua primitive. The \luamacros token list is used by \begLUA...\endLUA pair, you can add more macros here.
(0054) -- P. O. 2021-04-04
Printing time, date
autoload:
\sethours
\setminutes
\setseconds
\setweekday
declared also:
\hours
\minutes
\seconds
\weekday
\Othe
The current date and time are saved in the TeX primitive registers \year (current year), \month (current month), \day (the day of the the month) and \time (minutes from the last midnight) when TeX is started. That is all. The following macro code declares non-primitive registers \hours, \minutes, \seconds and \weekday. The values of these registers can be initialized by:
\sethours   % sets current \hours and \munutes from \time
\setminutes % equivalent to \sethours
\setseconds % sets \seconds from OS time
\setweekday % sets \weekday as current day in the week (0=Sun...6=Sat)
            % from \day, \month, \year
Moreover, the macro \Othe is provided: it behaves like \the but it keeps two-digits format. So, \the\minutes can expand to 7, but \Othe\minutes expands to 07. Examples:
\sethours \setseconds
Current time is \the\hours:\Othe\minutes:\Othe\seconds.

\setweekday
Current day in the week is
\ifcase\weekday Sun\or Mon\or Tue\or Wed\or Thu\or Fri\or Sat\fi.

Today is
\ifcase\month\or Jan\or Feb\or Mar\or Apr\or May\or Jun\or Jul\or
   Aug\or Sep\or Nov\or Dec\fi, \the\day, \the\year
\ or in another format: \the\year/\Othe\month/\Othe\day.
Of course, you don't have to use just such abbreviations and such a format as shown in the example above. You are free to create your macros with arbitrary format and/or language. You can use \_mtext if you want to create a multilingual document or multilingual macros. You can get inspiration from section 2.37.3 of OpTeX documentation where the multilingual \today macro is defined.
You can set \year, \month, \day to arbitrary values (not necessarily current) and then you can process your macros for printing or use \setweekday to get the day in the week in given date.
Implementation is based on calculations at lua level:
\newcount\hours \newcount\minutes \newcount\seconds \newcount\weekday

\def\setminutes{%
   \minutes=\directlua{tex.sprint(\the\time\pcent 60)}\relax
   \hours=\directlua{tex.sprint(math.floor(\the\time/60))}\relax
}
\let\sethours=\setminutes
\def\setseconds{\ea\setsecondsA\pdffeedback creationdate\relax}
\def\setsecondsA#1#2#3#4#5#6#7#8#9{\setsecondsB}
\def\setsecondsB#1#2#3#4#5#6#7#8\relax{\seconds=#6#7\relax}
\def\setweekday{\weekday=\directlua{% Zeller's algorithm:
      local m, y, K, J
      m = \the\month \ifnum\month<3 +12 \fi
      y = \the\year  \ifnum\month<3 -1 \fi
      K = y \pcent 100
      J = math.floor(y/100)
      tex.sprint((\the\day + math.floor((13*(m+1))/5) + K +
         math.floor(K/4) + math.floor(J/4) - 2*J + 6)\pcent 7)
   }\relax
}
\def\Othe#1{\ifnum#1<10 0\fi\the#1}
(0055) -- P. O. 2021-04-06
Listings of all nodes in selected pages
autoload:
\showpglists
We create macro "\showpglists list-of-pages" which prints the list of all nodes in selected pages to the log and to the terminal for debugging purposes. For example
\showpglists 3,4,7
prints all nodes of pages 3, 4, and 7.
This OpTeX trick is a simple example of usage of the pre_shipout_filter callback declared in OpTeX from version 1.04. The package nodetree is required for the listings of nodes. The implemetation:
\def\addshowpglists{\directlua{
   local nodetree = require("nodetree")
   callback.add_to_callback("pre_shipout_filter", function(head)
         nodetree.print(head)
         return head
      end, "showpglists") }}
\gdef\removeshowpglists{\directlua{
   callback.remove_from_callback("pre_shipout_filter", "showpglists") }}

\def\showpglists #1 {\addto\showpgs{#1,}}
\def\showpgs{,}

\addto\_begoutput{%
   \ea\isinlist\ea\showpgs\ea{\ea,\the\pageno,}\iftrue
      \addshowpglists
      \addto\_endoutput{\removeshowpglists}%
   \fi
}
The callback is registered in \_begoutput only if \the\pageno is in the page list \showpgs. Then it used in \_preshipout and unregistered in \_endoutput.
(0063) -- P. O. 2021-07-03
Listing all nodes in the box
autoload:
\shownodes
The TeX primitive \showbox stops like an error, so its usage is uncomfortable when we are debugging our code. The macro \shownodes behaves like \showbox, i.e. its parameter is the number of inspected box. The output is formatted by Lua nodetree library like \showpglists (colorized output of all nodes inside the box) and doesn't stop TeX.
\def\shownodes#1{%
   \ifcat\noexpand#1\relax \def\tmp{#1}\tmpnum=#1\ea\shownodesA
   \else \def\tmp{}\afterfi{\afterassignment\shownodesA \tmpnum=#1}\fi
}
\def\shownodesA{%
   \wterm{==== Box \the\tmpnum\space (\ea\string\tmp):}%
   \directlua{
   local nodetree = require("nodetree")
   nodetree.print(tex.box[\the\tmpnum])
}}
The first token of the parameter is checked because it can be a character constant (declared by \newbox) or the first digit of a direct number. If the first case is true then we save the name to the \tmp macro and print it by \wterm.
(0133) -- P. O. 2024-03-19
Lines modification inside \vbox
autoload:
\rebox
\leftfill
\rightfill
\lrfill
User can do \setbox0=\vbox{...} (or \vtop{...}) and then the created box can be modified by \rebox0 before usage \box0 (or \unvbox0). The \rebox macro works in more steps. First, it changes all \hbox'es inside the vertical list of given \vbox to their natural sizes. Then it measures the width of the outer \vbox (say, it is W). Finally, it modifies again all \hbox'es inside the \vbox by \hbox to W specification. You can see the effect if a paragraph is processed inside this \vbox, i.e. all lines have \hsize width first. The \rebox macro finds a widest line (in its natural width) and all lines are re-boxed to this width. It means that the left and right boundary of the resulting \vbox is given by this widest line although the stretchable \leftskip or \rightskip is used. If you use macros \leftfill or \rightfill or \lrfill before processing the paragraph and then use \rebox, the result is comparable with \vbox{\halign{\hfill#\cr...}} (ragged left) or \vbox{\halign{#\hfill\cr...}} (ragged right) or \vbox{\halign{\hfill#\hfill\cr...}} (centered), but you don't need to give \cr manually at the end of each line. Or you can use \break or \nl instead \cr.
Example:
\newbox\mybox
\setbox\mybox=\vbox{\hsize=7cm \lrfill \lorem[1.]}

Compare:

classical result: \frame{\copy\mybox}

\rebox\mybox
re-boxed result:  \frame{\box\mybox}
The implementation is an exercise of node and list manipulation in Lua.
\def\rebox{\directlua{
   local nod = tex.box[token.scan_int()]      % read head node of the given box
   if not(nod==nil) and nod.id==1 then        % given box must be \vbox
       for n in node.traverse(nod.head) do
           if n.id==0 then                    % i.e. hlist (\hbox)
               local nn = node.hpack (n.head) % calculate its natural width
               n.width = nn.width             % save natural width
               nn.head = nil  node.free (nn)  % remove created box node
           end
       end
       local nn = node.vpack (nod.head)       % calculate main vlist (\vbox) width
       nod.width = nn.width                   % save this width to nod.width
       nn.head = nil  node.free (nn)          % remove created box node
       for n in node.traverse(nod.head) do
           if n.id==0 then
               local nn = node.hpack (n.head, nod.width, "exactly") % \hbox to nod.width
               n.width = nn.width             % save changed hlist (\hbox) parameters
               n.glue_order = nn.glue_order n.glue_set = nn.glue_set n.glue_sign = nn.glue_sign
               nn.head = nil  node.free (nn)  % remove created box node
           end
       end
   end
}}
\def\leftfill {\leftskip=0pt plus1fill \parindent=0pt }
\def\rightfill{\rightskip=0pt plus1fill \parindent=0pt }
\def\lrfill{\leftfill \rightfill }
This feature cannot be fully implemented just by TeX primitives \setbox, \unvbox, \lastbox etc. because the \vbox list can include nodes which are inaccessible by these TeX primitives.
(0134) -- P. O. 2024-03-21
Running system commands during document processing
autoload:
\runsystem
PdfTeX and XeTeX support \write18 for doing this. But this is not true when LuaTeX is used. We must to use the Lua function "os.execute()" instead of \write18. This function returns nil and does nothing if the --shell-escape is unused at the optex command line (i.e. the execution of shell commands is disallowed for security reasons) or it executes the system command and returns the exit status. We create a simple macro \runsystem{command} which runs the given command. You can write, for example:
\runsystem{ls}
and the listing of the current directory (in Unix systems) is shown on the terminal (of course, only if --shell-escape is used at the optex command line).
The \runsystem macro can be defined as follows:
\newcount\exitstatus
\def\runsystem#1{\exitstatus=\directlua{
   texio.write_nl("")
   local status = os.execute("\luaescapestring{#1}")
   texio.write("log", "\nbb runsystem{\luaescapestring{#1}} status: " .. (status or -1) .. "\string\n")
   tex.print(status or -1)
} }
The macro \runsystem runs the given command and prints the copy of the given command followed by the exit status value to the log file. The status value -1 means that the --shell-escape is unused, so the executing of system commands is disallowed. Moreover, the \exitstatus counter includes the status value after \runsystem, you can use it in your following macros.
(0101) -- P. O. 2023-01-09
Using lua-visual-debug package
The lua-visual-debug package allows to show the spaces and box borders in the typesetting output. If you have installed it then you can try it. Don't use \input lua-visual-debug.sty. Use the following commands instead:
\_directlua{ lvd = require("lua-visual-debug")}

\_def \_optexoutput{\_begoutput \_preshipout0\_completepage
   \_directlua{lvd.show_page_elements(tex.box[0])}
   \_shipout\_box0 \_endoutput}
The first line loads the relevant Lua code. Next, we have to re-define the \output routine in order to run Lua function lvd.show_page_elements just before \shipout.
(0106) -- P. O. 2023-04-14
Non-overlapping margin notes
OpTeX provides the \mnote macro which vertically aligns first line of the margin note with the line where \mnote is used. This may lead to overlap margin notes (for example if they have many lines and are close together. User can use \mnoteskip in order to solve this problem manually. But there exists another approach which puts the mnotes to suitable places automatically. It is based on the Lua code, see the answer at the stack exchange site.
(0114) -- Max Chernoff, 2023-06-27
Printig a character regardless font ligature setting
autoload:
\directchar
We know the \char primitive which prints the character with given Unicode and the \Uchar primitive which makes a token with category 12 and with given Unicode. If a font is loaded with the font feature +tlig (it is default for text fonts in OpTeX) then some characters are not printed directly. Especially the " character is transformed to “ at font level. So, \char`" does the same as " alone: it prints “. But we want to print the " character directly although the +tlig font feature isn't deactivated. We can use \directchar number for such purposes (directly printed character). It locally deactivates the ligature processing for printing the character with given Unicode. Try this:
\fontfam[lm]
Test: \char`", nolig: \directchar`".
For example, you can declare \protected\adef"{\directchar`"\relax} if you want to print double prime quotes although the +tlig font feature is set. Or define the macro \protected\def\primeqquote{\directchar`"\relax} for printing this character.
\protected\def\directchar{\ifmmode \ea\Uchar\else \quitvmode \ea\directcharA\fi}
\def\directcharA{\directlua{
   local n = node.new(29, 256)
   n.font = font.current()
   n.char = token.scan_int()
   node.write(n)
}}
The glyph node with given character is inserted to the current horizontal list directly by Lua code. This method bypasses the font ligature processing.
(0135) -- P. O. 2024-04-15
Selective suppression of ligatures
The Lua code from selnolig LaTeX package works in OpTeX too. You can set rules for creating ligatures by patterns. See selnolig documentation for more information.
You need to have the selnolig package instaled. To initialize its features you can write:
\directlua{require("selnolig.lua")}  % loading Lua code
\directlua{enableselnolig()}         % switch selnolig on

\def\nolig#1#2{\directlua{ suppress_liga("#1","#2") }}
\def\keeplig#1{\directlua{ always_keep_liga("#1") }}

{\catcode`@=11 \newif\if@noftligs  \newif\if@broadfset  \newif\if@hdligset
\def\ProvidesPackage#1[#2]{}
\@noftligstrue   % select true or false
\@broadfsettrue  % select true or false
\@hdligsettrue   % select true or false
%\input selnolig-english-patterns.sty  % choose English patterns or:
\input selnolig-german-patterns.sty    % choose German patterns
}
The Lua code from ligtype LaTeX package works in OpTeX too. It does similar work like selnolig, see its documentation.
You need to have the ligtype package instaled. To initialize its features you can write:
\fontfam[lm]                        % needs Unicode fonts loaded
\directlua{require("ligtype.lua")}  % loading Lua code
\directlua{ligtype_on()}            % switch ligtype on
% \directlua{ligtype_no_short_f()}  % noshortf option
% \directlua{ligtype_all_short_f()} % allshortf option
% \directlua{ligtype_make_marks()}  % makemarks option
% \directlua{ligtype_no_default()}  % nodefault option
% \directlua{ligtype_lig_list()}    % liglist option
% \directlua{ligtype_con_notes()}   % connotes option
% \addto\_byehook{\directlua{ligtype_write_ligs()}} % kerntest option
The ligtype package initializes German patterns for suppression of ligatures by default.
(0127) -- Mico Loretan (selnolig), Thomas Kelkel (ligtype) 2023-12-06
Measuring elapsed time of OpTeX processing
We will implement a Lua timer, as described at tex.stackexchange. You can put \timerstart{label} \timerstop{label} anywhere in your macros or document and then \timerprint{label} prints the elapsed time between \timerstart{label} and \timerstop{label}. Moreover, you can initialize \timerstart{point} and then use "\TIMER name " at more points in your code. The \TIMER macro prints immediately elapsed time from \timerstart{point} or from previous \TIMER.
You have to run
optex --socket document
if you want to use this measurement, because the socket library has to be initialized.
If you try to measure elapsed time of whole document, then keep in mind that additional time is elapsed when OpTeX loads its format and initializes and when endgame routines are processed. If you try to run time routine from command line (i.e. time optex --socket document) then you can see a small difference: time reports about 0.2 seconds more than whole document measured by \timerprint. When I try to do the same with LuaLaTeX, I see 0.6 second more time than measurement by \timerprint because LuaLaTeX initializes many Lua routines (like luaotfload) in \everyjob.
The implementation:
\directlua{
  timer = timer or {} % table to hold time performance
  local socket = require('socket')
  local time_stat = time_stat or {}
  local gettime = socket.gettime

  time_stat["total"] = 0 % start time measurement

  function start_time_measure(field) % param "done" indicates timer was stopped
      time_stat[field] = {start = gettime(), done = false}
  end

  function stop_time_measure(field) % stop time measurement
      if not time_stat[field].done then
         time_stat[field] = {total = gettime() - time_stat[field].start, done=true}
      end
  end

  timer.start = start_time_measure
  timer.stop  = stop_time_measure
  timer.statistics = function(name) return time_stat[name].total end
} % !! run optex with option --socket

\def\timerstart#1{\directlua{timer.start("#1")}}
\def\timerstop#1{\directlua{timer.stop("#1")}}
\def\timerprint#1{\wterm{\directlua{
   timer.stop("#1")
   tex.print("elapsed time (#1):", string.format('\%.5f',timer.statistics("#1")).." s")
}}}
\def\TIMER #1 {\message{^^JTIMER point #1:}\timerprint{point}\timerstart{point}}
(0128) -- Yiannis Lazarides, P. O. 2023-12-07
Sections
New level of sections
autoload:
\iniseccc
\seccc
OpTeX defines \chap, \sec and \secc. A new level \seccc is not defined, but we can do it as an exercise of sections programming in OpTeX. The \chap has level 1, \sec has level 2, \secc has level 3. So, we will declare the 4th level of sections.
Note that OpTeX declares \secl4, \secl5, etc. but all these levels of sections are unnumbered, without copying to table of contents and with an only very simple design.
We can define \seccc analogical like \secc already defined in OpTeX:
\newcount \_secccnum
\def \_thesecccnum {\_othe\_chapnum.\_the\_secnum.\_the\_seccnum.\_the\_secccnum}

\_optdef\_seccc[]{\_trylabel \_scantoeol\_inseccc}

\_def\_inseccc #1{\_par \_sectionlevel=4
   \_def \_savedtitle {#1}% saved to .ref file
   \_ifnonum \_else {\_globaldefs=1 \_incr\_secccnum \_secccx}\_fi
   \_edef \_therefnum {\_ifnonum \_space \_else \_thesecccnum \_fi}%
   \_printseccc{\_scantextokens{#1}}%
   \_resetnonumnotoc
}
\public \seccc ;
We must implement resetting new counter at \secc level. All concept of reseting counters are copied here for greater clarity.
\_def \_chapx {\_secx   \_secnum=0   \_lfnotenum=0 }
\_def \_secx  {\_seccx  \_seccnum=0  \_tnum=0 \_fnum=0 \_dnum=0 \_resetABCDE }
\_def \_seccx {\_secccx \_secccnum=0 }
\_def \_secccx {}
Finally, we must declare a design of the \seccc:
\_def\_printseccc#1{\_par
   \_abovetitle{\_penalty-100}{\_medskip}
   {\_bf \_noindent \_raggedright \_printrefnum[@\_quad]#1\_nbpar}%
   \_nobreak \_belowtitle{\_smallskip}%
   \_firstnoindent
}
If we want to see \seccc in the table of contents, then we must declare the printing rule of the 4th level of sections:
\_def\iniseccc{} % use it for autoloading this OpTeX trick code before \maketoc
\_sdef{_tocl:4}#1#2#3{\_advance\_leftskip by2\_iindent \_cs{_tocl:2}{#1}{#2}{#3}}
Now, \seccc works in the table of contents and in PDF outlines too:
\hyperlinks \Green \Green
\outlines0

\iniseccc
\maketoc

\chap  My chapter
\sec   Special section
\secc  This is subsection
\seccc New level of sub-subsection
Text.
\seccc Next text
Text.

\end
(0033) -- P. O. 2021-01-14
Adding \part, the highest level of sections
OpTeX supports \chap, \sec, \secc, but not \part, i.e. the outermost level of them. We suppose that user can define it including required design if it is needed. The example of \part macro follows:
\newcount\partnum
\eoldef\part#1{\vfil\break
   \incr\partnum \_chapnum=0 \_chapx % reset counters
   \vglue100pt
   \incr\tocrefnum \dest[toc:\the\tocrefnum] % destination from TOC and outlines
   \centerline{\typosize[20/]\bf Part \the\partnum:\quad #1} % Title
   \_ewref\_Xtoc{{0}{part}{}{}#1} % TOC line, \part has level 0
   {\nopagenumbers \vfil\break}   % single page without pageno
}
You can try it:
\hyperlinks \Green \Green
\outlines0
\maketoc

\part Book One

\chap My chapter
\sec  Special section
\secc This is subsection
\secc Next subsection
Text.

\chap Next Chapter
\sec  next sec

\part Book Two

\bye
Note, that table of contents is created properly and correct tree structure of outlines is prepared too.
(0059) -- P. O. 2021-06-01
References
List of figures, list of tables
autoload:
\makeLOF
\makeLOT
\captionF
\captionT
OpTeX provides only \maketoc for making table of contents. We create commands \makeLOF for creating a list of figures and \makeLOT for creating a list of tables.
We create macros \captionF resp. \captionT for the captions of the figure or of the table respectively with the following syntax:
\captionT [label]{A short caption} A detail caption \par
\captionF [label]{A short caption} A detail caption \par
All parameters are obligatory. The short caption is used in the generated list of figures/tables, the detail caption is printed immediatelly. The commands \caption/f or \caption/t cannot be used if you want to put the information about the figure/table to the generated list.
The implementation:
\_refdecl{%
\_def\lotlist{} \_def\loflist{}^^J
\_def\Xtab#1#2#3{\_addto\lotlist{\lline{#1}{#2}{#3}}\_ea\_addto\_ea\lotlist\_ea{\_currpage}}^^J
\_def\Xfig#1#2#3{\_addto\loflist{\lline{#1}{#2}{#3}}\_ea\_addto\_ea\loflist\_ea{\_currpage}}
}
\def\captionT [#1]#2{\caption/t[#1]\_ewref\Xtab{{#1}{\_thetnum}{#2}}\ignorespaces}
\def\captionF [#1]#2{\caption/f[#1]\_ewref\Xfig{{#1}{\_thefnum}{#2}}\ignorespaces}

\def\lline#1#2#3#4#5{\line{\hskip2em\llap{\bf#2 } #3 \_tocdotfill\ \_ilink[pg:#4]{#5}}}

\def\makell#1#2{\par
   \ifx#1\undefined \opwarning{no data for list of #2, try to run TeX again}\openref
   \else #1\fi
}
\def\makeLOF{\makell\loflist{figures}}
\def\makeLOT{\makell\lotlist{tables}}
The \refdecl declares new commands used in the ref file in the format:
\Xtab{label}{table-number}{short caption}
\Xfig{label}{figure-number}{short caption}
These commands put the data to the \loflist or \lotlist in the format:
\lline{label}{number}{short caption}{gpagenum}{pagenum}
for each figure/table. The macro \lline defines the typography of each object used in the generated lists. You can change it, of course. For example, if you use \bf\ref[#1] insetad \bf#2 then you have the numbers in the list clickable (after \hyperlinks declaration).
(0066) -- P. O. 2022-02-01
The text "on page \pgref" printed only sometimes
We create the macro \onpage which can be used just after \ref[label] and it expands only to space if the \ref occurs at the same page as referred page. It expands to the text "on page \pgref[label]" if it is referred to a different page than the current one. For example:
Section \ref[mylabel]\onpage shows bla bla.

\vfil\break

\sec [mylabel] Section bla bla
prints the text: "Section 1.1 on page 2 shows bla bla" but if you remove the \vfil\break in this example then the text "Section 1.1 shows bla bla" is printed because the referred section is on the same page. The same task was formulated at Stack exchange, see witpet's answer.
You must run TeX twice in order to get the required result.
The implementation is simple:
\def\onpage{\label[x?\_lastreflabel]\wlabel{}%
   \space
   \ea\ifx\csname _pgref:x?\_lastreflabel\ea\endcsname
          \csname _pgref:\_lastreflabel\endcsname
   \else on page \pgref[\_lastreflabel] \fi
}
If \ref[label] is used then the \onpage macro creates an internal label x?label and writes it to the .ref file. The test if \_pgref:label is equal to \_pgref:x?label is done and if these pages differ then the text "on page \pgref[label]" is printed. Note that the macro \_lastreflabel` includes the label from the last used \ref macro.
(0087) -- P. O. 2022-06-06
Links to sections in external files
We say \exlink[2.23]{section 2.23} and this creates an active link to the given section in a selected document. The example below selects the document "OpTeX documentation". If the selected document is created by OpTeX then we know that there are links in the format #toc:number, where number is serial number of the section (counted from one). We must to convert section number to the serial number. This can be done by reading the .ref file generated when OpTeX creates the refered document.
\bgroup
   \globaldefs=-1
   \def\refs{} \tmpnum=0
   \def\_Xtoc#1#2#3{\incr\tmpnum
      \ea\addto \ea\refs \expanded{{\noexpand\sdef{r:#3}{\the\tmpnum}}}
      \scantoeol\ignoreit
   }
   \isfile{optex-doc.ref}\iftrue \input{optex-doc.ref}\fi
   \ea
\egroup
\refs

\def\exurl{https://petr.olsak.net/ftp/olsak/optex/optex-doc.pdf}
\def\exlink[#1]{\ea\ulink\expanded{[\exurl\#toc:\trycs{r:#1}{}]}}
The optex-doc.ref file is read in a group when \globaldefs=-1, because we don't want to rewrite the data read from actual .ref file. The \_Xtoc is re-defined in order to save the section numbers from its #3 parameter. The control sequences \r:section.number will expand to the serial number.
Another method is to use internal links in the format #ref:label, if \label[label] is used in refered document. And links to the control sequences processed by doc.opm are in the format #cs:sequence (for main doc. point) or #cs:^sequence (for user doc. point). For example \ulink[https://petr.olsak.net/ftp/olsak/optex/optex-doc.pdf#cs:ulink]{text} jumps to the documentation of the \ulink macro.
(0096) -- P. O. 2022-11-19
Hyperlinks with atypical borders
The PDF specification declares possibility of borders around the active area of hyperlinks. They can be visible on the screen but they are not printed. OpTeX sets these borders invisible by default, but user can set the border of a specific type of hyperlinks by \def\_"type"border{RGB color values}, for example \def\_refborder {1 0 0} sets the border around references visible in red. Se the OpTeX manual for more information.
If the border is set visible using the above mentioned method, the border has its line thickness 0.6 bp and it is a normal rectangle. But PDF specification allows other alternatives for such borders, see section "Border Styles" in the PDF spec. If you want to set such different style of the border than you can use following trick. Define
\def\borderset#1]#2]{]#1}
and use it by:
\hyperlinks\relax\relax
\fnotelinks\relax\relax
\def\_refborder {1 0 0 \borderset{/BS <</S/U /W 1>>}}
\def\_fntborder {1 0 0 \borderset{/BS <</S/U /W 1>>}}
This example sets the border to be only underline in red, 1 bp thickness, for references and footnotes.
Note that not all PDF viewers support all styles mentioned in the PDF specification.
This trick defines the \borderset macro which removes the internal text ]/Border[0 0 .6] hardwired to the \_pdfborder OpTeX macro, returns the character ] back and inserts given parameter. This parameter can be anything according to the PDF specification.
(0100) -- P. O. 2023-01-02
Bibliography
Citations by full bibliographic records
autload:
\fcread
declared also:
\fullcite
\fcititem
We implement something like LaTeX \fullcite command. First, you have to load information from .bib file at beginning of your document using
\fcread (bib-style) bib-base % example: \fcread (simple) op-biblist
and then you can use \fulcite[label]. This command expands to the full bibliography record related to the label or the warning about unknown label is printed to the log file. The format of the cited records is given by used bib-style. You can create your own bib-style if the file bib-simple.opm doesn't meet the requirements. Note: style iso690 doesn't work with \fcread now.
You can mix common \cite, \usebib, etc. commands with new \fullcite commands. I.e. you can read your bib-base secondly by the \usebib command in the bibliography section in your document. The implementation:
\newtoks\fcithook
\def\fcitlist{}

\def\xbibadd#1{%
   \unless \ifcsname fcit:\_entrykey\endcsname
      \sxdef{fcit:\_entrykey}{}\xdef\fcitlist{\fcitlist\fcititem[\_entrykey]}\fi
   \global \ea\addto\csname fcit:\_entrykey\ea\endcsname\ea{\expanded{#1}}%
}
\def\ubibfield{\unexpanded\ea{\_bibfield}}
\def\remdotspace #1. \end #2\relax #3{%
   \ifx ^#2^\else \ea \gdef \csname fcit:#3\endcsname{#1}\fi}
\def\remdotxspace #1.\ \end #2\relax #3{%
   \ifx ^#2^\else \ea \gdef \csname fcit:#3\endcsname{#1}\fi}

\fcithook{
  \def\_dofullfield#1#2{\def\_dofield##1{#1}\xbibadd{\_ea\_dofield\_ea{\ubibfield}}}
  \def\_dofemptyfield#1#2{\def\_dofield##1{#2}\xbibadd{\_ea\_dofield\_ea{\ubibfield}}}
  \def\_bprintaB #1*#2*#3\_fin{%
     \ifx\_bibfield\readauthor \def\_bibfield{}\readauthor \fi
     \ifx\_bibfield\readeditor \def\_bibfield{}\readeditor \fi
     \xbibadd{\_if^#3^#1\_else\_ea\_bprintaC\_ea{\ubibfield}{#1}{#2}\_fi}}
  \def\_authorini#1\_endcsname{\edef\_bibfield{\ubibfield\_authorname}}
  \def\_editorini#1\_endcsname{\edef\_bibfield{\ubibfield\_editorname}}
  \def\_addauthlist{}
  \def\_bprintv [#1]#2#3{#3}
  \def\_Inclause{\xbibadd{In:~}}
  \def\_dobibmark{}
  \let\_url=\relax  \let\_ulink=\relax \def\_preurl{}
  \def\_citelist{\_citeI[*]}
  \let\fcititem=\relax
}
\def\readauthor{\_loopauthors {author}}
\def\readeditor{\_loopauthors {editor}}

\def\fcread (#1) #2 {{%
   \setbox0=\vbox{\bibtexhook=\fcithook
      \bibpart{fullcites}\nocite[*]\usebib/c (#1) #2 }
   \def\fcititem[##1]{%
   \ea\ea\ea \remdotspace  \csname fcit:##1\endcsname \end . \end \relax {##1}%
   \ea\ea\ea \remdotxspace \csname fcit:##1\endcsname \end .\ \end \relax {##1}%
   }\fcitlist % removing last .\space or .space from each bib-record
}}
\def\fullcite[#1]{\trycs{fcit:#1}{??\opwarning{\string\fullcite[#1] unknown label}}}
If you want to correct bib-records before they are used then you can apply \replstring to the commands \fcit:label or you can write all these commands to a file, edit this file and use \input file instead \fcread at beginning of your document. The preparing of such file can be done by following code:
\fcread (simple) op-biblist  % use your bib-file here
\newwrite\fcitfile
\ifx\fcitlist\undefined \let\fcitlist=\_optextrick_fcitlist \fi
\immediate\openout\fcitfile=fullcite-data.tex
\def\fcititem[#1]{\immediate\write\fcitfile {%
   \noexpand\sdef{fcit:#1}\pcent^^J \space\space
   {\unexpanded\ea\ea\ea{\csname fcit:#1\endcsname}}}}
\fcitlist % all records are printed to the fullcite-data.tex
\bye
The advantage is that you have the printed text under your own control (because you can edit this file) and the disadvantage is, that you have more problems after a new bib-record is added to the .bib file.
(0092) -- P. O. 2022-10-10
Bibmark generator
When \nonumcitations is declared then \cite commands print "bibmarks". They can be declared in .bib file or by \bib command. If a "bibmark" isn't declared for given bib-record, then it is generated in the form: LastName of the first author, comma, year. You can declare your own format of these generated bibmarks (OpTeX version 1.11+ and newer).
For example, you want to print last names of first three authors followed by the year in parenthesis. If there are more than three authors then only first author followed by et al. should be written. For example:
\nonumcitations
\cite[three-authors] % prints: First, Second, and Three (2023)
\cite[single-author] % prints: First (2023)
\cite[four-authors]  % prints: First, et al. (2023)
% suppose, we have relevant bib-records in our .bib file without an explicit bibmark
The implementation:
\bibtexhook{
   \def\_createbibmark #1;#2,#3;#4,#5;#6,#7;#8,#9\_fin{%
      \ifx ^#8^%
        \ifx ^#6^%
           \ifx ^#4^#2%
           \else #2, and #4\fi
        \else #2, #4, and #6\fi
      \else #2, et al.\fi
      \space (#1)%
   }
}
\_def\cite[#1]{{\_citeA#1,,,\_printsavedcites}} % no square brackets printed around
The
\_createbibmark year;Latstname1,Firstname1;Latstname2,Firstname2;etc.\_fin
macro is re-defined here. If the bib-record has only single author then the macro is called in the format
\_createbibmark year;Latstname,Firstname;,;,;,;\_finIt means that other authors #4, #6 and #8 are empty in this case. See also section 2.32.6 in the OpTeX documentation.
Another approach is described in the OpTeX trick 0131
(0104) -- P. O. 2023-03-24
Format author names when \nonumcitations is set
We want to control the format of author names in \cite when \nonumcitations is set. Both styles iso690 and simple define \_createbibmark which prints only the last name of the first author and adds "et al." if there are more than one author. We introduce the macro \fmtauthor. User can define it as required. For example, the last name is printed and "von" part is prefixed if it isn't empty. Maximal three authors are printed:
\nonumcitations
\def\fmtauthor #1,#2,#3,#4;{\ifx^#3^\else #3 \fi #1} % expands to [von ]Lastname

\bibtexhook{
   \def\_createbibmark #1;#2,#3;#4,#5;#6,#7;#8,#9\_fin {%
      \ifx^#4^%
         \fmtauthor #2,#3;% single author
      \else \ifx ^#6^%
         \fmtauthor #2,#3; and \fmtauthor #4,#5;% two authors
      \else \ifx ^#8^%
         \fmtauthor #2,#3;, \fmtauthor #4,#5; and \fmtauthor #6,#7;% three authors
      \else
         \fmtauthor #2,#3;, \fmtauthor #4,#5;, \fmtauthor #6,#7; et al.% more authors
      \fi\fi\fi
      \ifx^#1^\else , #1\fi %  year, if it exists
   }
}
The \fmtauthor macro gets four parameters: last name, first name, von, junior. The \fmtauthor macro defined in this example prints the last name and if von is not empty, then von+space is prefixed. The \_createbibmark deals separately with the printing of one author, two authors, three authors and more authors.
(0131) -- P. O. 2024-02-26
Sorting bib records by reverse year
OpTeX from version 1.12+ implements its own macros for reading .bib files and sorting bib records. We don't provide a user-comfortable macro with sorting options, because OpTeX concept is: copy macros from OpTeX's base code and re-define them to meet your needs. For example, you want to implement reverse sorting by year field, i.e. from newer to older.
The default sorting rule is: sort by Lastname, Fisrtnames (and maybe by von and Junior) of the first author and if the records are equal from this point of view, then sort them by year ascending. Maybe, you want to use the same rule but sort by year descending. So, you can copy the macro \_preparebibsorting, name it \bibsorting and modify it. Finally, you have to put the command
\_let\_preparebibsorting=\bibsorting
to your bib-style file or you can put it to the \bibtexhook.
\def\bibsorting{%
   \_getfield[sortedby]\_sortedby
   \_ifx\_sortedby\_empty   % explicitly given [sortedby] field has precedence
      \_def\_sortedby{}%
      \_getfield[author]\_tmp  % sorting by author firstly
      \_ifx\_tmp\_empty \_else \_ea\_preparebibsortingA\_tmp \_fin \_fi
      \_getfield[year]\_tmp    % soering by year secondly
      \_ifx\_tmp\_empty \_else
        \_edef\_tmp{\_the\_numexpr 10000-\_tmp\_relax}% ------ reverse year
        \_eaddto\_sortedby{\_tmp}\_fi
      \_edef\_sortedby{\_sortedby}%  we need to run macros aka \"e etc.
      \_edef\_sortedby{\_ea\_removeoutbraces\_sortedby {\_fin}}% remove braces
   \_fi
   \_sxdef{_bes:\_citekey\_ea}\_ea{\_csname;\_detokenize\_ea{\_sortedby}^^^\_cit
}
\bibtexhook={\_let\_preparebibsorting=\bibsorting}
Note the line "------- reverse year", it is added to the original macro.
(0113) -- P. O. 2023-06-06
Slides
Navigation bar for selecting pages
The following code creates a clickable navigation bar for selecting pages/slides in \slides style. You can insert it to the file op-slides.tex (between lines \backgroundpic{op-slides-bg.png} and \verbchar` and try it. You must process the document by OpTeX twice.
\pgbackground={\vbox to0pt{\_copy\_bgbox\_vss}
     \ifnum\_slidelayer=0 \_slidelayer=1 \fi
     \ifnum\pageno>\thispage
        \xdef\thispage{\the\pageno}\xdef\maxlayer{\_cs{_p:\thispage}}\fi
     \immediate\_wref\_sdef{{_p:\_the\_pageno}{\_the\_slidelayer}}
     \_sxdef{_p:\_the\_pageno}{\_the\_slidelayer}
     \nointerlineskip
     \hbox to\pdfpagewidth{\hss\vbox{\null\slideslist}\kern5pt}
}
\def\prepslidepages{\openref\def\slideslist{}%
  \if?\lastpage \else
     \tmpnum=0
     \fornum 1..\lastpage \do{%
         \advance\tmpnum by0\_cs{_p:##1}\edef\tmp{\the\tmpnum}%
         \addto\slideslist{\slidepage{##1}}%
         \ea\addto\ea\slideslist\ea{\ea{\tmp}}%
         }%
  \fi
}
\def\thispage{0}
\prepslidepages

\def\slidepage#1#2{%
  \hbox{\Grey \ifnum\pageno=#1 \printpagenum \Blue \fi \pagerectangle{#2}}
}
\def\printpagenum{%
  \llap{\bf\the\pageno \ifnum\_slidelayer=0\maxlayer\else+\fi\ }%
}
\def\pagerectangle#1{\let\Blue=\relax \ilink[pg:#1]{\vrule height.8ex width.8ex}}%

\def\_endslides{\vfil\break \_decr\pageno \edef\lastpage{\folio}
   \let\slideslistA=\slideslist \prepslidepages
   \ifx\slideslistA\slideslist \else \advance \_unresolvedrefs by1 \fi
   \_byehook \_end
}
The \pgbackground iserts a background picture declared by \backgroundpic, then it writes to the .ref file
\sdef{_p:pageno}{slidelayer}
so, we have saved the number of last layer of each page after the .ref file is read again. Finally, \pgbackgroud prints the clickable bar as a \vbox with list of \hbox'es generated by \slideslist macro. This macro is prepared by \prepslidepages as a list of \slidepage{pageno}{globalpage}. The globalpage represents the given page with maximal layer and it is used as clickabe link to the page.
The \_endslides is redefined. It does checking of consistency of the navigation bar: The \slideslit is created again and compared with previous \slideslistA. If they are differ then \_unresovedrefs are advanced by 1 and \_byehook will write the "WARNING: Rerun to get references right". (You need the version of OpTeX bigger than 0.17, where \_endslides macro is used).
(0029) -- P. O. 2020-11-19
Languages
The (n)german.sty implementation
Old TeX german documents use shorthands with active " character for
- dieresis: "a is ä, "U is Ü, etc. (comes from old days where ancient 7bit fonts were used),
- double es: "s is ß, "S is SS, "z is ẞ, etc.,
- quoutation marks: "`text"' is „text“,
- special hyphenations: Zu"cker is Zucker or Zuk-/ker, Ro"ller is Roller or Roll-/ler,
- special marks for hyphenations: "-, "|, "", "~ and "=.
See `texdoc ngerman` for more information.
The first three types seem to be obsolette today (but maybe you want to process an old TeX document or you have an unconfigured keyboard). The last two types can be usable. You can do this markup with following definitions:
\def\germanTeX   {\deolang \activeqq} % starts old German hyphens 1901 + "shorthands
\def\ngermanTeX  {\delang  \activeqq} % starts new German hyphens 1996 + "shorthands
\def\originalTeX {\enlang  \catcode`"=12 } % English hyphens + deactivates "shorthands

\def\activeqq{\adef"##1{\ifcsname qq:"\string##1\endcsname \cs{qq:"\string##1\_ea}\else
                        \opwarning{"\string##1 not declared}\string##1\fi}}
\def\qqdef"#1{\sdef{qq:"\string#1}}
\qqdef "a{ä} \qqdef "o{ö} \qqdef "u{ü} \qqdef "s{ß}  \qqdef "z{ẞ}  \qqdef "e{ë} \qqdef "i{ï}
\qqdef "A{Ä} \qqdef "O{Ö} \qqdef "U{Ü} \qqdef "S{SS} \qqdef "Z{SZ} \qqdef "E{Ë} \qqdef "I{Ï}

\qqdef "ck{\nobreak\discretionary{k-}{}{c}\allowhyphens k}
\qqdef "CK{\nobreak\discretionary{K-}{}{C}\allowhyphens K}
\qqdef "ll{\specdiscr l} \qqdef "mm{\specdiscr m} \qqdef "nn{\specdiscr n}
\qqdef "LL{\specdiscr L} \qqdef "MM{\specdiscr M} \qqdef "NN{\specdiscr N}
\qqdef "pp{\specdiscr p} \qqdef "rr{\specdiscr r} \qqdef "tt{\specdiscr t}
\qqdef "PP{\specdiscr P} \qqdef "RR{\specdiscr R} \qqdef "TT{\specdiscr T}
\qqdef "ff{\specdiscr f}
\qqdef "FF{\specdiscr F}
\qqdef "`{„} \qqdef "'{“} \qqdef "<{«} \qqdef ">{»}

\qqdef "-{\nobreak\-\allowhyphens}
\qqdef "|{\nobreak\discretionary{-}{}{\kern.03em}\allowhyphens}
\qqdef ""{\hskip0pt\relax}
\qqdef "~{\leavevmode\hbox{-}}
\qqdef "={\nobreak-\hskip0pt\relax}

\def\specdiscr#1{\nobreak\discretionary{#1#1-}{}{#1}\allowhyphens#1}
\def\allowhyphens{\nobreak \hskip0pt\relax}
The German environment is opened by \germanTeX or \ngermanTeX (as described in german.sty and ngerman.sty doc). You have to load Unicode font (\fontfam[lmfonts], for example) because preloaded EC fonts have bad encoding for ß, for example. Now, you can try (text from gerdoc.tex):
\fontfam[lmfonts]
\ngermanTeX

Der beim 6.~Treffen der deutschen \TeX-Interessenten in M"unster
festgelegte Befehlssatz wurde nach"-tr"aglich um einige Befehle
erweitert.
\bye
Note that usage of these macros are incompatible with \dequotes, i.e. with quotation marks used by \"text" and preferred in OpTeX.
(0036) -- P. O. 2021-01-22
Features of PDF viewer
Page labels shown in PDF viewer
OpTeX uses \gpageno as a counter which counts pages globally from one to the last page in the document. Moreover, plain TeX (and OpTeX too) declares \pageno and use it as page counter printed in footlines or headlines of the pages. There can be more separate sections in the document, each such a section has its own \pageno range and they can be printed in various format. For example, setting \pageno=-1 starts a page range printed in roman numerals: i, ii, iii, iv, etc.
If none is specified then PDF viewer knows nothing about \pageno ranges and their format. PDF viewer shows only \gpageno in its status bar. But you can do specification of \pageno ranges using \pdfcatalog:
\pdfcatalog{/PageLabels << /Nums [ index <<spec>> index <<spec>> ...etc. ] >>}
where index is \gpageno-1 and spec is specification of the format of the \pageno range. It informs the PDF viewer that given ranges start at index+1 global page and have given format. This format is used in the PDF viewer status bar. The spec can be:
/S/r ... lowercase roman numerals /S/R ... uppercase roman numerals /S/D ... decimal arabic numerals /S/A ... letters A..Z /S/a ... letters a..z
Additional specification can be
/P (string) ... optional prefix used before the counter in given queue /St number ... starting number in given \pageno range (default is 1)
The following example is taken from PDF manual:
\pdfcatalog{/Pagelabels << /Nums [
0 << /S/r >>
4 << /S/D >>
7 << /S/D /P (A-) /St 8 >>
] >>
}
which gives page labels: i, ii, iii, iv, 1, 2, 3, A-8, A-9, ...
You can accumulate your page specifications in your macro \pagespecs and use it at the end of your document (or when the last page range is started). For example:
\def\pagespecs{}
\pageno=-1 % Front matter
\edef\pagespecs{\pagepsecs \the\numexpr\gpageno-1 <</S/r>>}
...
\vfil\break
\pageno=1 % Main matter
\edef\pagespecs{\pagepsecs \the\numexpr\gpageno-1 <</S/D>>}
...
\vfil\break
\def\_folio{App-\the\pageno} % Appendices
\edef\pagespecs{\pagepsecs
\the\numexpr\gpageno-1 <</S/D /P (App-) /St \the\pageno >>}
\pdfcatalog {/PageLabels << /Nums [ \pagespecs ] >>}
(0056) -- P. O. 2021-04-09
Others
More pages on single sheet
We create macros \sheet NUM { page spec. }, and \prinsheets. These macros read pages from given PDF document (defined in the \document macro) and prints sheets with more pages per single sheet. For example:
\def\document{name} % the name of the source document without .pdf extension
\sheet 1 { [ 1 | 2 ] } \printsheets
This example prints two pages per single sheet, pages are [ 1 | 2 ] on the first sheet, [ 3 | 4 ] on the second, [ 5 | 6 ] on the third, etc.
The [...] in the page spec. means a single row. You can have more rows in the single sheet.
The \sheet 1 must be declared always. You can declare more: \sheet 2, \sheet 3 etc. All document pages declared in the whole bunch of sheets are read first and then the sheets are printed. If there are unprinted document pages, then the next pages for the bunch of sheets are read again and the sheets are printed, etc. For example, you can declare \sheet 1 and \sheet 2 for duplex printing.
The paper dimensions (for printing) is calculated directly from the sheet dimensions without margins if \margins is unused. You can set the paper dimensions and left+top margins by \margins (see section 1.2.1 of OpTeX doc). The setting right+bottom margins is irrelevant because the sheets aren't scaled. But you can scale document pages to a desired size by \def\pgparam{width10cm} (for example). If it is unused then the document pages have their natural size.
You can try more complicated example of "imposition pages to sheets", see wiki about it. The example looks like:
\def\document{name} % included document is name.pdf
\vspacing=18mm % spaces between rows is 18mm (default is 0mm)
\sheet 1 {
[ v5 | v12 |14mm| v9 | v8 ]
[ p4 | p13 |14mm| p16 | p1 ]
}
\sheet 2 {
[ v7 | v10 |14mm| v11 | v6 ]
[ p2 | p15 |14mm| p14 | p3 ]
}
\printsheets
The example shows more syntax rules. The page numbers can be prefixed by letters: none or p (no rotation), r (90 degrees), l (-90 degrees), v (180 degrees). The page separators | are optional and if they are used (for greater clarity) then they must be followed by a space. If there is no space then the dimension terminated by second | is read and the space between pages is declared here.
You can add crop-marks to the output of sheets using cropmarks.tex from olsak-misc macro collection released on CTAN and included in TeXlive.
The implementation of \sheet and \printsheets:
\newcount\docpage \newdimen\vspacing
\voffset=0pt \hoffset=0pt \pdfpagewidth=0pt
\def\pgparam{} % additional parameters for \pdfximage, width5cm for example
\def\sheet{\afterassignment\scansheet \chardef\sheetnumber}
\def\scansheet{\ifnum\sheetnumber=1 \tmpnum=0 \fi
\ea\scansheetA \csname sheetbox\the\sheetnumber\endcsname
}
\def\scansheetA#1#2{\def\tmp{\vbox\bgroup\baselineskip=0pt \lineskip=\vspacing}%
\foreach #2\do ##1[##2]{%
\addto\tmp{\hbox\bgroup}\scansheetB ##2X\addto\tmp{\egroup}%
}
\addto\tmp{\egroup}\let#1=\tmp
}
\def\scansheetB #1{\trycs{pg.#1}{\pgscan#1}}
\sdef{pg.p}{\pgscan}
\def\pgscan{\afterassignment\pgset\docpage=}
\def\pgset{\incr\tmpnum \ea\addto\ea\tmp\ea{\ea{\ea\box\the\docpage}}\scansheetB}
\sdef{pg.|}{\isnextchar{ }{\scansheetB}{\marginset}}
\def\marginset#1|{\addto\tmp{\kern#1\relax}\scansheetB}
\sdef{pg.r}{\addto\tmp{\rotbox{90}}\pgscan} \sdef{pg.l}{\addto\tmp{\rotbox{-90}}\pgscan}
\sdef{pg.v}{\addto\tmp{\rotbox{180}}\pgscan} \sdef{pg.X}{}
\def\printsheets{\chardef\numpages=\tmpnum
\setbox1=\hbox{\pdfximage \pgparam {\document.pdf}\pdfrefximage\pdflastximage}
\dimen0=\wd1 \dimen1=\dimexpr\ht1+\dp1\relax
\docpage=1 \tmpnum=1 \printsbunch
\end
}
\def\printsbunch{% scans document pags and prints the bunch of sheets
\loop \ifnum\tmpnum<\numpages % scan \numpages boxes from document
\incr\tmpnum \setboxnum\tmpnum
\repeat
\ifdim\pdfpagewidth=0pt
\setbox0=\csname sheetbox1\endcsname \pdfpagewidth=\wd0 \pdfpageheight=\ht0 \shipout\box0
\else \shipout\csname sheetbox1\endcsname \fi % prints scanned boxes as sheet 1
\incr\pageno \tmpnum=2
\loop \ifcsname sheetbox\the\tmpnum\endcsname % print \seet 2 \sheet3 etc.
\shipout \csname sheetbox\the\tmpnum\endcsname
\incr\pageno \incr\tmpnum
\repeat
\ifnum\docpage<\pdflastximagepages \tmpnum=0 \ea\printsbunch \fi
}
\def\setboxnum#1{\incr\docpage % does \setbox#1=\hbox{next page from the document}
\setbox#1=\ifnum\docpage>\pdflastximagepages
\hbox{}\wd#1=\dimen0 \ht#1=\dimen1 % void page
\else \hbox{\pdfximage\pgparam page\docpage{\document.pdf}\pdfrefximage\pdflastximage}\fi
}
The \sheet NUM { pg. spec } scans the rows declaration [...] using \foreach and creates the macro \sheetboxNUM which is \vbox{\hbox{}\hbox{}...}. Each \hbox (single row) includes the list of {\box pgNUM} prefixed (optionally) by \rotbox{degrees}. The number of declared document pages for whole bunch of sheets is set by \tmpnum and saved to \numpages by \printsheets. The \printsheets macro reads first page of the document and sets parameters read from it and runs \printsbunch. The \printsbunch macro reads next pages of the document for whole bunch of sheets (using \loop) and saves them individually to the \box pgNUM. The \shipout\sheetboxNUM prints the given sheet. The \sheetbox1 is printed and the PDF dimensions are measured and set (if this is really the first sheet). The second \loop prints other sheets from the single bunch of sheets. The \printsbunch macro is repeated (recursive call) for the next bunch of sheets if there are document pages not yet printed.
(0088) -- P. O. 2022-06-14
Printing booklets
We create macro \printbooklet which reads pages from a PDF document and creates sheets with two pages (one next to other) per single sheet. When the sheets are printed in landscape format with duplex printing (short edge) and you fold the printed output in the half then you get a booklet of whole document. Usage:
\margins/1 a4l (0,0,0,0)mm % A4 landscape format with no additional margins
\def\document {name} % name.pdf is the document which is read
\def\pgparam{width148.5mm} % pages are scaled to the half of A4 landscape width
\printbooklet % creates the booklet
For example, if the document has 15 pages, then the output looks like:
[ | 1 ] [ 2 | 15 ] [ 14 | 3 ] [ 4 | 13 ] [ 12 | 5 ] [ 6 | 11 ] [ 10 | 7 ] [ 8 | 9 ]
The implementation:
\newcount\docpage \newcount\doclastpage
\newdimen\interspace
\def\pgparam{} % additional parameters for \pdfximage, width5cm for example
\def\printbooklet{
\setbox1=\hbox{\pdfximage \pgparam {\document.pdf}\pdfrefximage\pdflastximage}
\dimen0=\wd1 \dimen1=\dimexpr\ht1+\dp1\relax
\doclastpage=\pdflastximagepages
\advance\doclastpage by3 \divide\doclastpage by4 \multiply\doclastpage by4
\docpage=1
\loop
\ifnum\docpage=1 \else \setbox1=\page\docpage \fi \incr\docpage
\setbox2=\page\doclastpage \decr\doclastpage
\setbox3=\page\docpage \incr\docpage
\setbox4=\page\doclastpage \decr\doclastpage
\shipout\hbox{\box2\kern\interspace\box1} \incr\pageno
\shipout\hbox{\box3\kern\interspace\box4} \incr\pageno
\ifnum\docpage<\doclastpage \repeat
\end
}
\def\page#1{\ifnum#1>\pdflastximagepages \hbox to\dimen0{\vbox to\dimen1{}\hss}%
\else \hbox{\pdfximage\pgparam page#1{\document.pdf}\pdfrefximage\pdflastximage}\fi
}
The number of sheet-pairs is doc-pages / 4 rounded up. The doc-pages is read from the \pdflastximagepages when first page from the document is read. Then the \doclastpage is calculated as number of sheet-pairs multiplied by 4. It is ideally the same as \pdflastximagepages but it can be greater: the void pages must be used in such case. The \page NUM macro returns real page from the document or void page, if NUM>\pdflastximagepages. The sheet-pairs are printed in the loop.
(0089) -- P. O. 2022-06-17
Direct output of a box to a single page
autoload:
\directoutput
We create a macro \directoutput box which outputs the given box to the page without using \output routine. The page will have the same dimensions as the given box (plus \hhkern margins at the left+right side and \vvkern margins at the top+bottom side). For example:
\directoutput \hbox {Hello} % Creates a small page with the word Hello only.
\directoutput \vbox {parahraph text} % Creates next page with the paragraph.
\directoutput \hbox to2cm {A\hfil B} % The box can have a box specification.
\bye
Similar features has the "standalone" LaTeX class.
The implemntation uses OpTeX's \_preshipout for colors pre-processing:
\def\directoutput{\begingroup \afterassignment\directoutputA \setbox0=}
\def\directoutputA{\aftergroup \directoutputB}
\def\directoutputB{\_preshipout0\box0
\pdfpageheight=\dimexpr\ht0+\dp0+2\vvkern \relax
\pdfpagewidth=\dimexpr\wd0+2\hhkern\relax
\hoffset=\hhkern \voffset=\vvkern
\shipout\box0
\incr\pageno
\endgroup
}
(0105) -- P. O. 2023-03-27
Version number of the format
The \optexversion macro expands to "x.yz Mon.Year" or "x.yz+ Mon.Year". The first one means official released version (uploaded to the CTAN) and the second one denotes versions of the format patched and uploaded to github.com but not released. When I decide to release next version, I add one to the minor number yz, upgrade the date information Mon.Year and remove the + mark. When I do first new commit to the released version, I add the + mark at github.com. Next commits do not change \optexversion.
We create an expandable macro \numversion which expands to xyz0 for released versions and xyz5 for patched versions. You can use it in the context \ifnum\numversion>number do something\else do something else\fi.
\def\numversion{\ea\numversionA\optexversion\relax}
\def\numversionA#1.#2#3#4#5\relax{#1#2#3\ifx+#45\else0\fi}
(0049) -- P. O. 2021-03-02
Showing differences between versions of the document
Suppose we have two versions of the same document: document-old.tex and document-new.tex. We can print document-new.tex with the added/changed parts colorized. Define:
\def\diffstart/{{\nolocalcolor\Red}}
\def\diffstop/{{\nolocalcolor\Black}}
\regmacro {\def\diffstart/{}\def\diffstop{}}
{\def\diffstart/{}\def\diffstop{}}
{\def\diffstart/{}\def\diffstop{}}
and run
wdiff -1 --start-insert='\diffstart/' --end-insert='\diffstop/' \
document-old.tex document-new.tex > diff.tex
optex diff.tex
The resulting PDF will have the new phrases typeset in red color.
Because \localcolor is the default and we set these two colors as \nolocalcolor, then there can be problems. But most cases will work just fine. Moreover this solution is simple and effective.
Only new texts are highigted without any change of formatting of the document. If you need to see colored deleted texts, then you can view them on your ANSI terminal by using:
wdiff -n -w $'\033[30;41m' -x $'\033[0m' -y $'\033[30;42m' -z $'\033[0m' \
document-old.tex document-new.tex | less -R
This trick was inspired by an idea from Daniel Gromada. He suggested it for the OPmac tricks set.
(0014) -- P. O., D. G. 2020-05-17
How to run OpTeX at Overleaf
Overleaf is LaTeX oriented site, but we can run OpTeX (version from the summer) when you insert the file latexmkrc with contents:
$lualatex = 'TEXINPUTS=./optex//:$TEXINPUTS luatex -fmt=optex %O %S';
to your project and select "LuaLaTeX" engine in the Overleaf menu. Or simply copy this project to your project.
If we want to run more recent OpTeX version (not yet installed at Overleaf) then we have to do a set of obscure and dirty tricks:
First of all, we have to generate optex.fmt binary file at Overleaf. This file is typically binary incompatible in various computers and various versions of LuaTeX, so you cannot generate it at your computer and simply upload it. Create a zip file with optex files in your computer:
cd ??where optex/ directory is zip -r optex-recent.zip optex/
Create a new Overleaf project and upload optex-recent.zip. Create the main.tex file with the following contents:
\documentclass[a4paper]{article}
\usepackage{bashful}
\begin{document}
\bash[script,stdout,stderr]
unzip -o optex-recent.zip
cd optex/base/
luatex -ini optex.ini
rm *.opm
\END
\end{document}
Note, that you must use "cd" with respect of the structure used in the ZIP file. If you download ZIP file from github, for example, then use "unzip -o OpTeX-master.zip" and "cd OpTeX-master/optex/base/".
Click "Recompile". The oputput PDF should show the messages from OpTeX format generation. Click on the icon just right to "Recompile" (logs and output files), scroll the window down and click on the button "Other logs & files". The optex.fmt should be here.
The "Other logs & files" are temporary files: Unfortunately, they are removed before each TeX run. So, you need to download optex.fmt to your computer and upload again to the Overleaf project. Do it now.
The same is true for unzipped files from optex-recent.zip. They are lost in the next TeX run. This is reason why we cannot use files from optex-recent.zip when processing OpTeX documents and we must to upload all *.opm files to the Overleaf project again. Create the subdirectory optex/ (lowercase letters) in the project and upload all *.opm files to this directory. The uploader accepts maximum 40 files per one upload action, so more than 80 files from OpTeX package need to be uploaded in three steps. The directory structure in the optex/ directory can be arbitrary, for example all *.opm files are directly in the optex/ directory. Alternative: you can upload not all *.opm files but only these files needed at OpTeX runtime: f-*.opm, hisyntax-*.opm, mathclass.opm, unimath-codes.opm, unimath-table.opm, usebib.opm, bib-*.opm, slides.opm.
Prepare the latexmkrc at main level of directories in the Overleaf project with the one-line content:
$lualatex = 'TEXINPUTS=./optex//:$TEXINPUTS luatex -fmt=optex %O %S';
Upload all files from OpTeX demo/ directory to the main directory level of Overleaf project, especially op-demo.tex and op-ring.png files. This is only for testing.
Select from main Overleaf menu: Compiler: LuaLaTeX, main document: op-demo.tex, Code check: Off.
Now, you have optex.fmt, latexmkrc, op-demo.tex, op-ring.png in the main directory. Try the buttom "Recompile" and wait a while (LuaTeX needs to initialize the OTF font databases when it runs first). If you see the PDF result: "Demonstration", congratulations! The first run gives the result without TOC, second "Recompile" gives TOC too.
If you have additional OpenType fonts not installed at OverLeaf, then you can save them into fonts/ directory in your project and modify the latexmkrc file:
$lualatex = 'TEXINPUTS=./optex//:$TEXINPUTS OPENTYPEFONTS=./fonts// luatex -fmt=optex %O %S';
(0022) -- P. O. 2020-05-29